LinkedIn Integration
Integrating LinkedIn with Skima AI allows you to automate candidate imports from LinkedIn job posts directly into your Skima dashboard. This removes the manual effort of downloading resumes and keeps your hiring process seamless and organized.
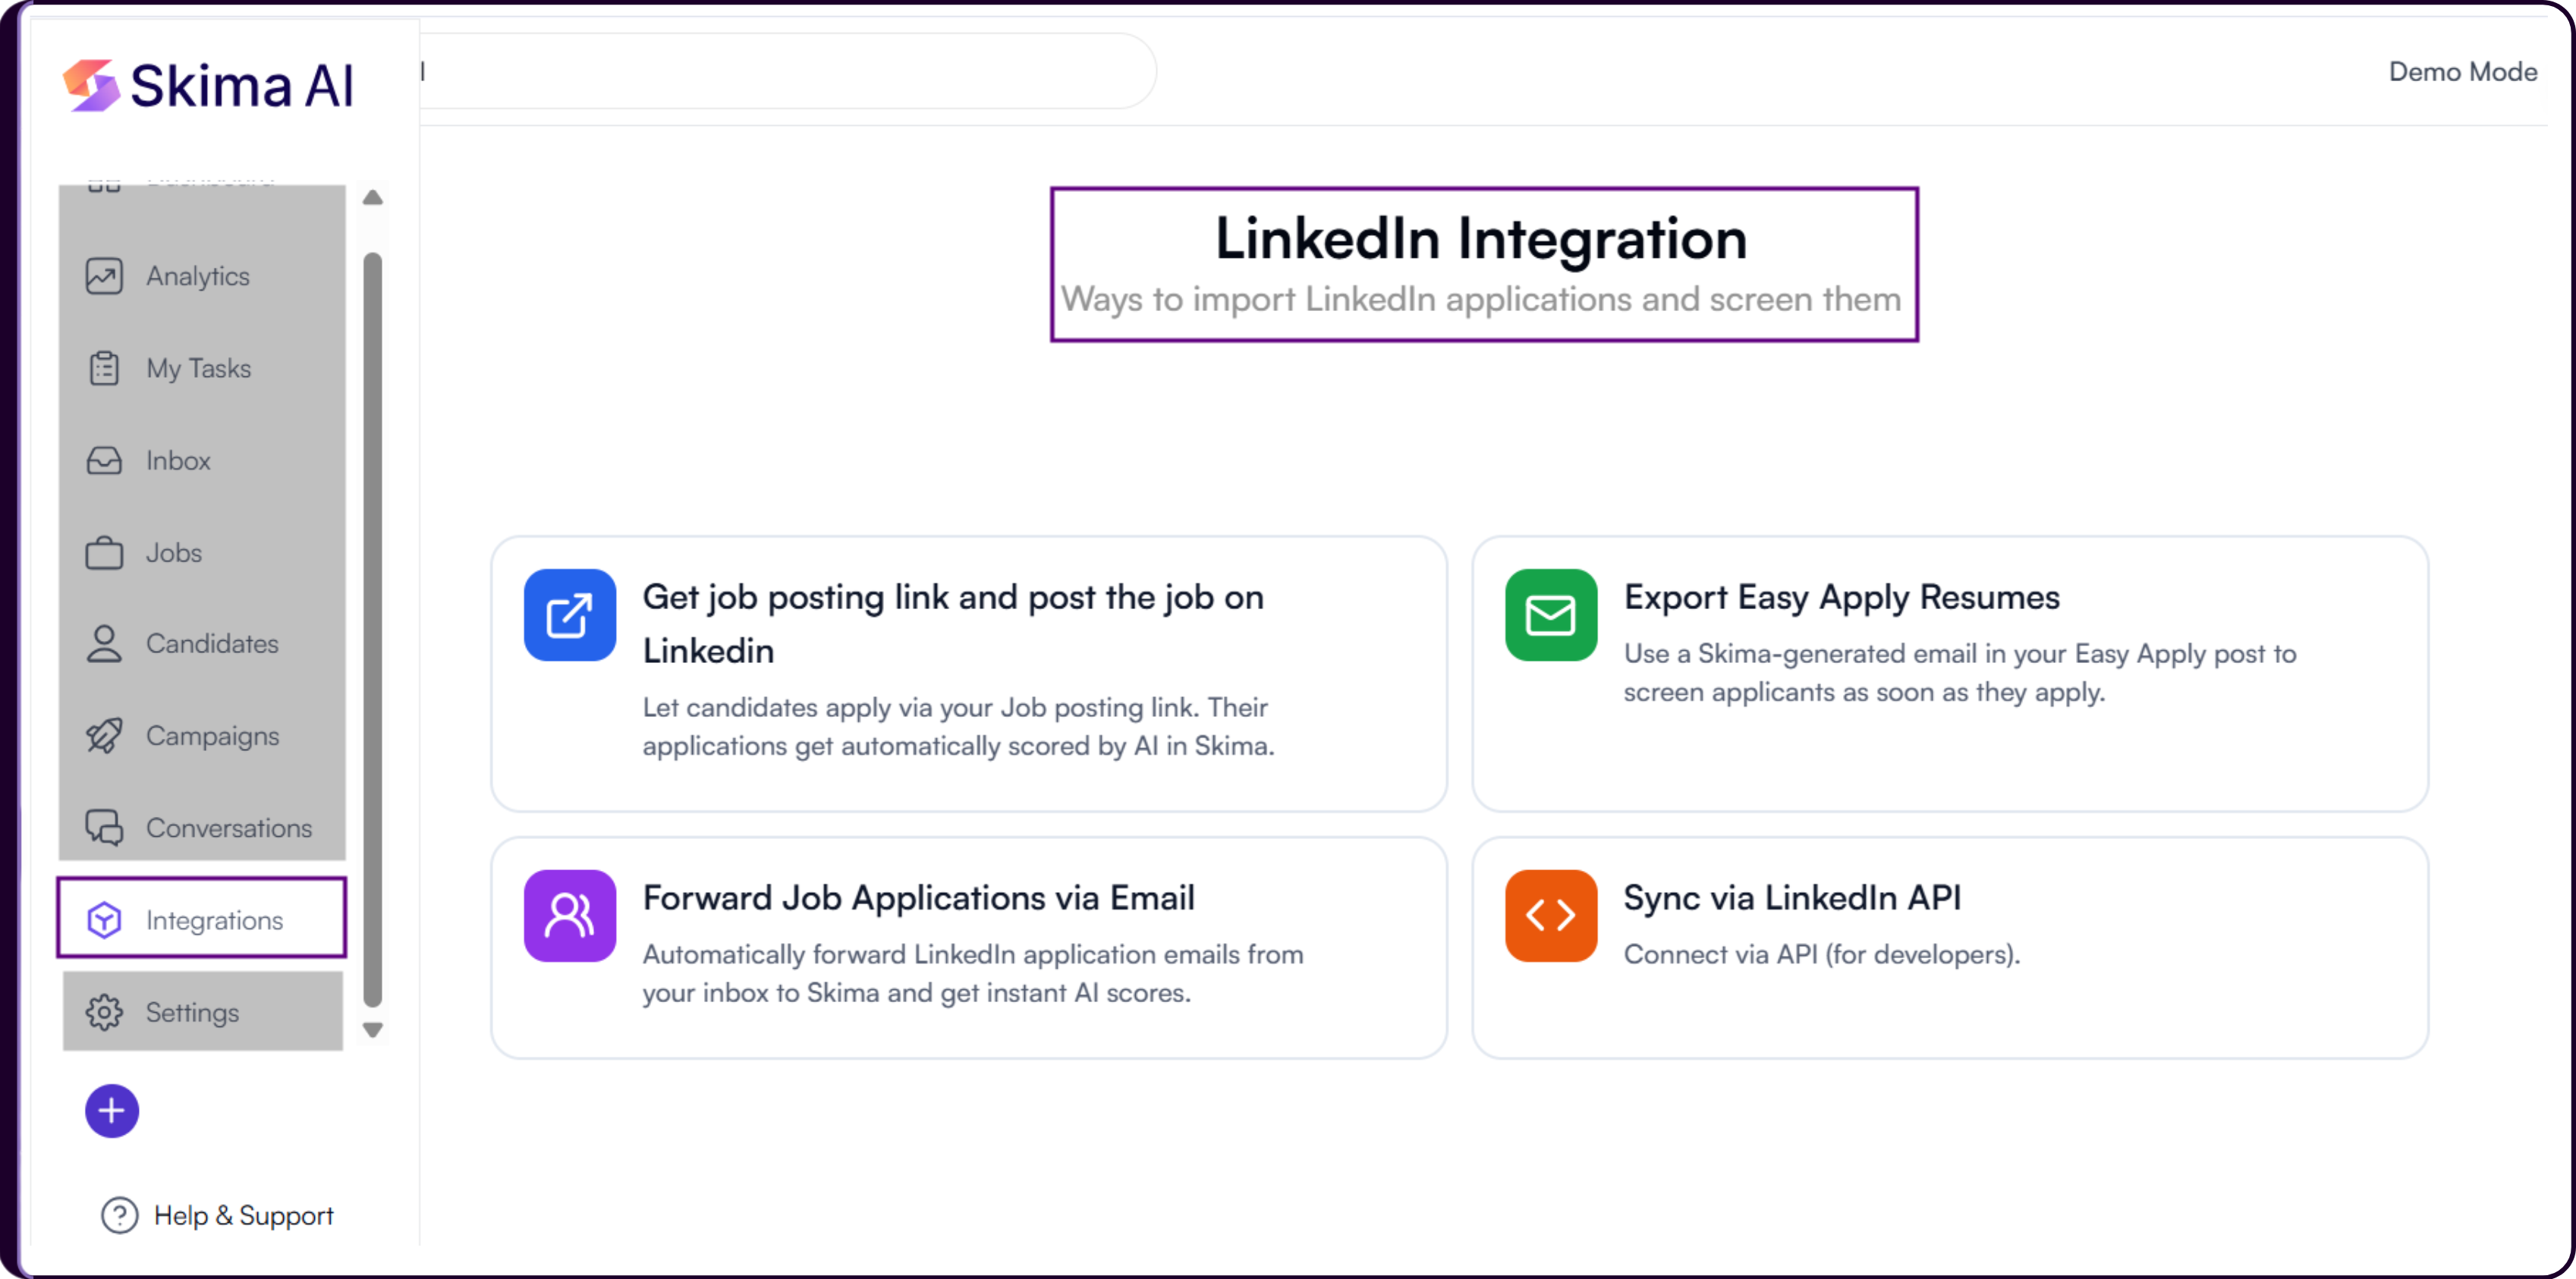
Access LinkedIn Integration
Navigate to 'Settings' from the left sidebar.
Open 'LinkedIn Integration' tab.
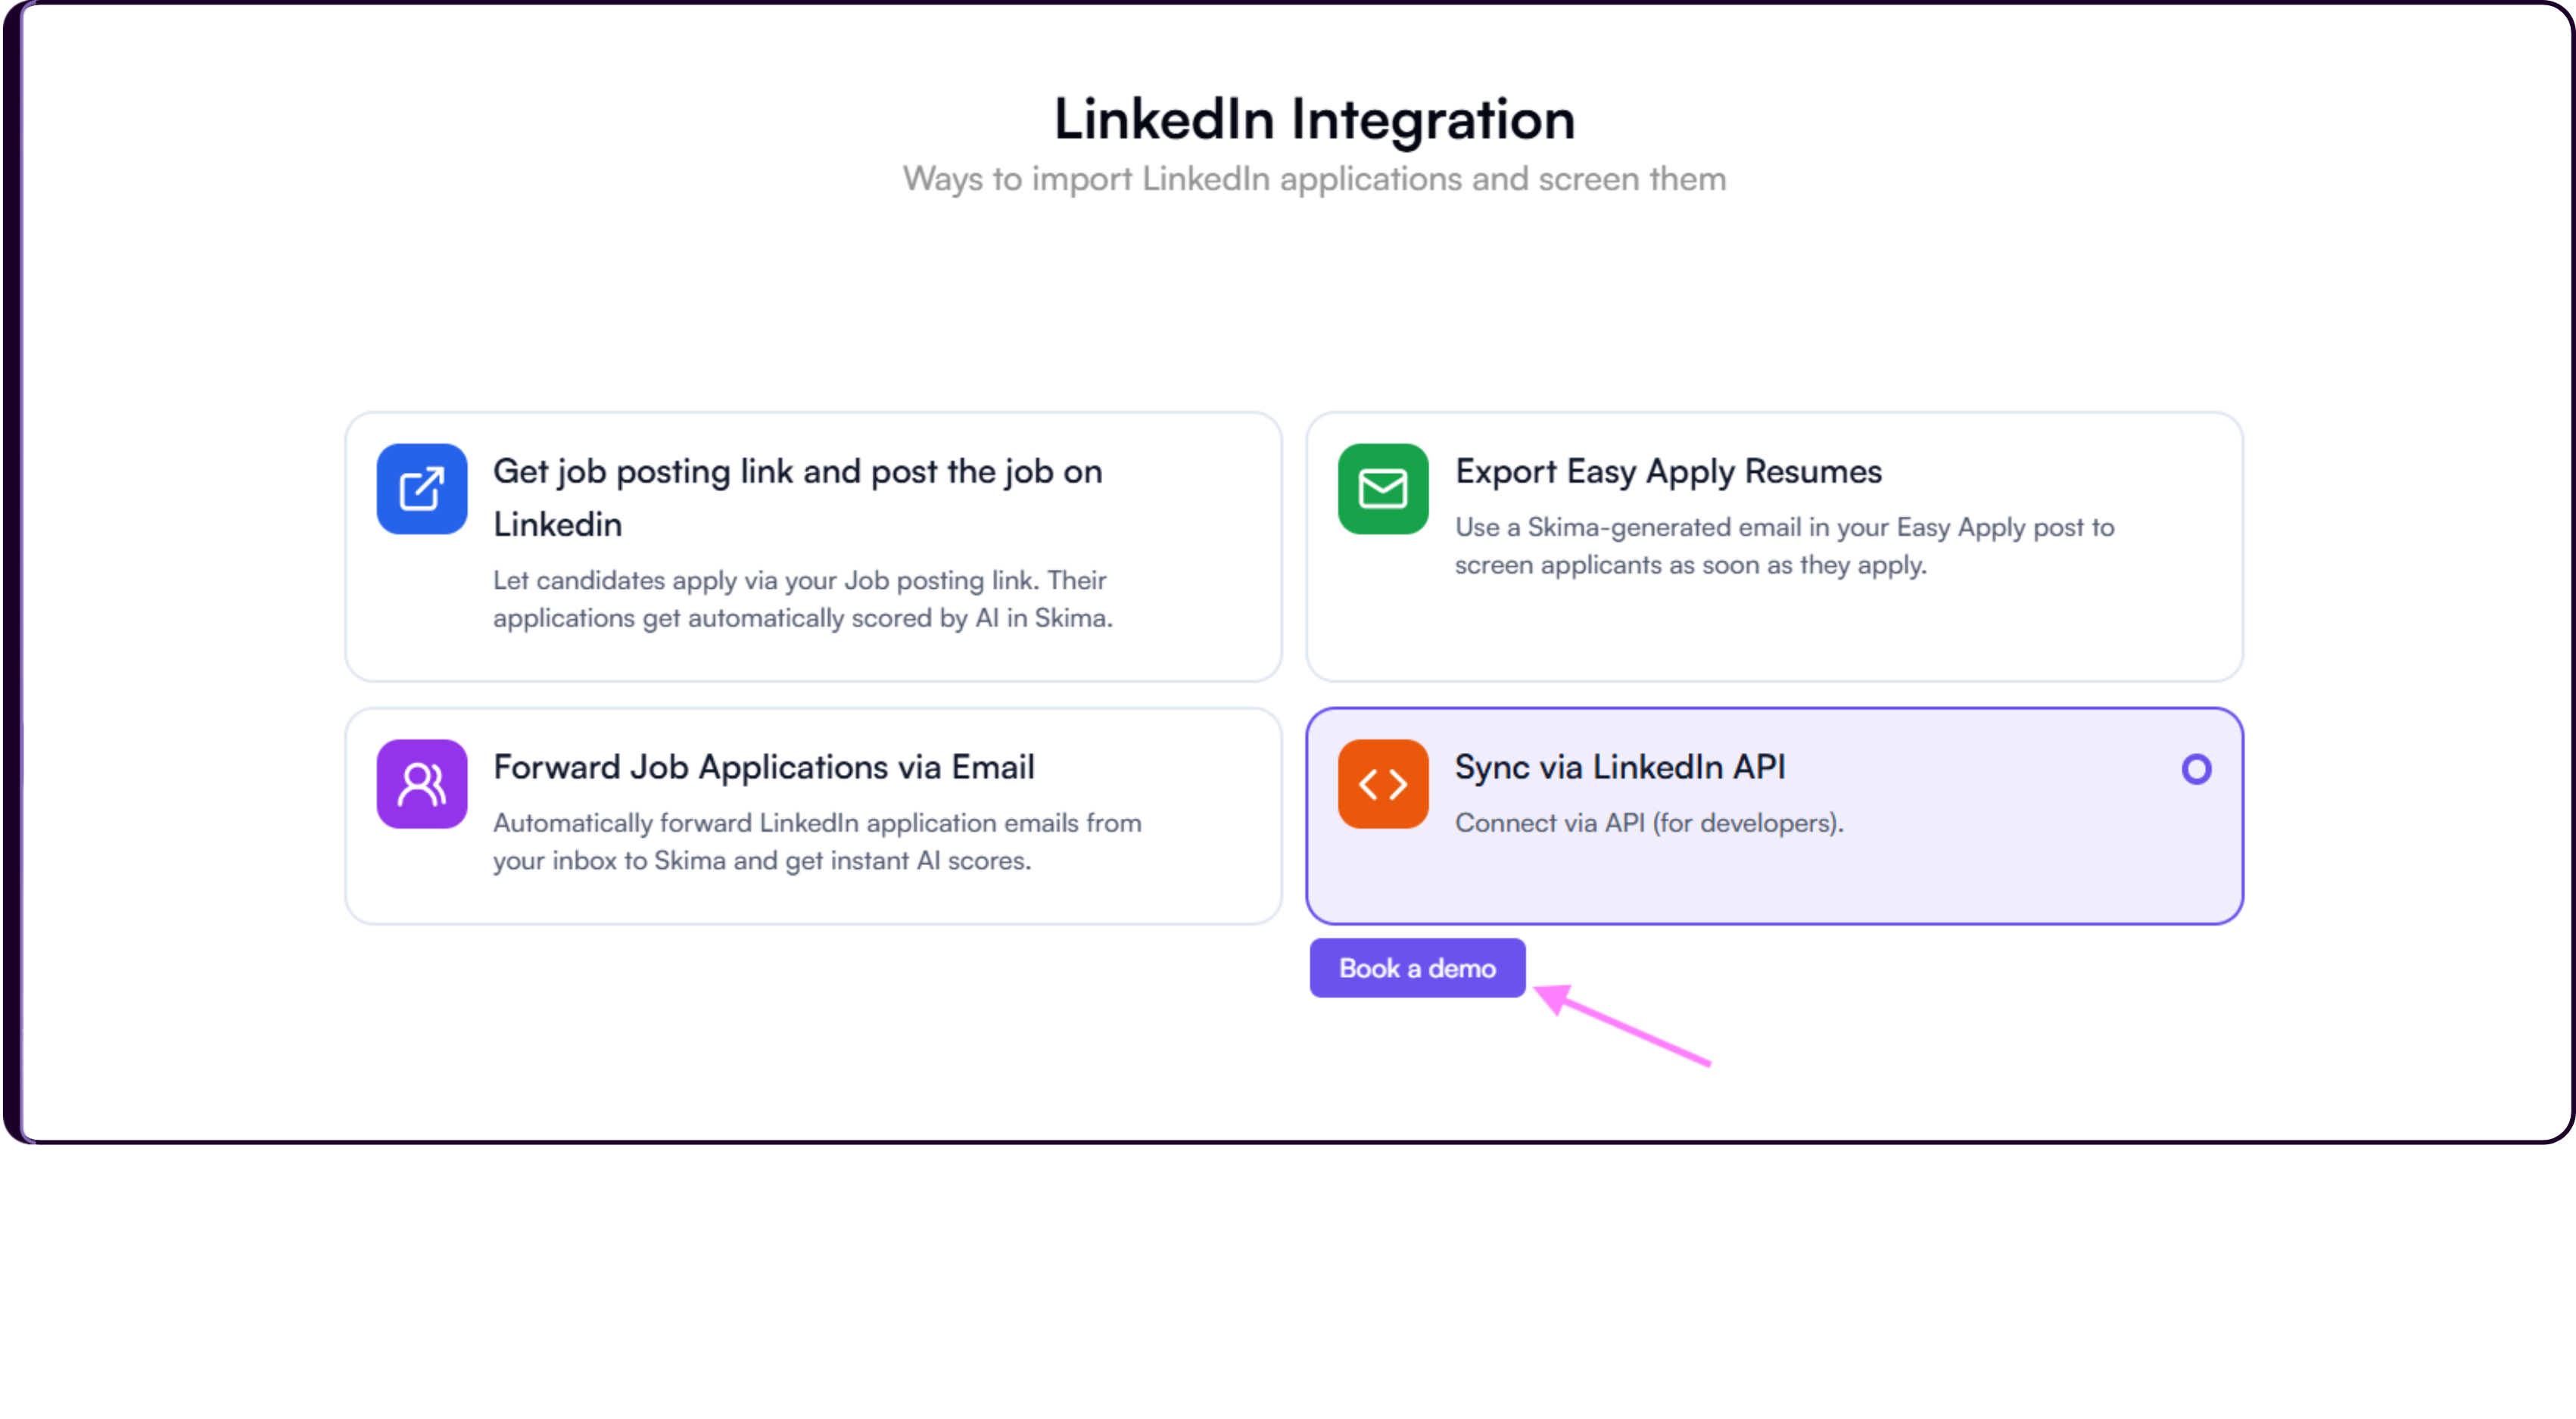
Inside the integration section, you will find the following options:
- Get a Public Job Posting Link
- Export Easy Apply Resumes
- Forward Job Applications via Email
- Sync via LinkedIn API
1. Generate a Job Posting Link
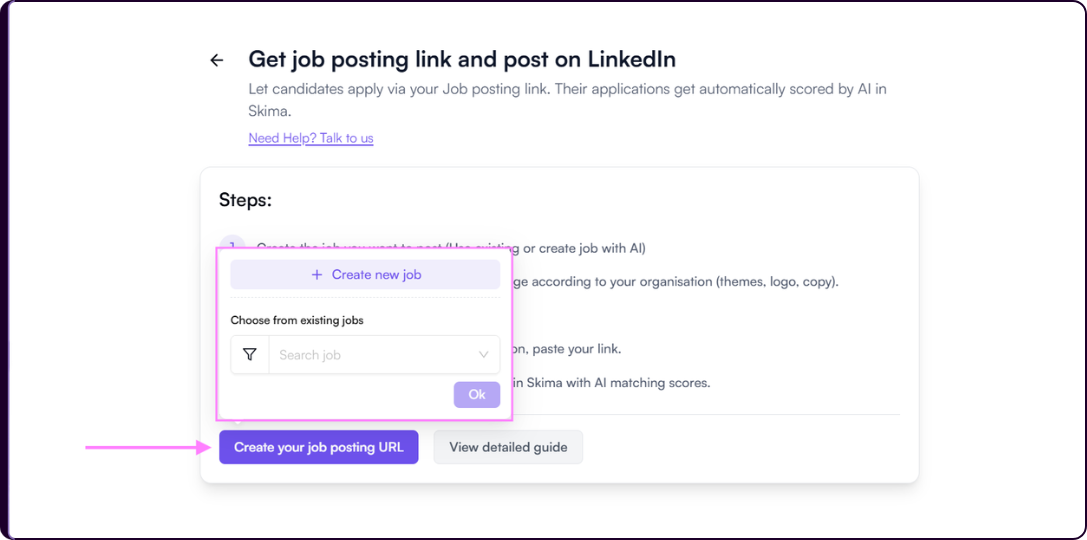
Click on 'Get Job Posting Link'.
You will now see detailed instructions about generating a public job posting URL.
Click on 'Create Your Job Posting URL'.
Skima AI will now prompt you to select a job.
You can either:
Create a New Job
Create a brand-new job by:
- Filling job details manually
- Uploading a Job Description
- Using AI to generate the JD
You can refer to the complete guide here: Create Job & Publish Job
Once the job details are completed and you click on 'Create Job', the job posting automatically becomes live inside Skima AI.
Use an Existing Job
Select an already created job from your existing jobs list inside Skima AI.
Copy the Public Job Link
Once the job is selected or created:
The public job posting page will open automatically.
You will see a preview of how the job appears to applicants.
Click on 'Copy URL' from the top-right corner to copy the public job posting link.
You can customize the appearance of your public job posting page using Skima AI Career Page settings.
Read more: Customising Your Career Page
Post the Link on LinkedIn
While creating the job post on LinkedIn:
Fill in the job details as usual.
During the 'Post Job' step:
- Navigate to 'Manage Applicants'
- Select 'On External Website'
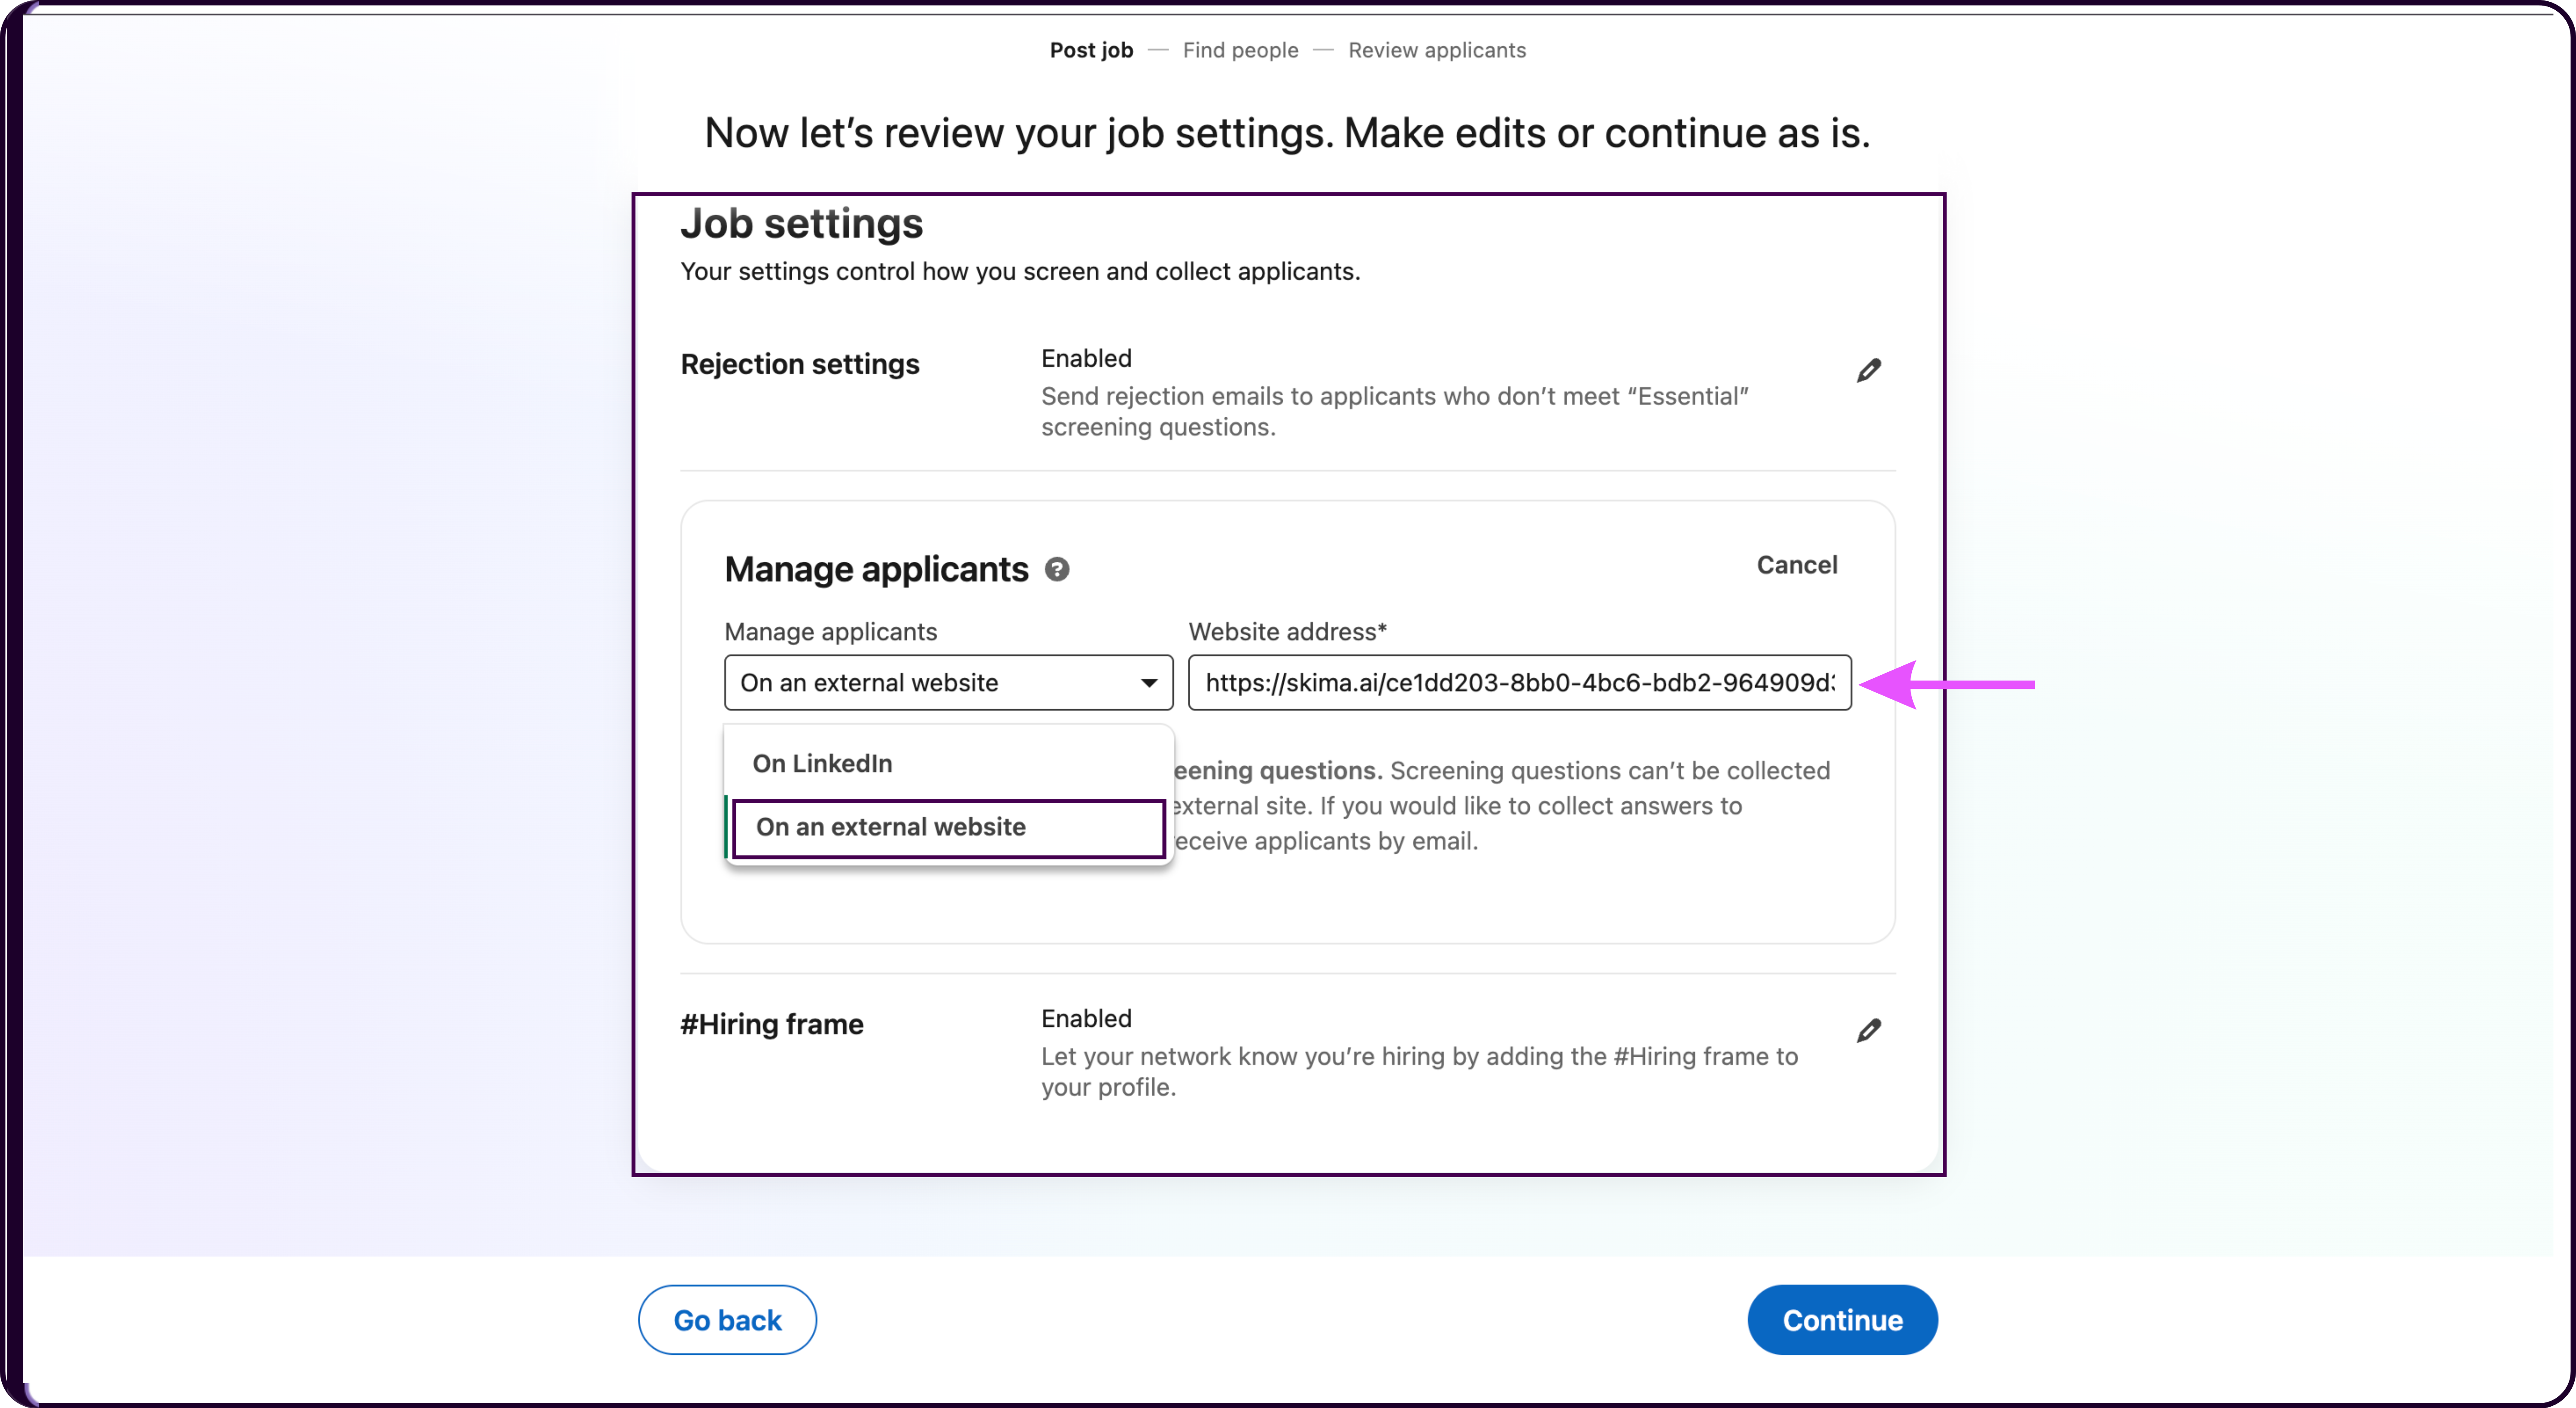
- Paste the copied Skima AI public job link into the provided field.
Once configured, candidates clicking 'Apply' on LinkedIn will automatically land on your Skima AI public job page.
After candidates submit their application:
- Their resumes are automatically added to the job
- Screening questions are processed
- AI scoring begins automatically inside Skima AI
- Applications become instantly available in your recruiter dashboard
2. Export Easy Apply Resumes
The Export Easy Apply Resumes workflow helps recruiters automatically import candidates applying through LinkedIn Easy Apply jobs directly into Skima AI.
Skima AI uses a unique forwarding email address to capture incoming Easy Apply applications, automatically associate them with the correct job, and begin AI scoring workflows instantly.
Generate Your Forwarding Email
Navigate to 'Settings' → 'LinkedIn Integration'.
Click on 'Export Easy Apply Resumes'.
You will now see detailed setup instructions explaining how Easy Apply forwarding works.
Click on 'Generate Your Forwarder Email'.
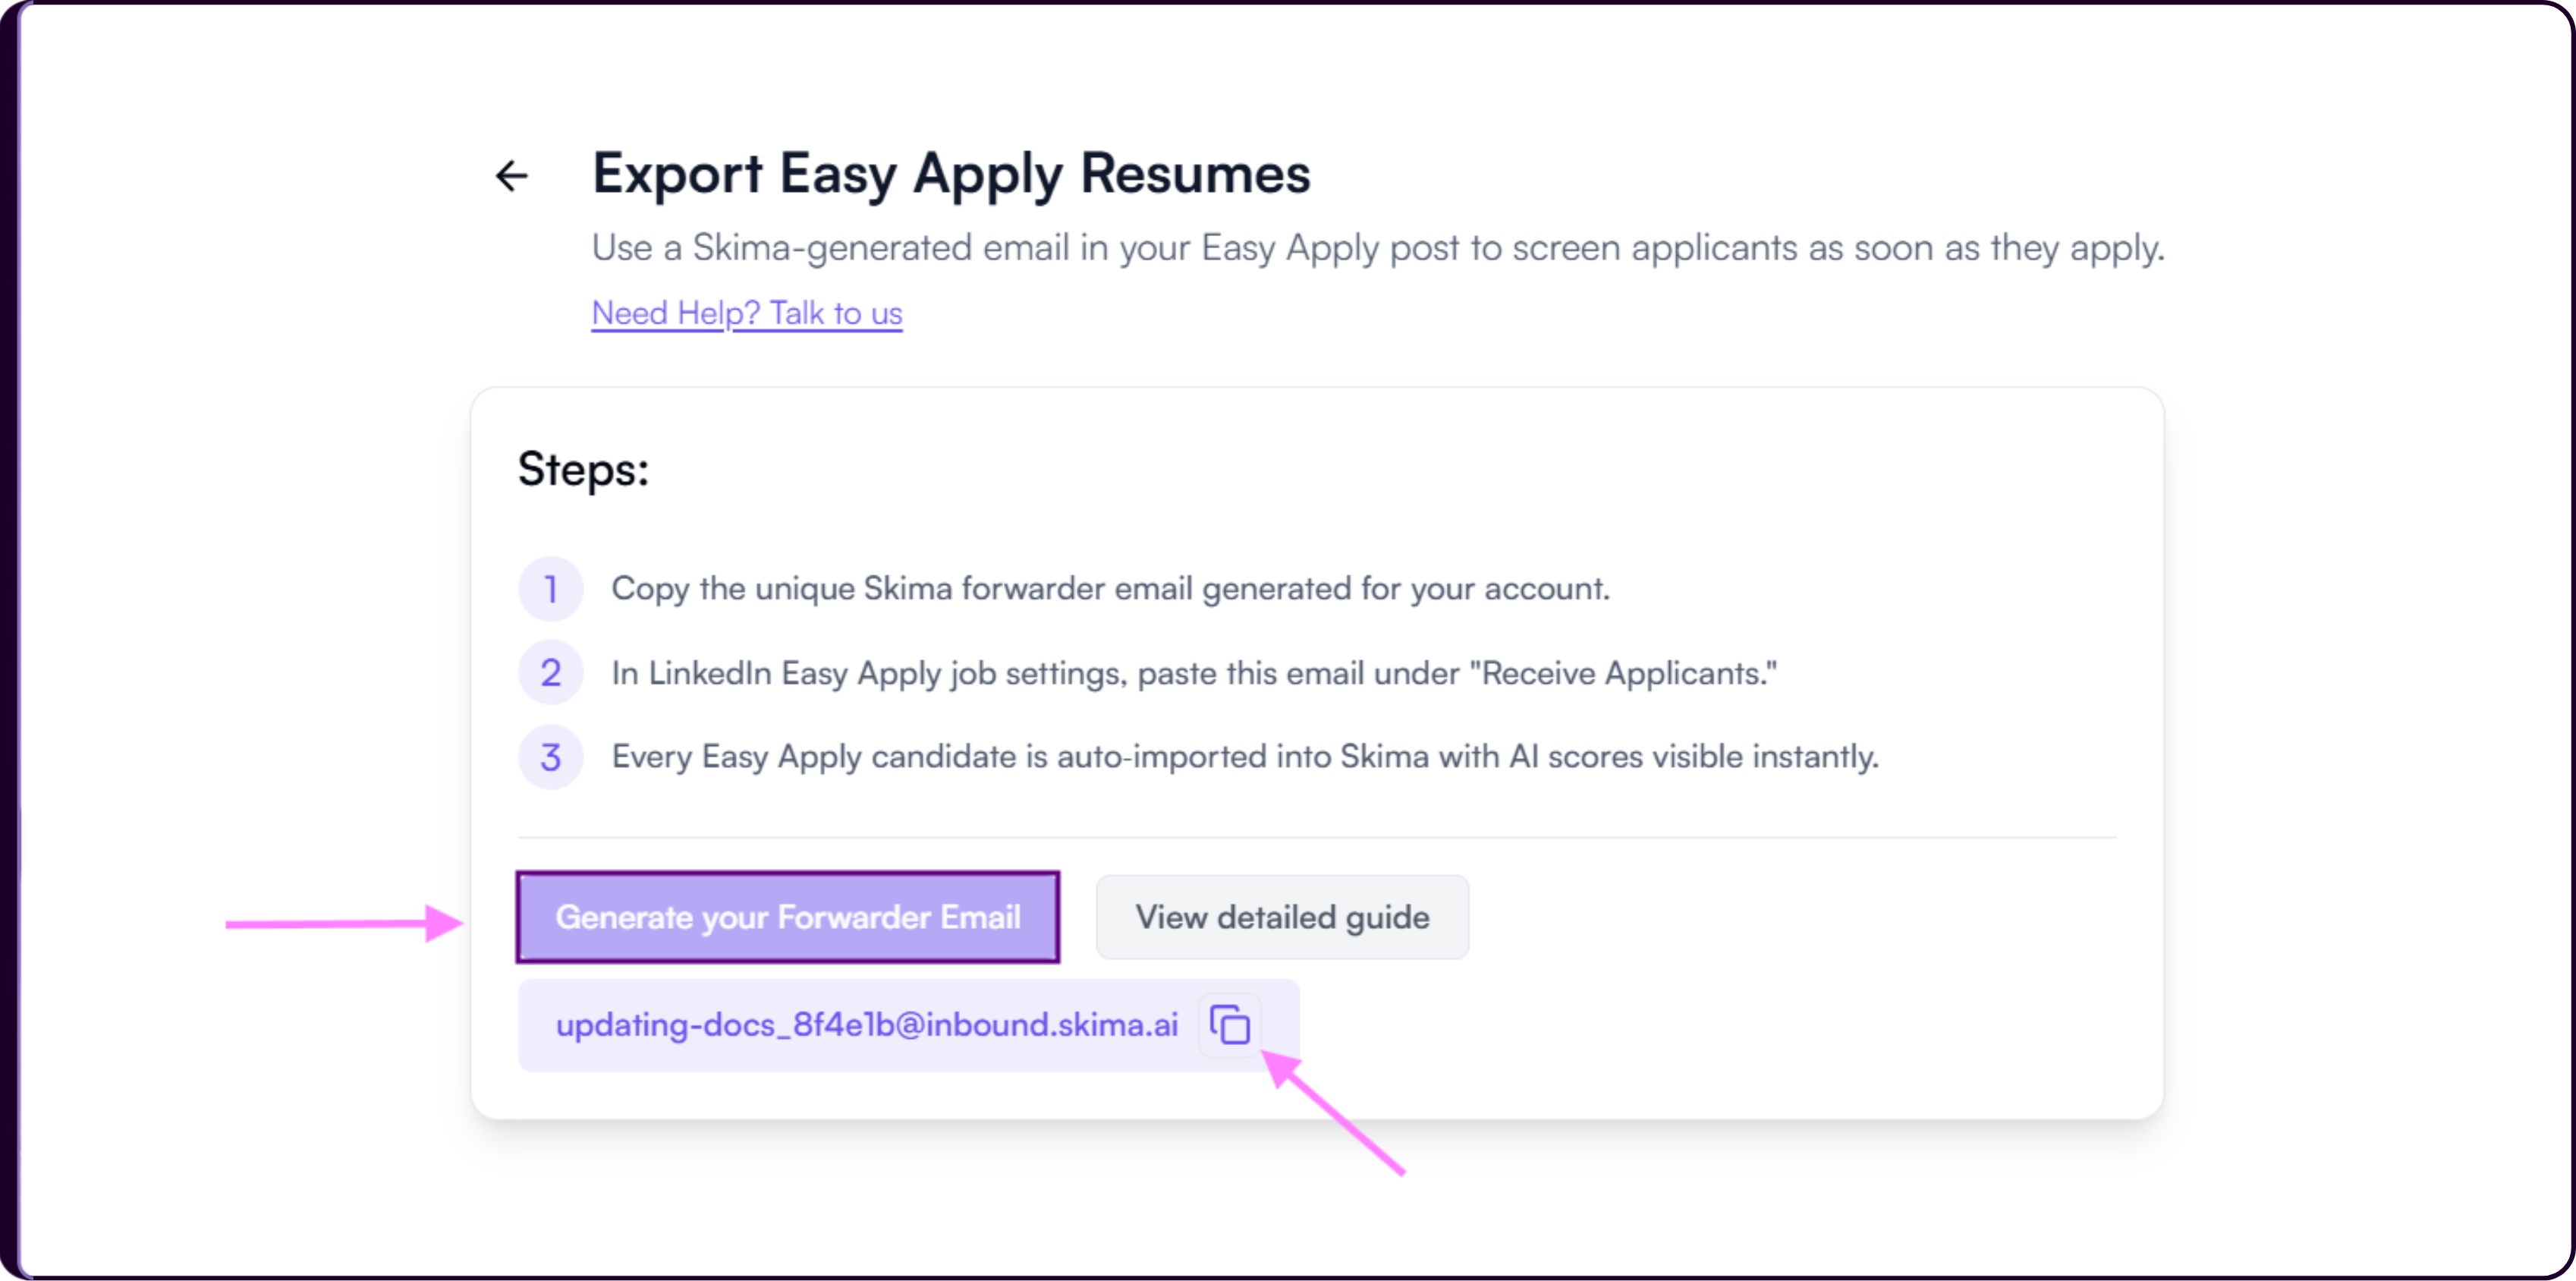
Skima AI will generate a unique forwarding email address for your workspace.
Copy the generated forwarding email.
Each forwarding email is uniquely generated for your organization and is used to identify incoming LinkedIn Easy Apply applications automatically.
Configure the Forwarder on LinkedIn
While creating or editing a LinkedIn job post with Easy Apply enabled:
Proceed to the 'Post Job' step -> 'Job Settings modal':.
Under 'Manage Applicants':
- Select 'On LinkedIn'
- Locate the 'Email for Applicant Updates' field
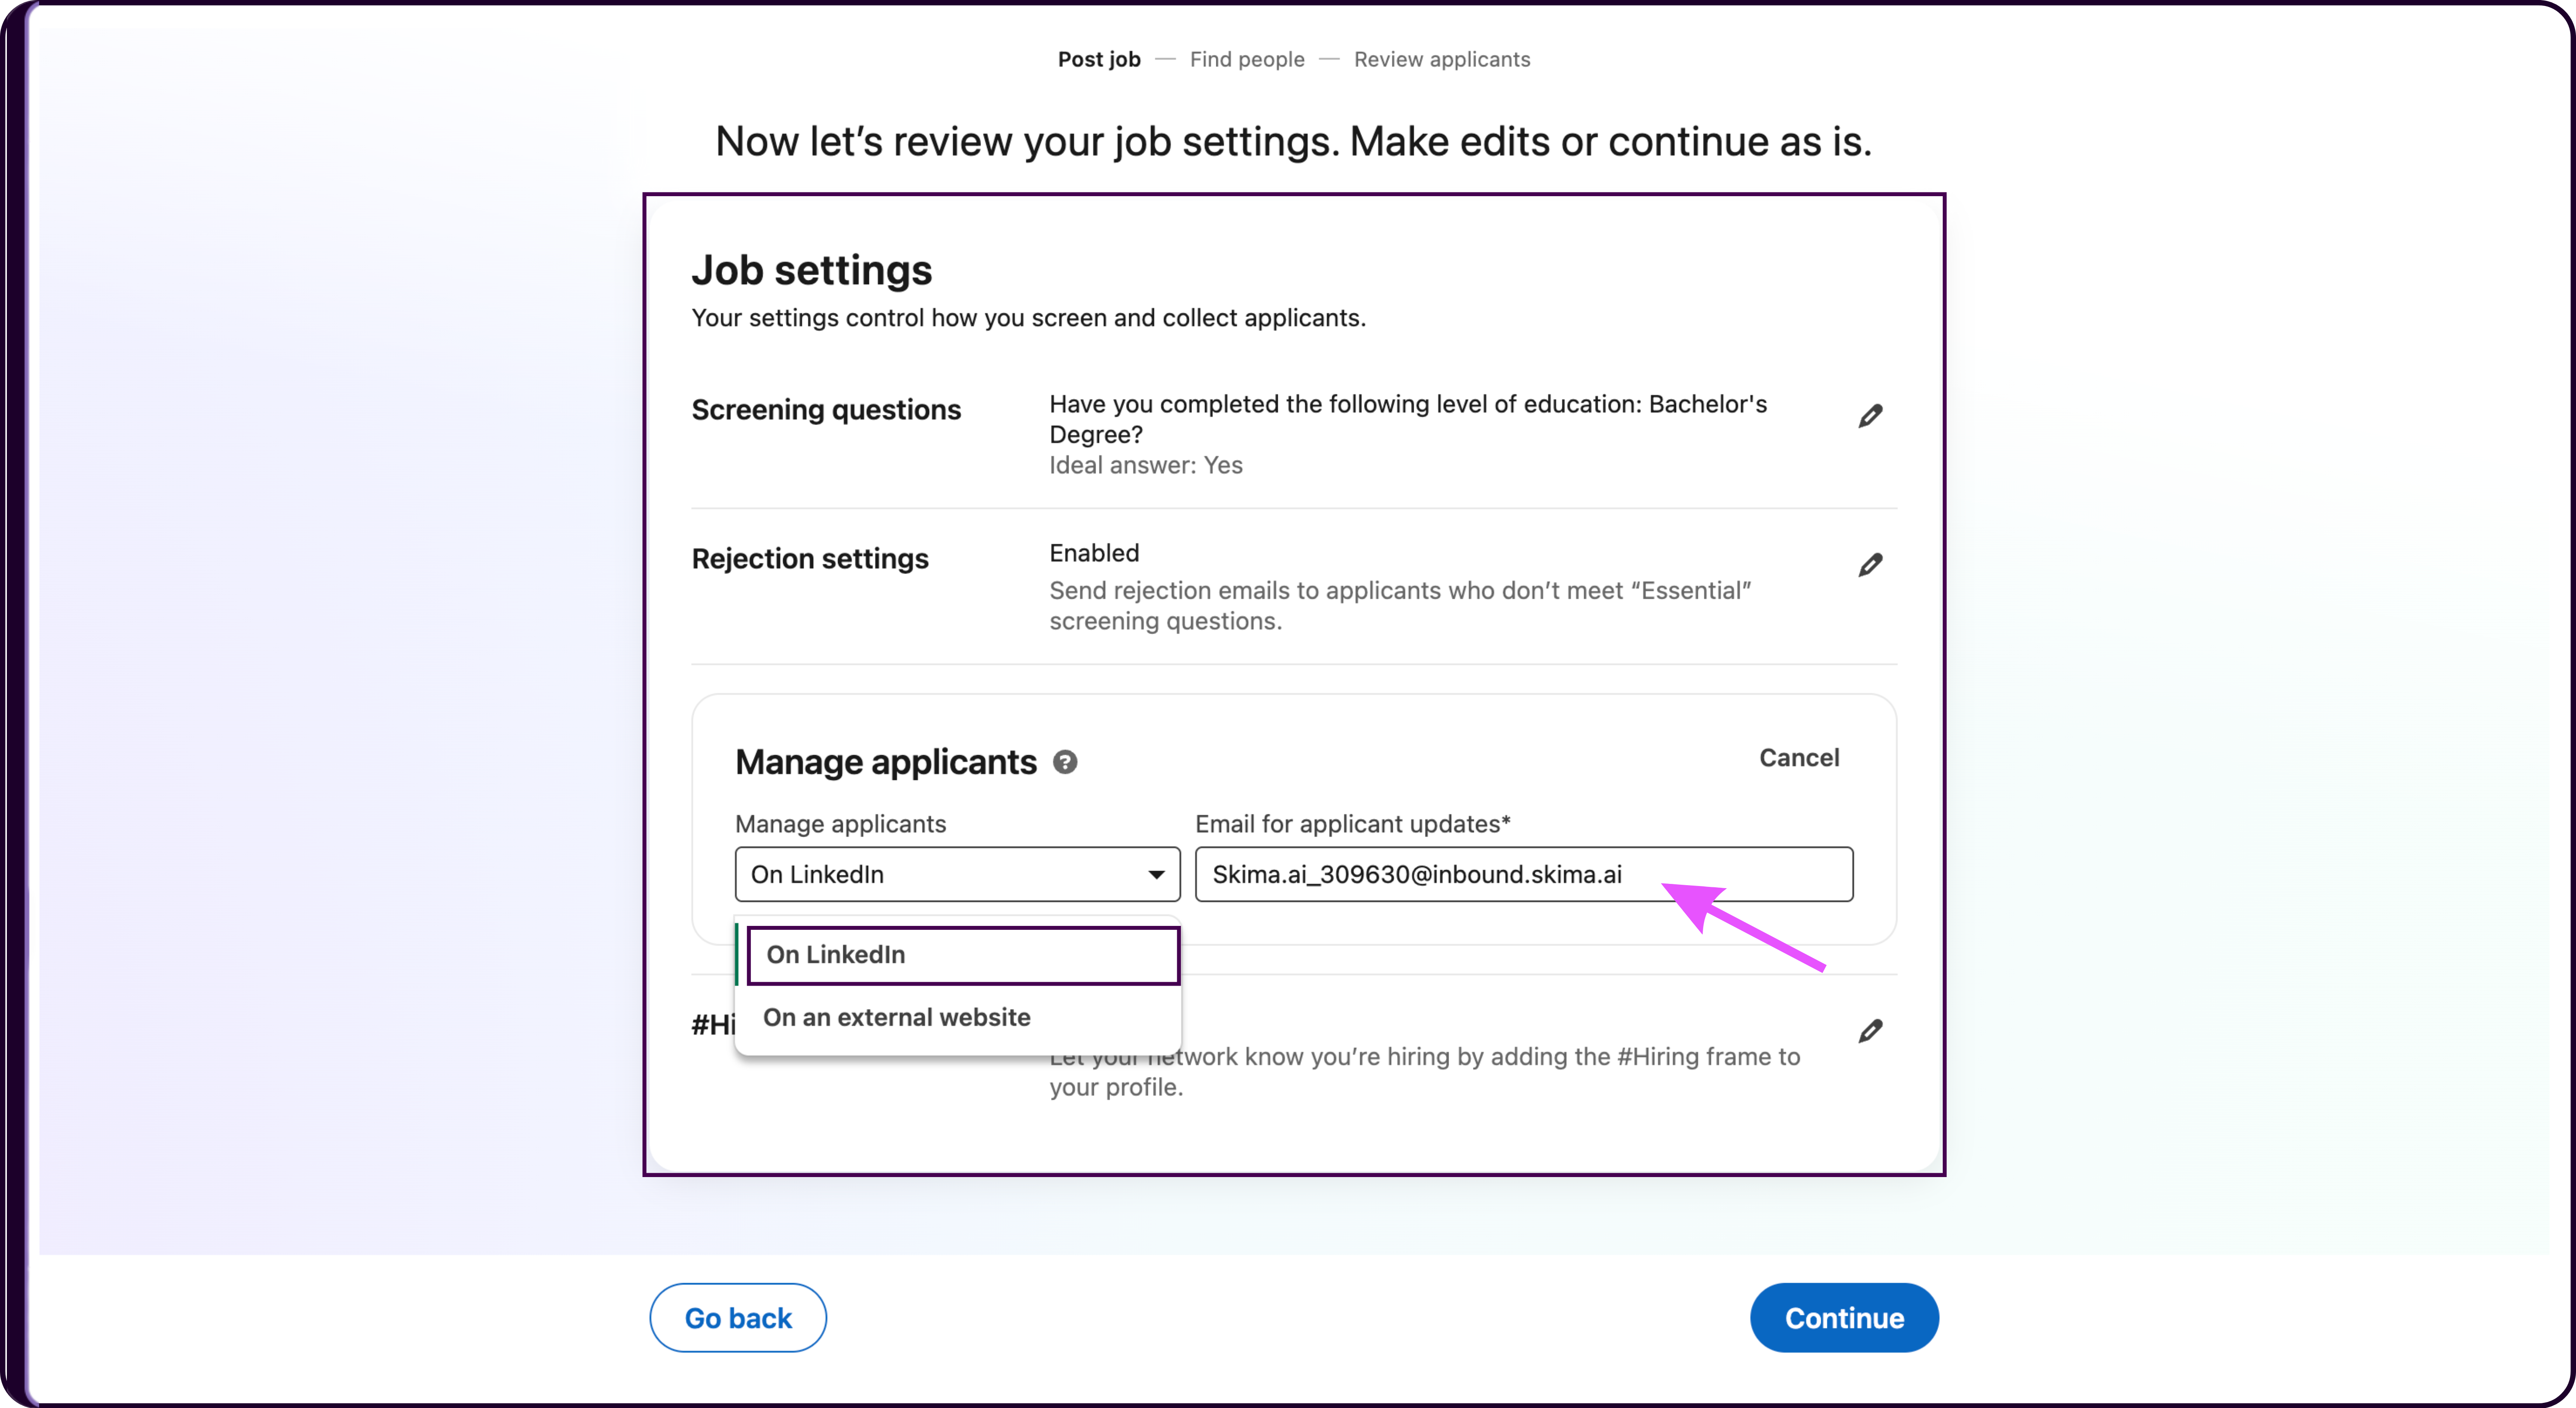
- Paste the Skima AI forwarding email into this field.
Once configured:
- Every Easy Apply applicant will automatically be forwarded into Skima AI
- Candidate resumes will be imported instantly
- Applications will be linked to the corresponding job
- AI scoring and screening workflows will begin automatically
Ensure the job already exists inside Skima AI before configuring Easy Apply forwarding. This allows Skima AI to correctly map incoming candidates to the appropriate job and apply scoring workflows accurately.
3. Forward Job Applications via Email
If your organization already receives LinkedIn job applications directly in an email inbox, Skima AI allows you to automatically forward those applications into the platform for AI-based scoring and candidate processing.
This workflow helps recruiters centralize incoming applications without manually downloading resumes or uploading candidates individually.
Generate Your Forwarding Email
Navigate to 'Settings' → 'LinkedIn Integration'.
Click on 'Forward Job Applications via Email'.
Click on 'Generate Your Forwarder Email'.
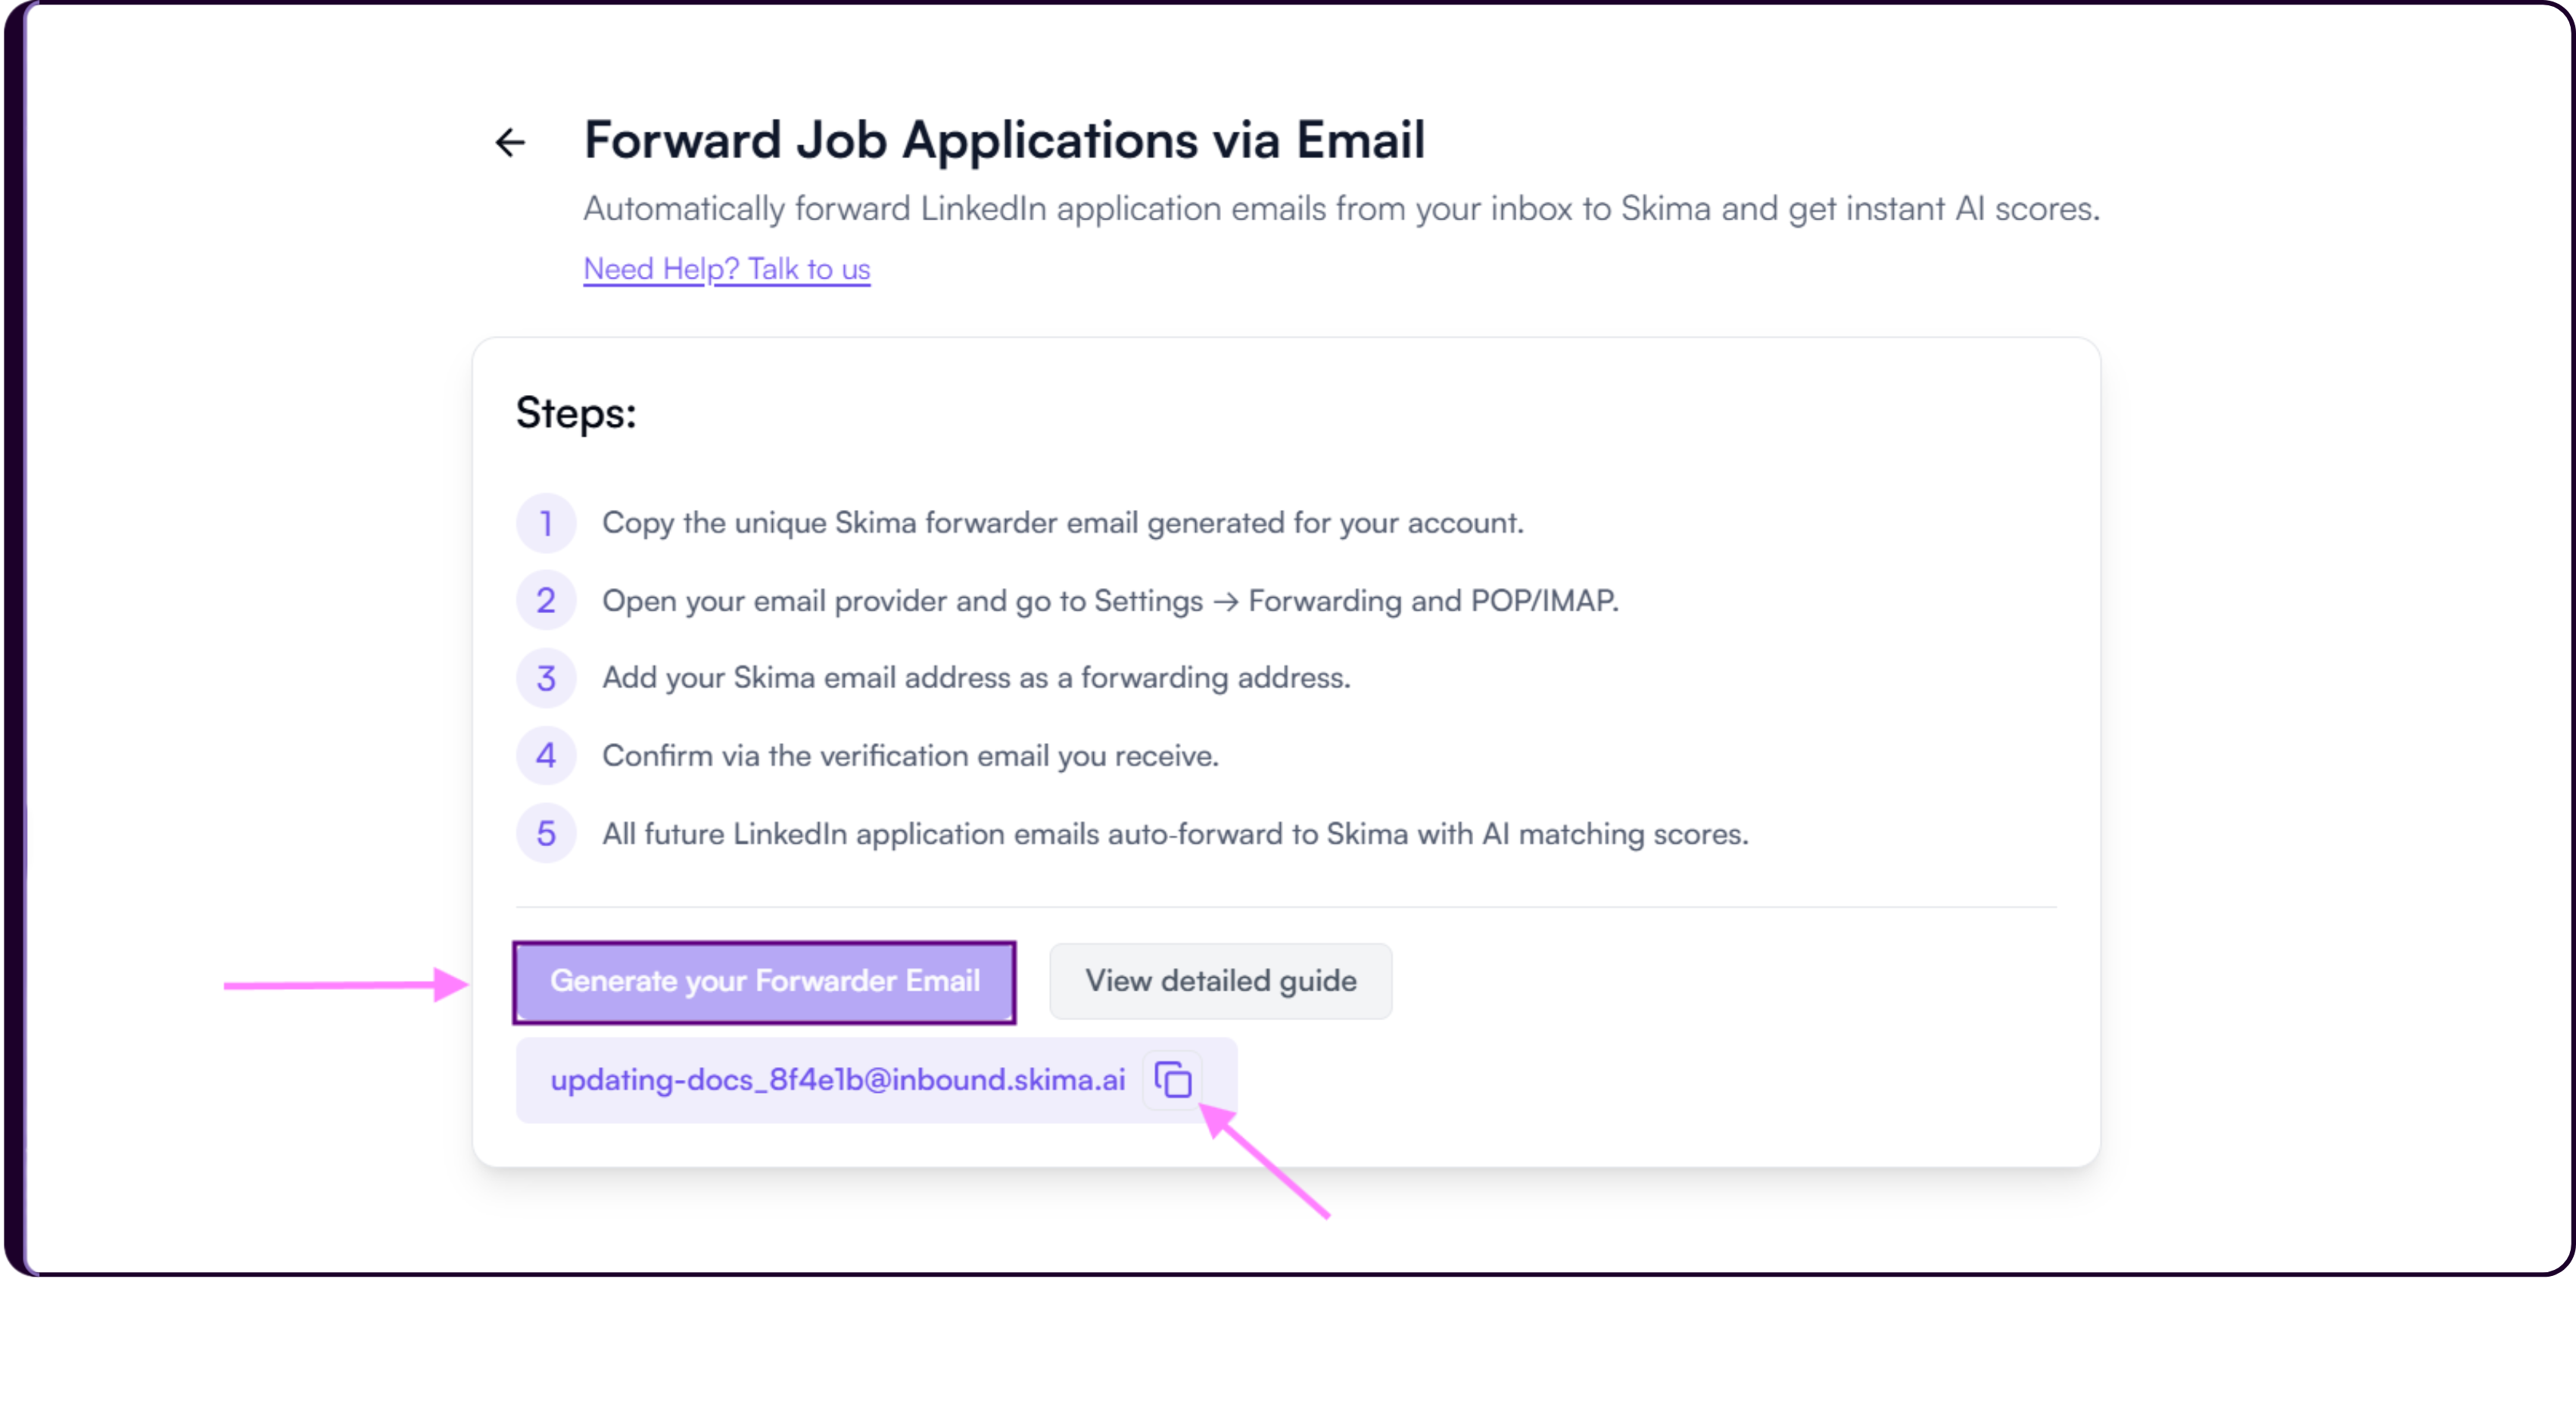
Skima AI will generate a unique forwarding email address for your workspace.
Copy the generated email address.
Configure Email Forwarding in Gmail
If you use Gmail to receive LinkedIn job applications, follow these steps to enable forwarding.
Open Gmail using the email account where LinkedIn applications are received.
Click on the 'Settings' icon and select 'See All Settings'.
Open the 'Forwarding and POP/IMAP' tab.
Click on 'Add a Forwarding Address'.
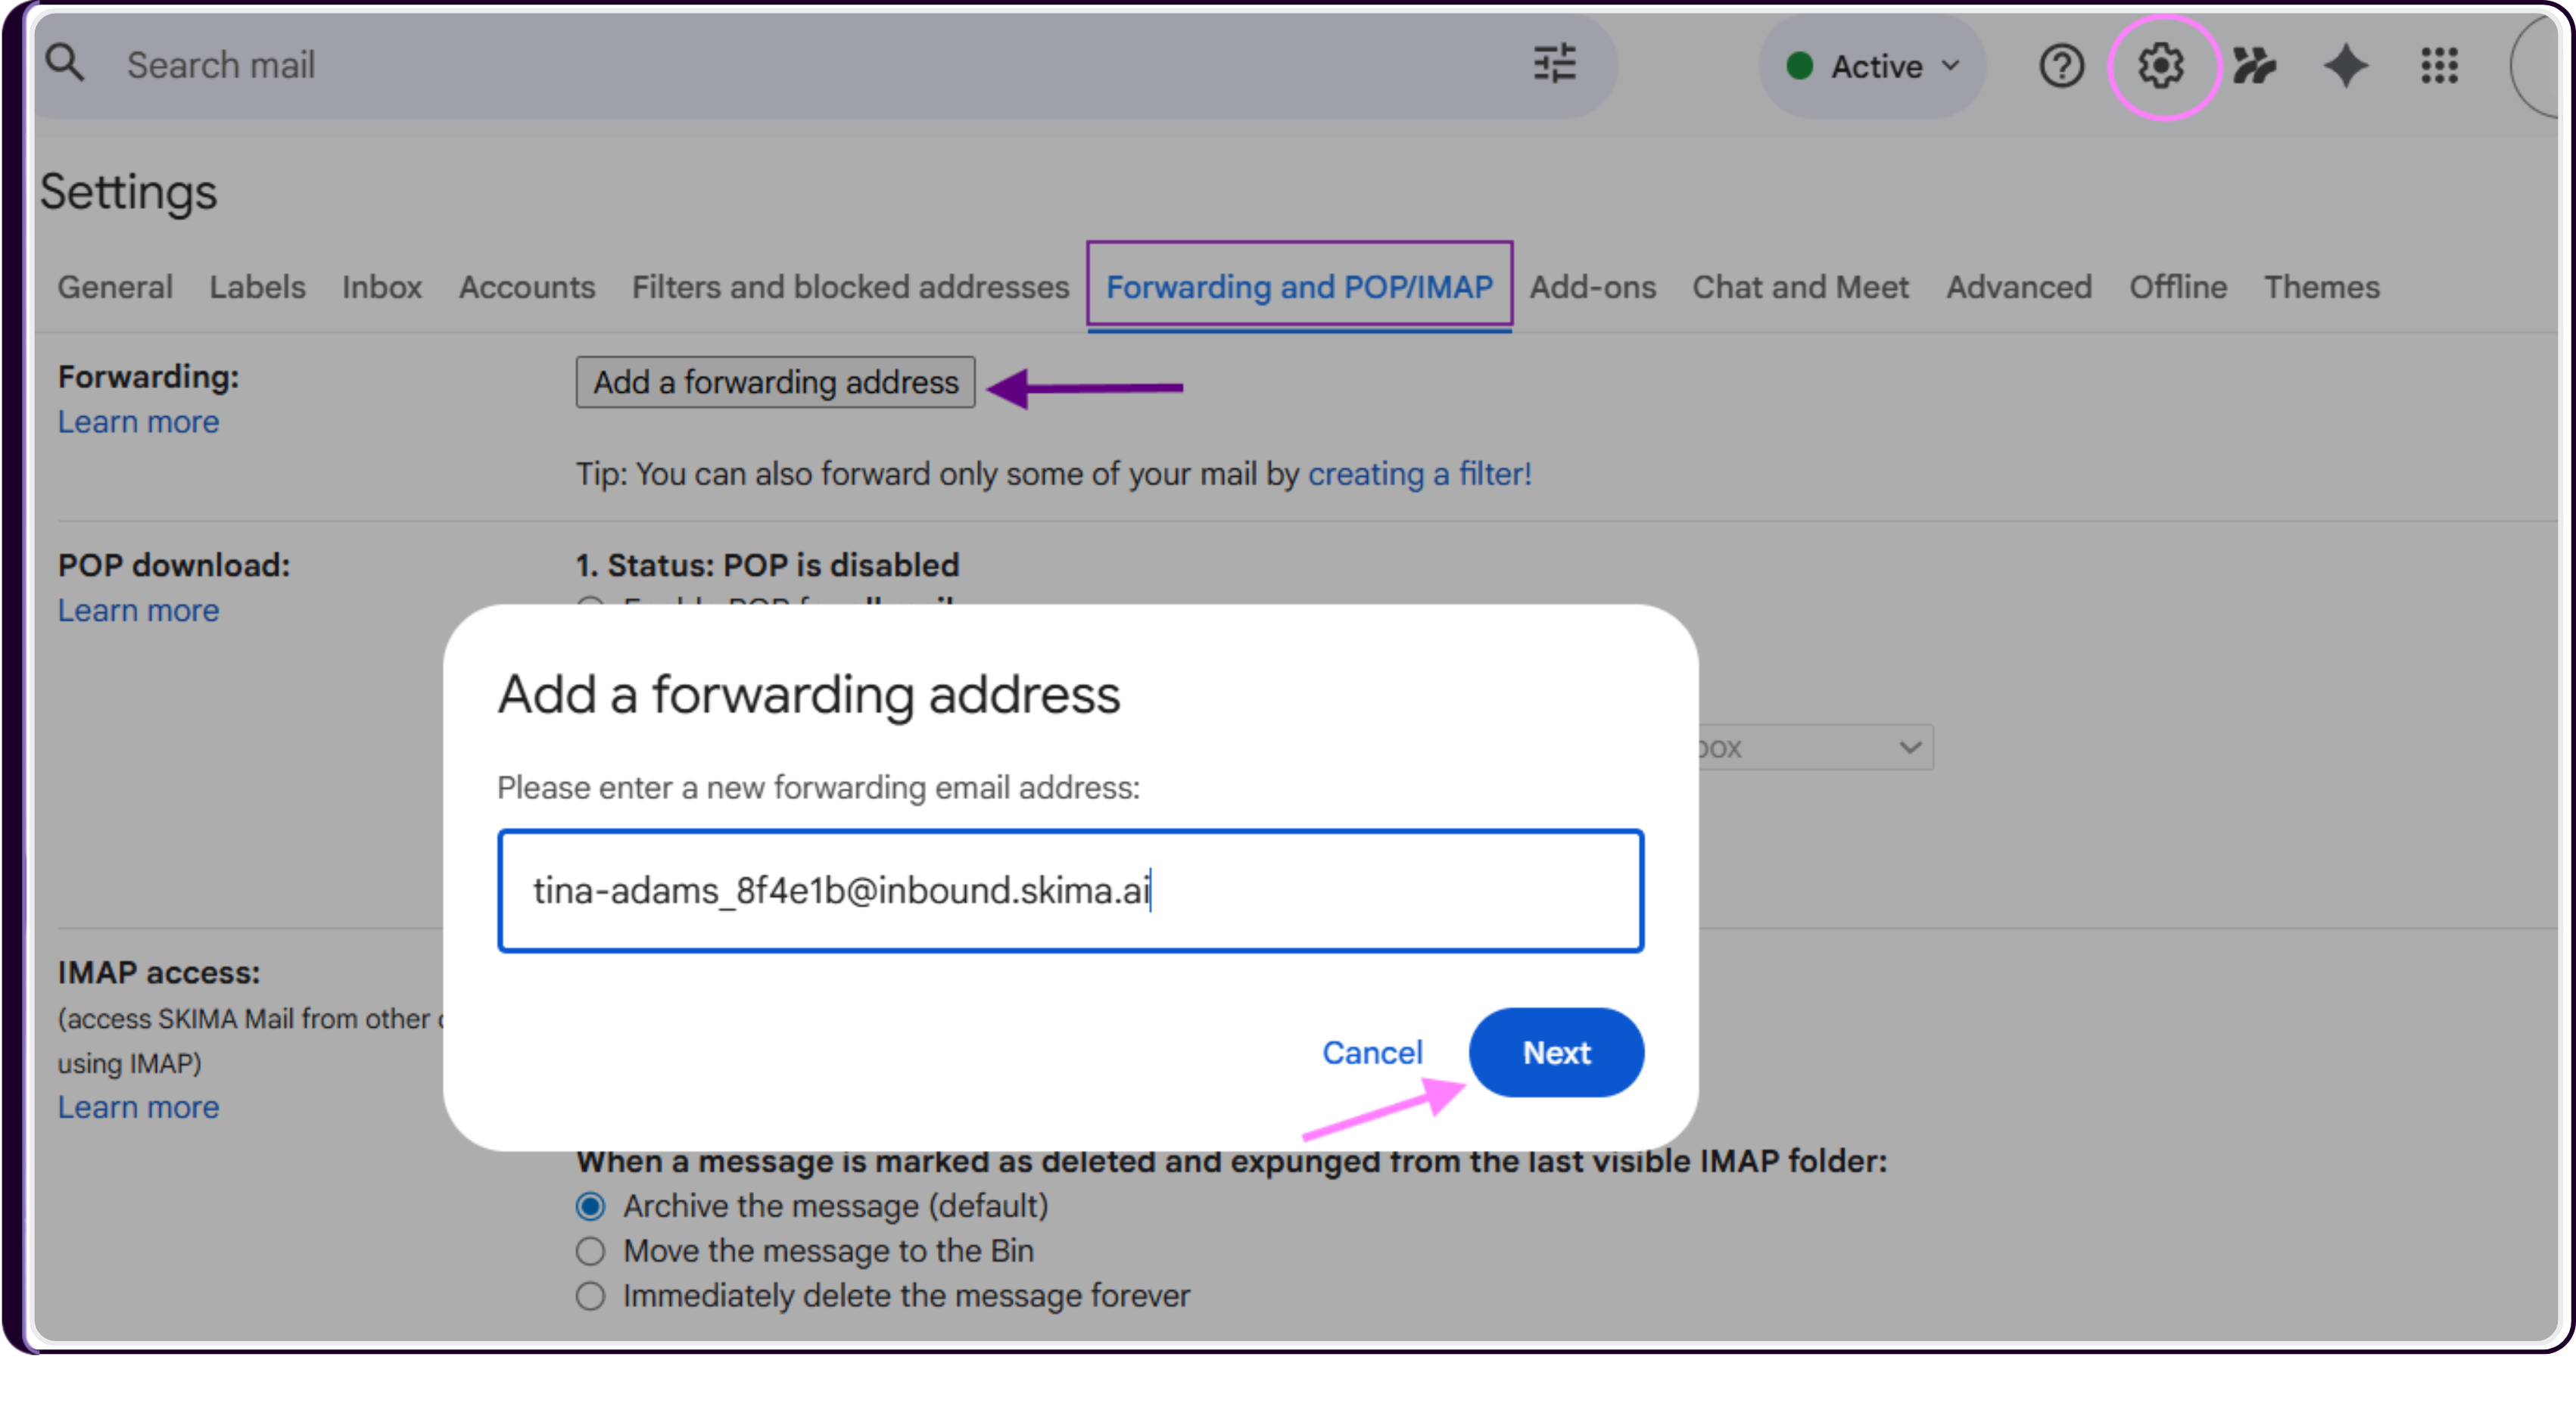
Paste the Skima AI forwarding email address copied earlier.
Click on 'Next' and confirm the request.
Gmail will now send a verification email to the forwarding address configuration.
Activate Email Forwarding
Open your inbox.
Locate the Gmail verification email.
Confirm the forwarding request.
Once verification is completed:
- LinkedIn application emails will automatically forward into Skima AI
- Candidate resumes and details will be processed automatically
- AI scoring workflows will begin instantly
- Applications will become available inside your recruiter dashboard
4. Sync via LinkedIn API
For organizations looking for a deeper and more automated LinkedIn integration, Skima AI also supports LinkedIn API-based syncing workflows.
This setup enables more advanced automation capabilities between LinkedIn and Skima AI for candidate intake and application processing.
Request LinkedIn API Integration
Navigate to 'Settings' → 'LinkedIn Integration'.
Click on 'Sync via LinkedIn API'.
Click on 'Book a Demo'.
- Schedule a setup session with the Skima AI team.
During the setup process, the Skima AI team will help configure and validate the LinkedIn API integration based on your organization's requirements and LinkedIn access permissions.