Create Job
Creating a job in Skima AI is more than just publishing a role. It is the starting point for how the AI understands your hiring requirements, evaluates candidates, and creates structured screening logic for the role.
The quality of your Job Description directly impacts candidate scoring, AI matching accuracy, knockout filters, and the overall quality of shortlisted candidates. Skima AI helps recruiters create, refine, and calibrate jobs so screening becomes faster, more structured, and more aligned with actual hiring expectations.
Navigate to Jobs
Log in to your Skima AI account.
From the left sidebar, click on 'Jobs'.
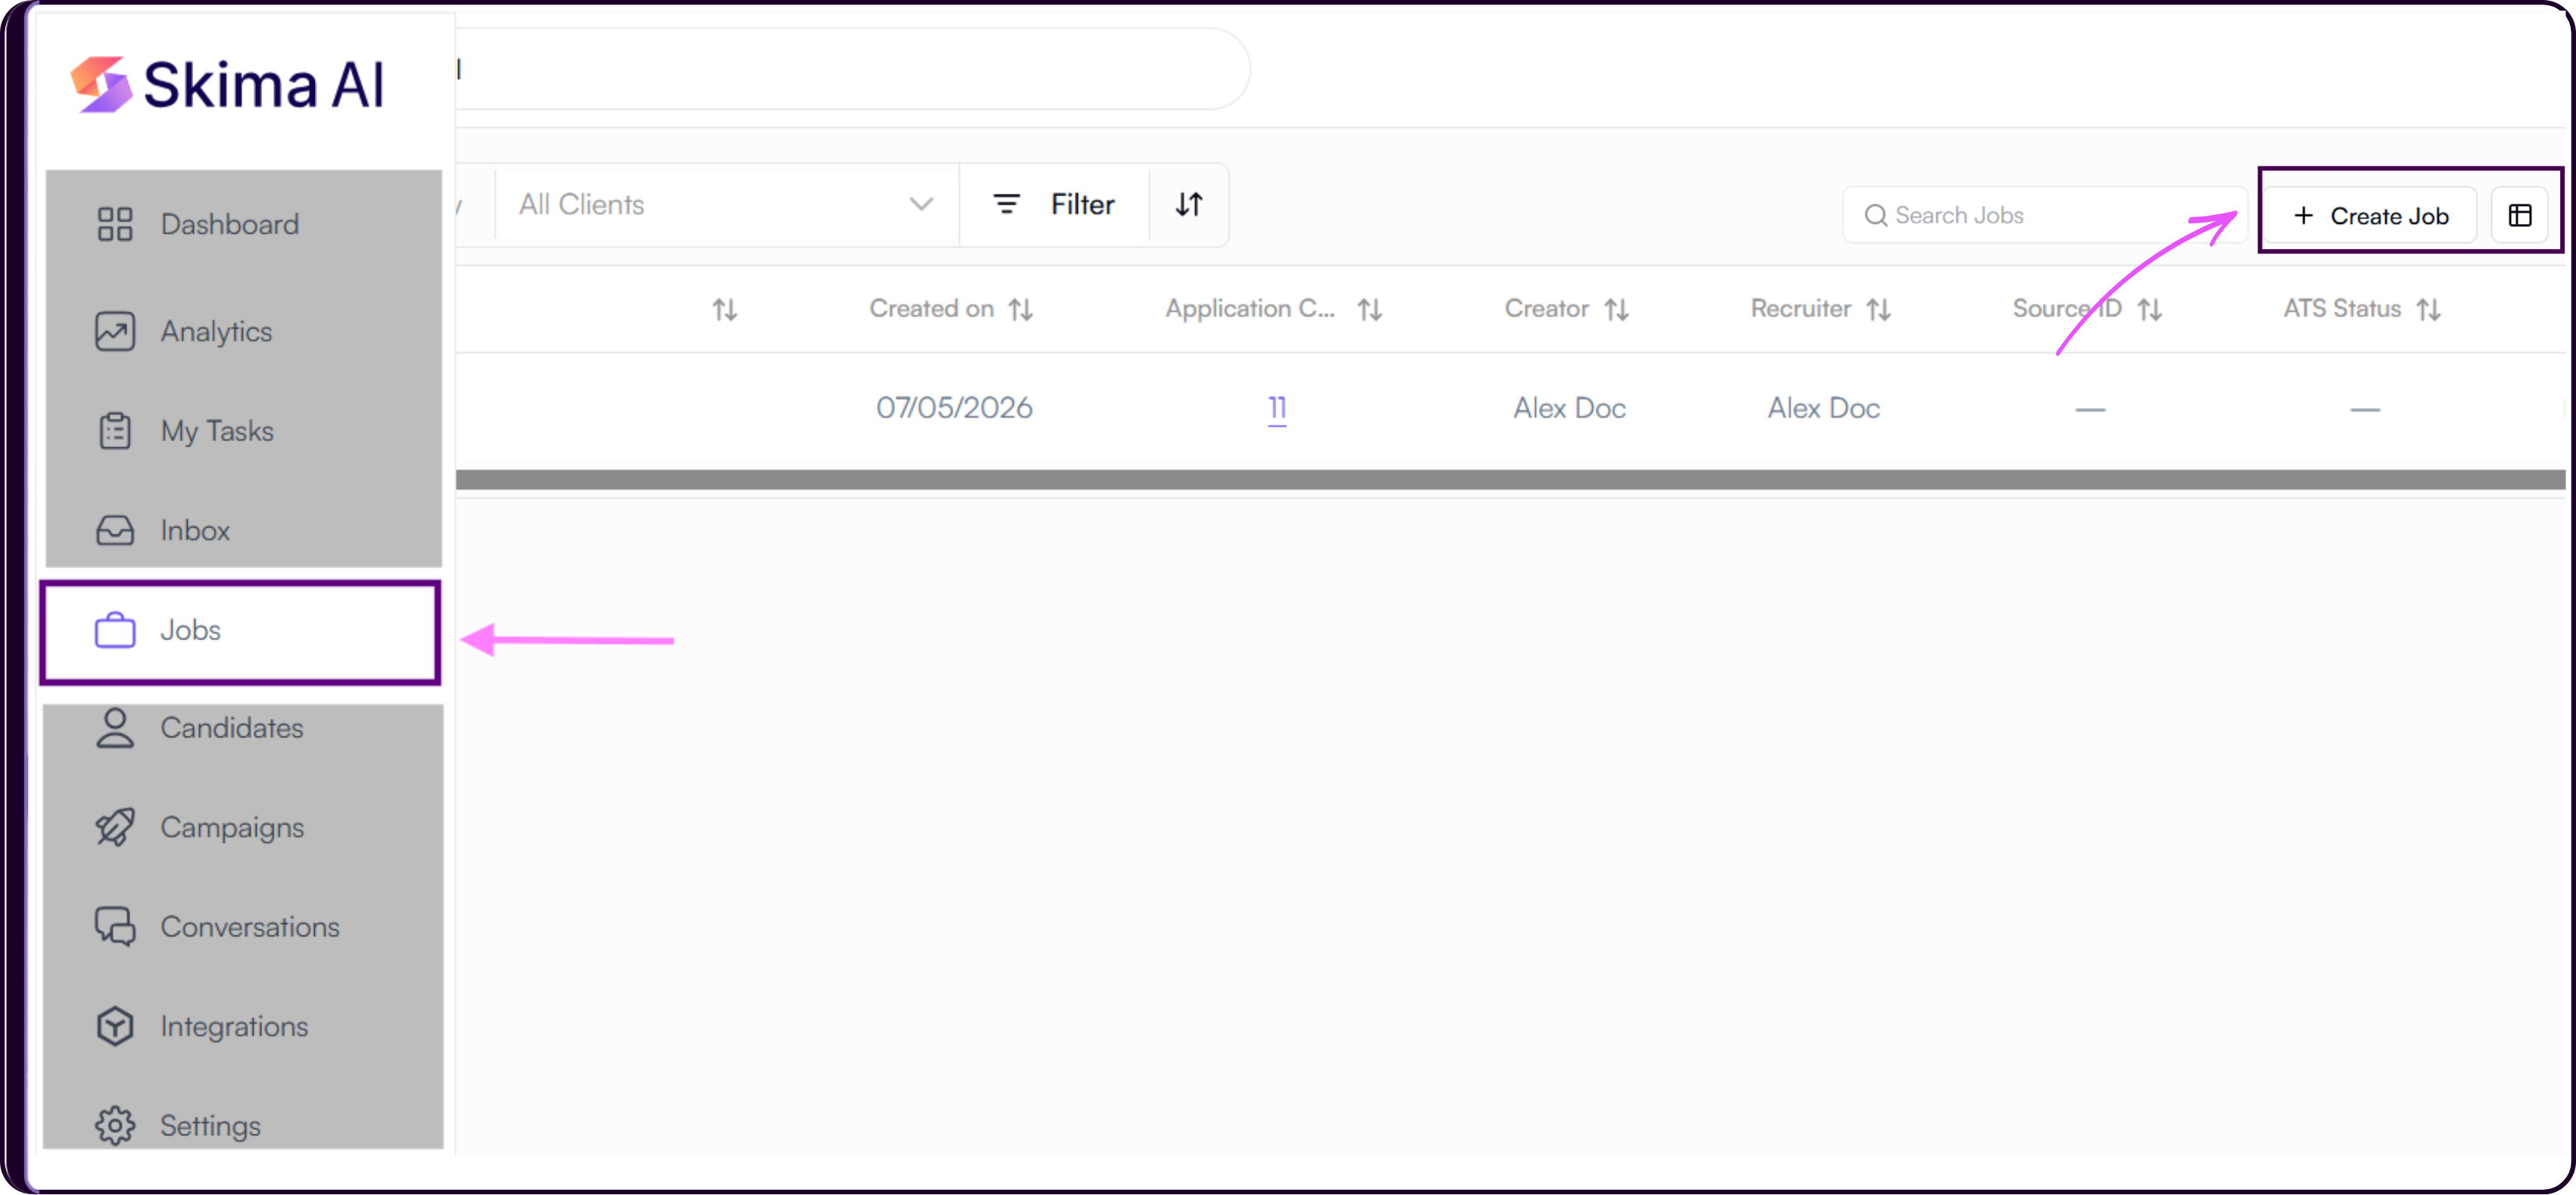
This opens the Jobs page where you can view existing jobs, track job status, create new jobs, and access candidate pipelines for each role.
Click on 'Create Job' to start creating a new role.
Add Job Details
Once you click on 'Create Job', a form will appear where you can enter the foundational details of the role. These details help Skima AI understand the position and generate better candidate matching and screening logic.
Add the Job Title
The Job Title directly impacts candidate understanding, AI matching accuracy, and search visibility. Use clear and standardized titles whenever possible.
Add the Job Location
Enter the location where the role is based. This helps candidates understand where the role is located and allows Skima AI to apply location-based matching during screening.
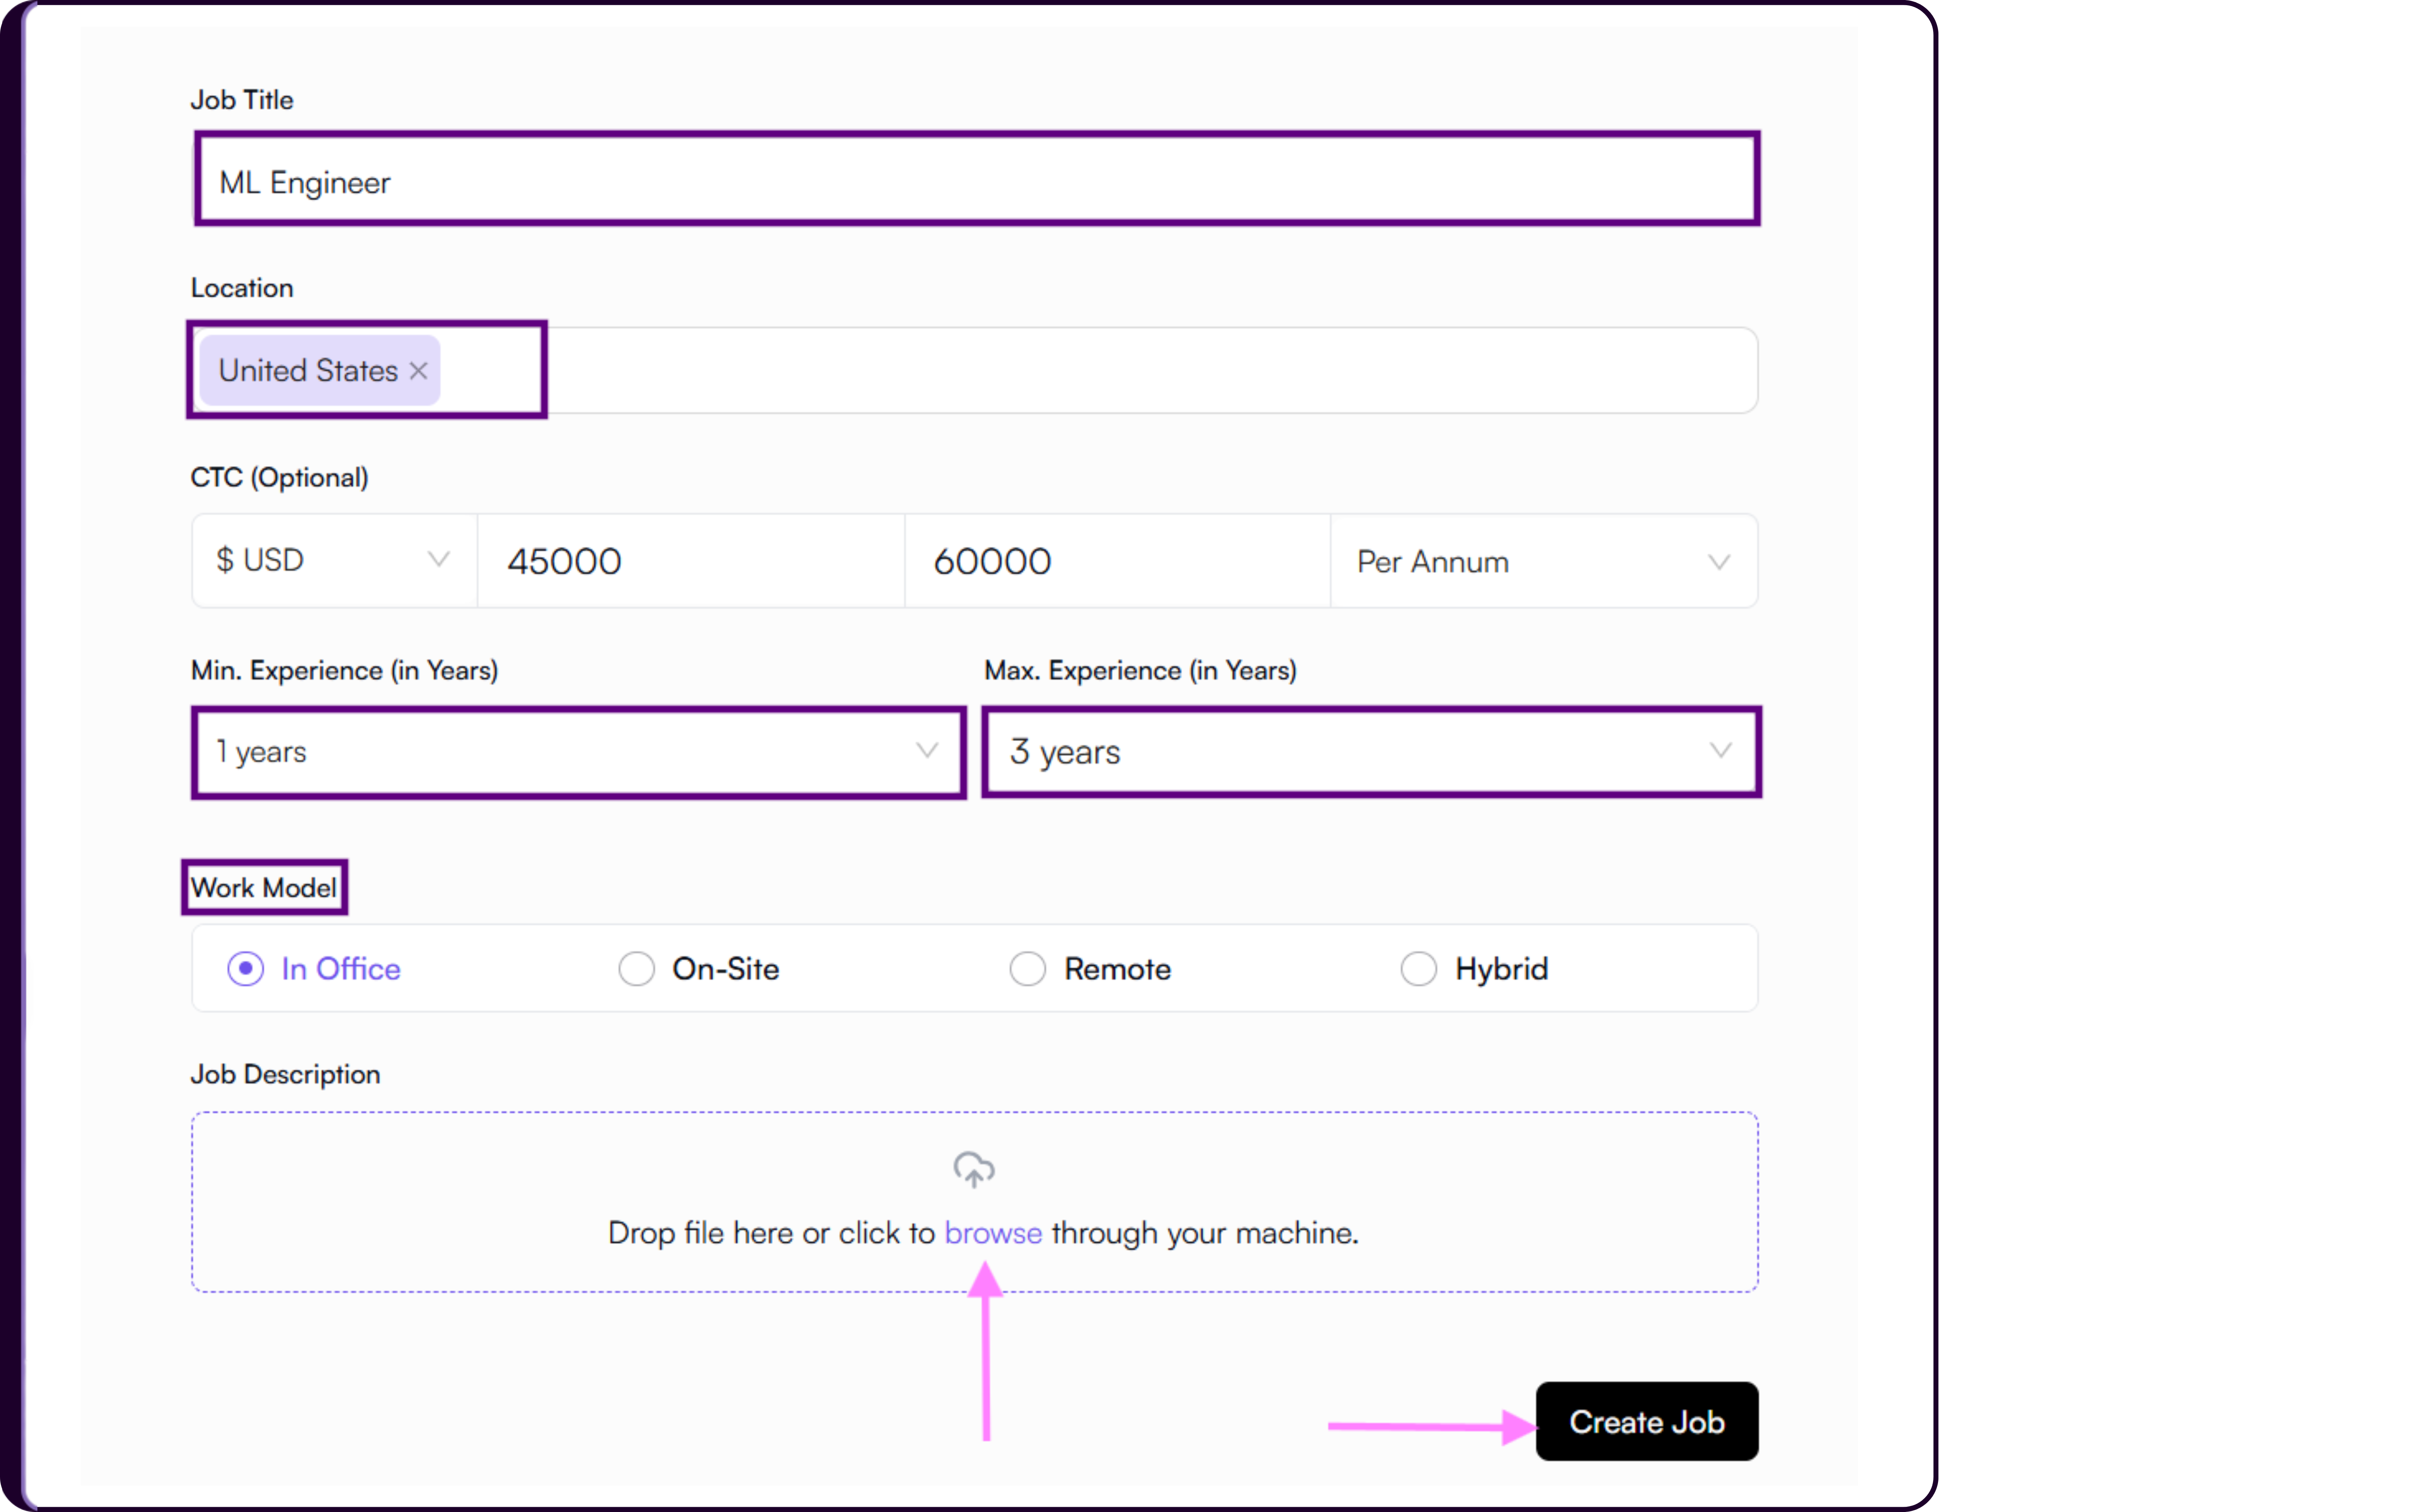
Add the CTC / Salary Range
Select the salary currency and enter the compensation range for the role. You can also define the compensation duration such as per hour, per week, per month, or per annum.
Transparent salary information helps improve candidate quality and reduces mismatched applications.
Set Experience Requirements
Select the minimum years of experience required for the role. Adding a maximum experience range is optional. You can also select 0 for both fields if required.
Example:
Minimum Experience: 3 Years
Maximum Experience: 6 Years
Select the Work Model
Choose how the role will be structured operationally. Available options include In Office, On-site, Hybrid, and Remote depending on how candidates are expected to work.
Use clear and realistic experience ranges and work model details to improve candidate matching accuracy during screening.
Create or Upload the Job Description
The Job Description is one of the most important parts of the hiring workflow because it directly affects how candidates are screened, scored, ranked, and shortlisted.
Skima AI uses the Job Description to understand role expectations, generate AI screening logic, create knockout filters, evaluate candidate fit, and improve ranking accuracy. A well-written Job Description improves both candidate quality and screening precision.
i. Upload an Existing Job Description
If you already have a Job Description prepared, you can upload it directly into Skima AI.
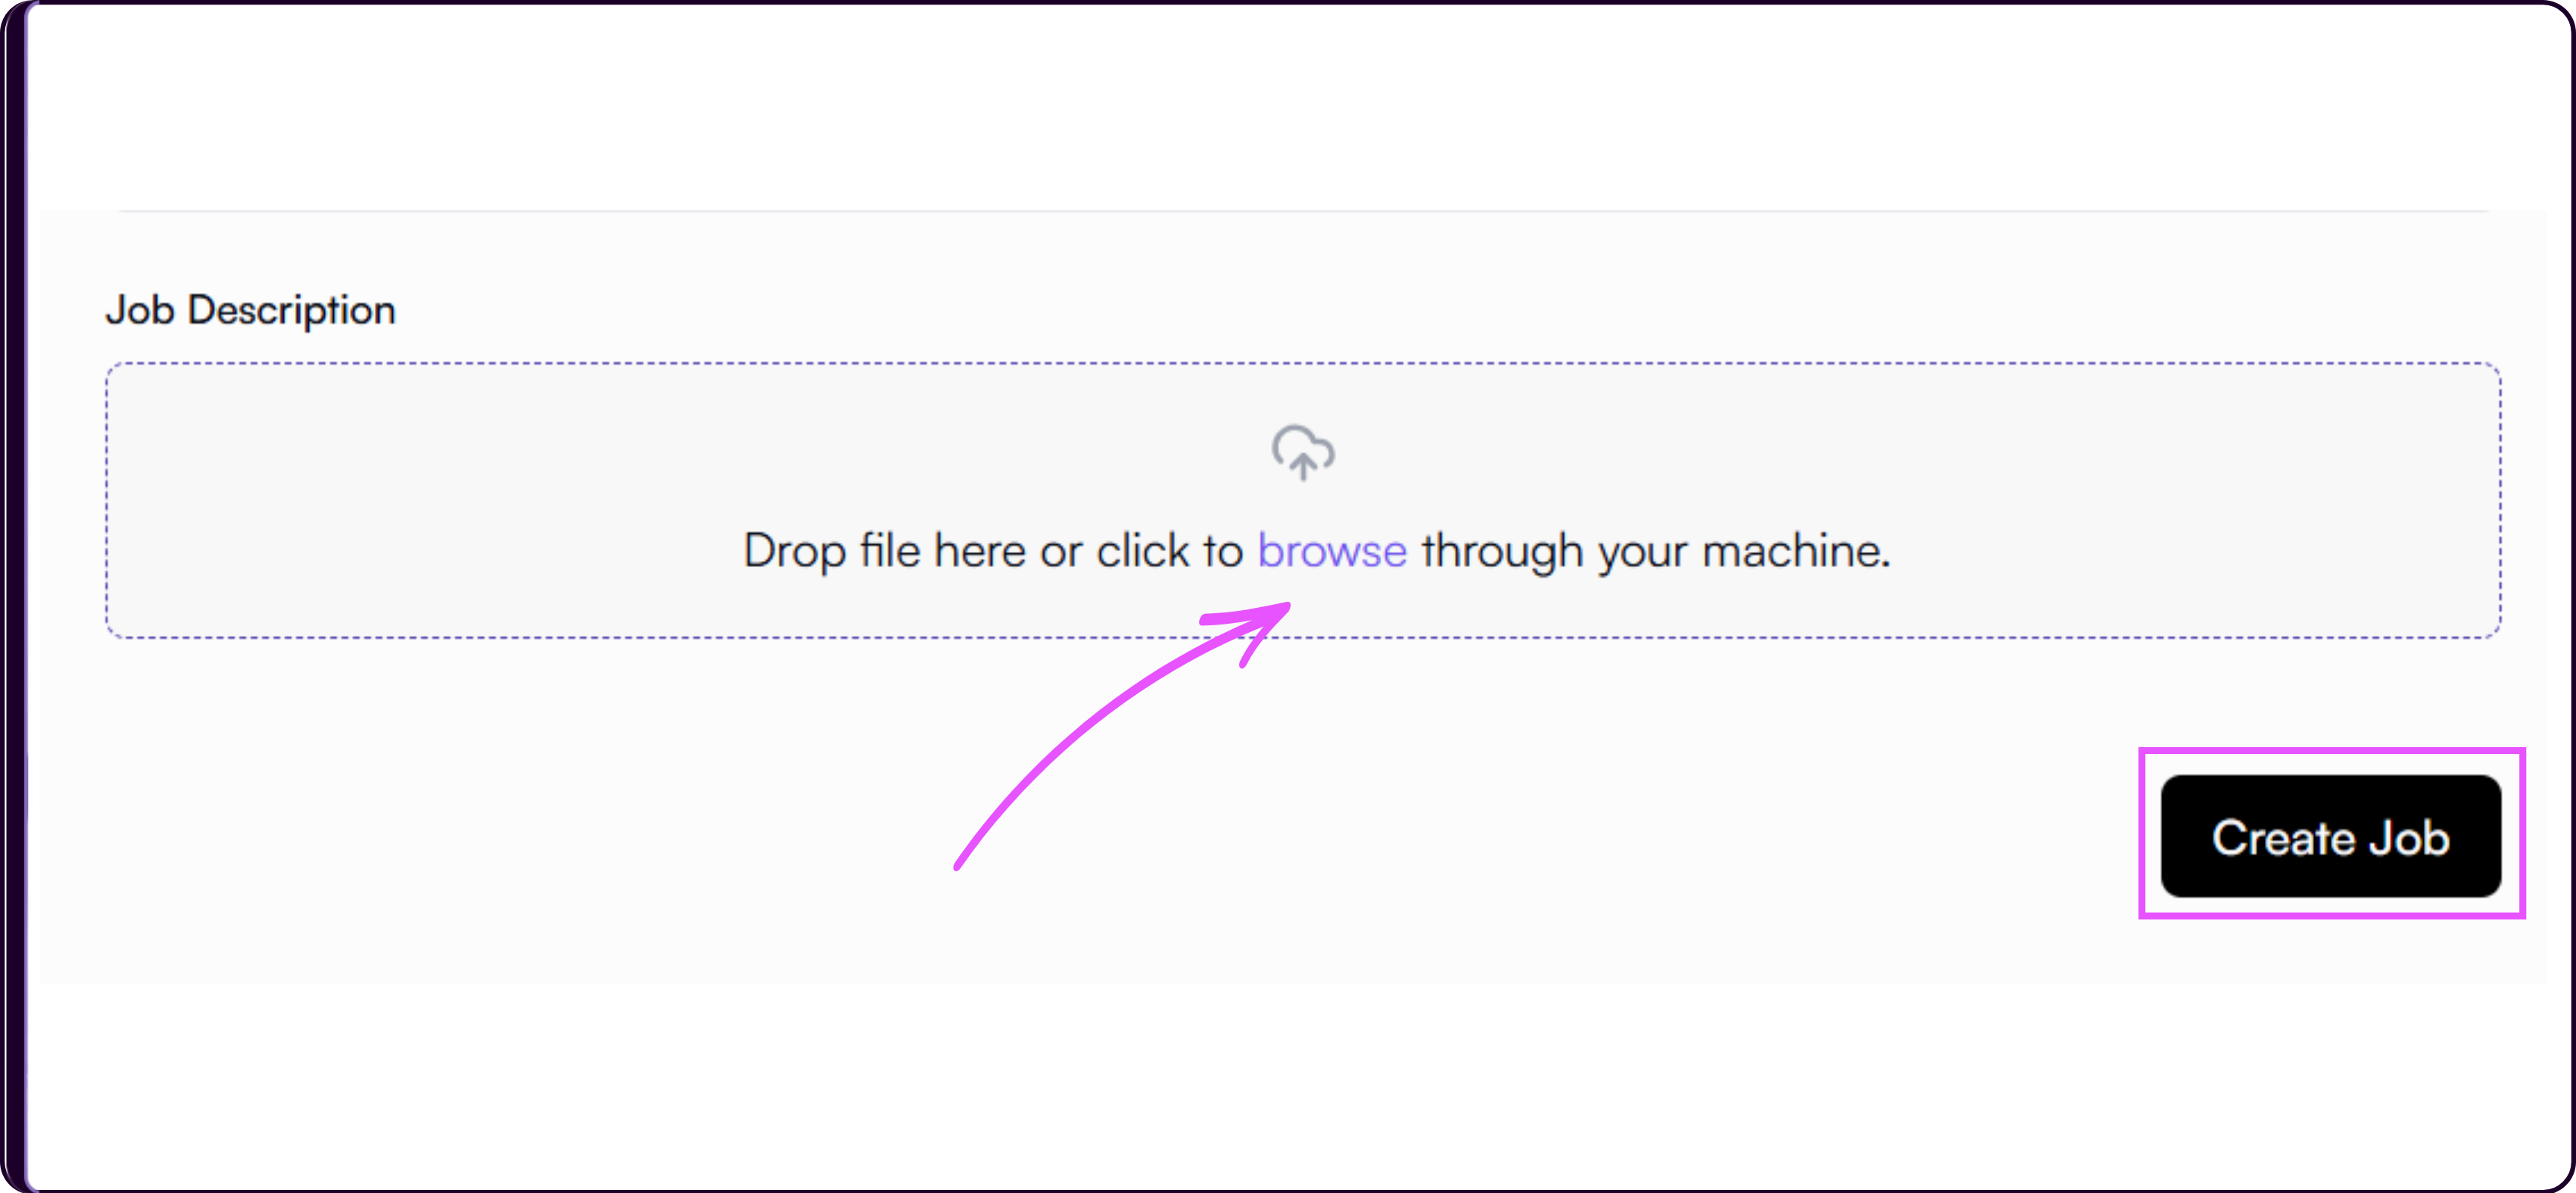
Navigate to the Job Description section.
Click on 'Browse'.
Select the Job Description file from your system.
Skima AI will automatically extract and process the information from the uploaded file and generate the Job Description for your role.
ii. Create a Job Description Using AI
If you do not already have a Job Description prepared, Skima AI can generate one automatically.
Complete the Job Details section.
Click on 'Create Job' directly.
A loading screen will appear while Skima AI generates the Job Description.
The AI-generated Job Description is created based on the Job Title, experience requirements, location, work model, and compensation details added during setup.
AI-generated Job Descriptions can always be edited and refined later according to your hiring requirements.
Edit and Calibrate the Job Description
Once the Job Description is created, you will be redirected to the 'View JD' section. This is where recruiters refine the screening logic and improve how the AI evaluates candidates.
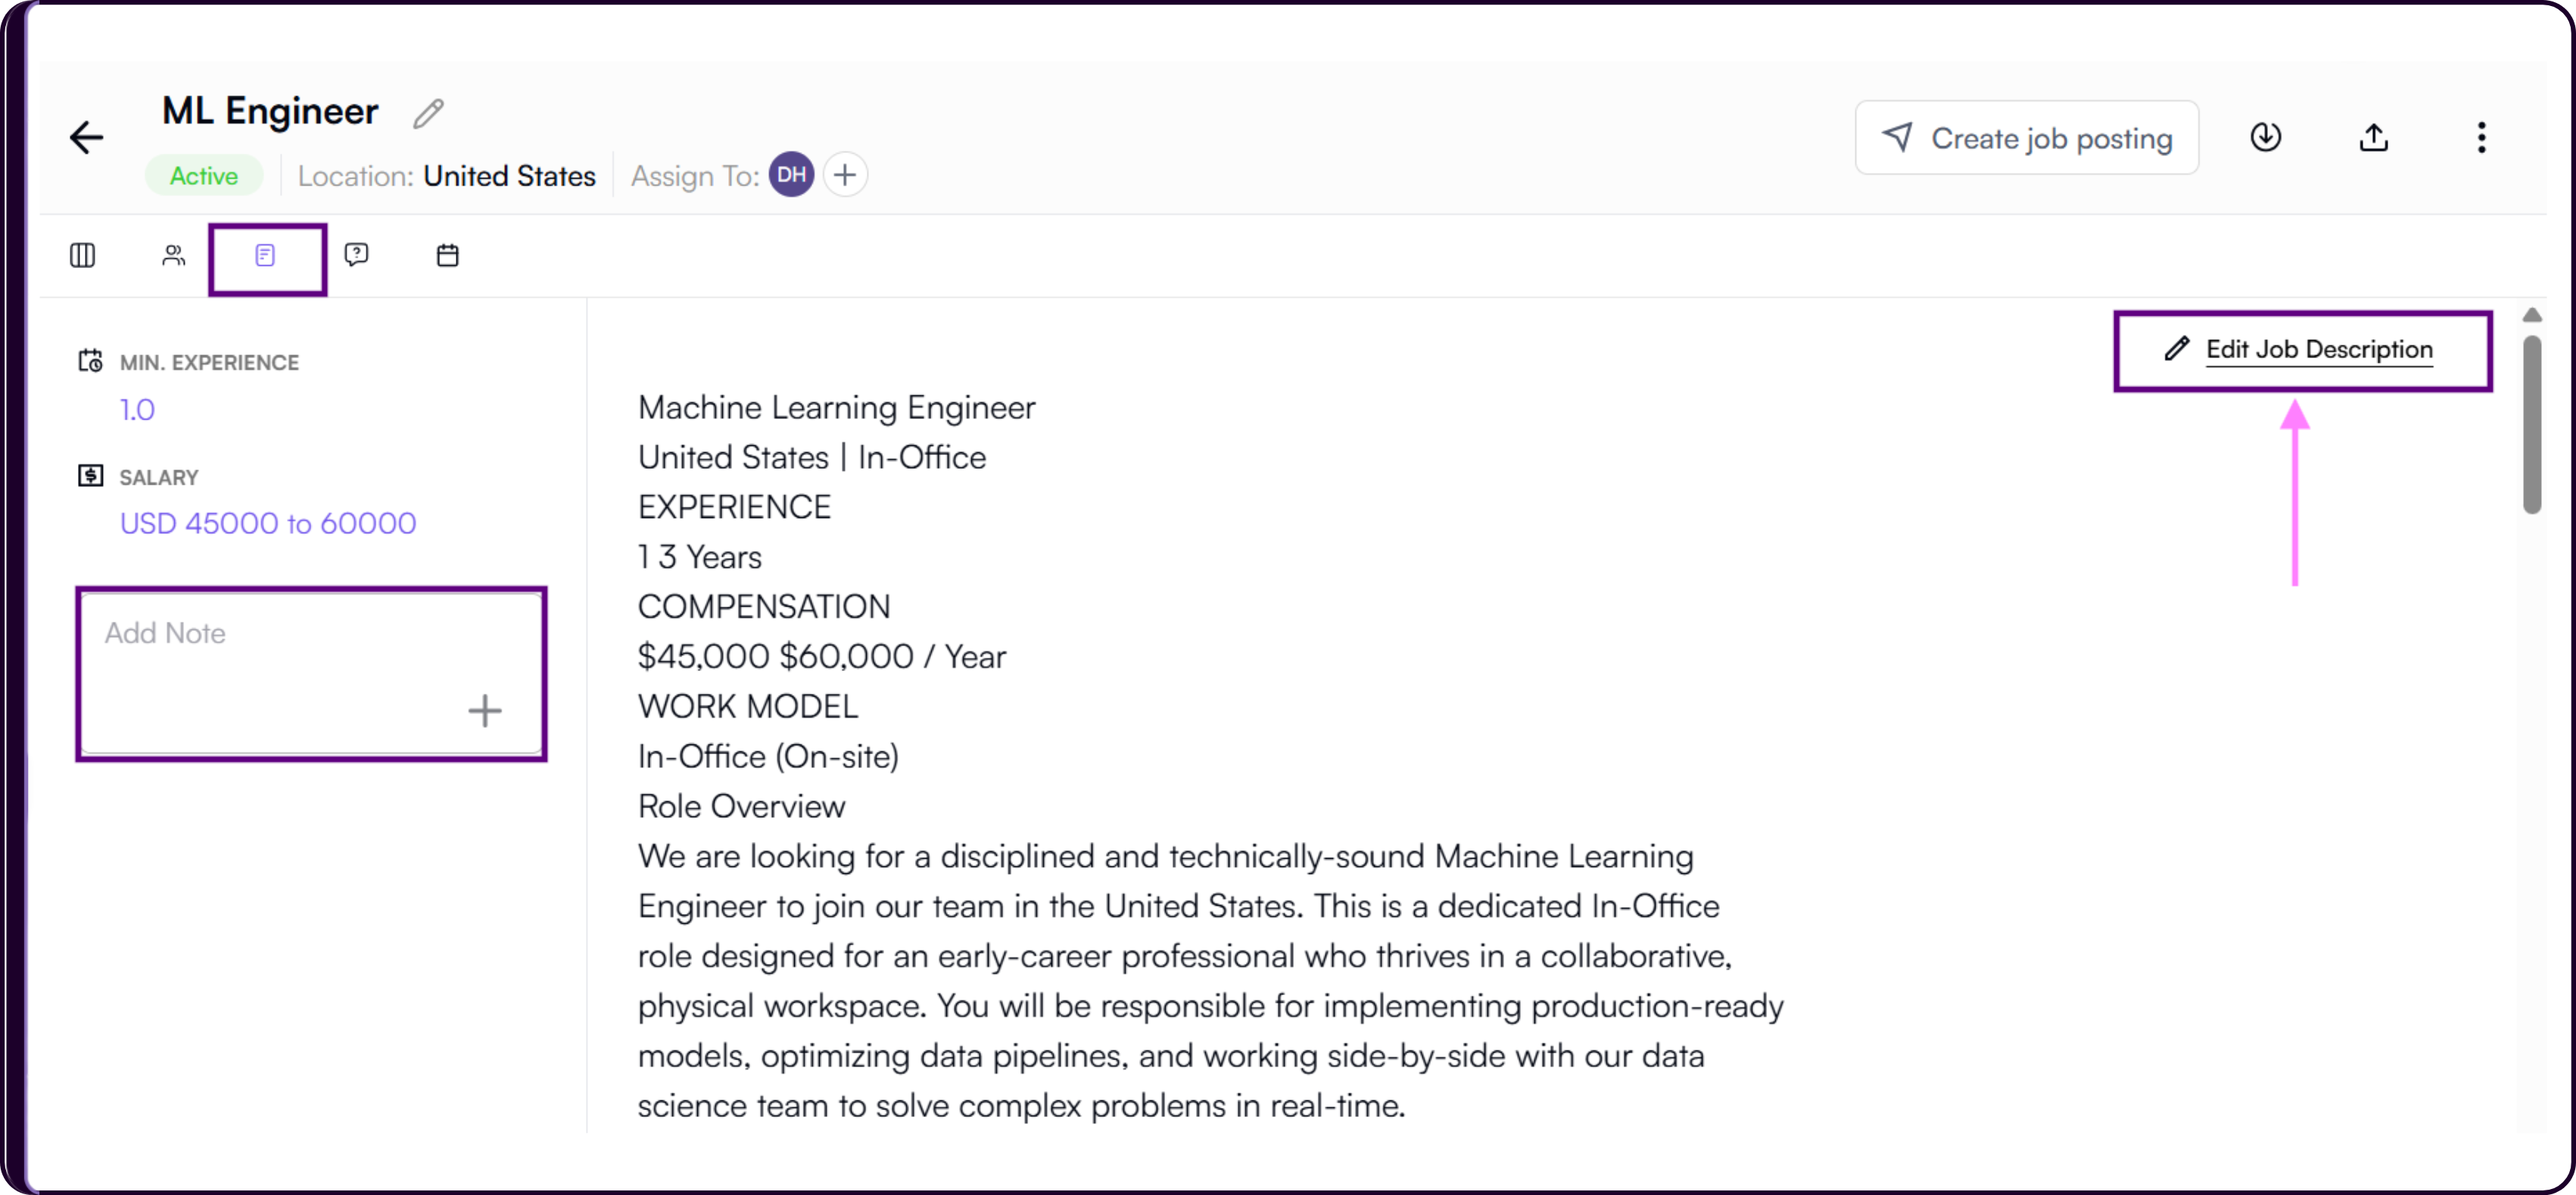
1. Edit the Job Description
Click on 'Edit Job Description' to refine the JD further.
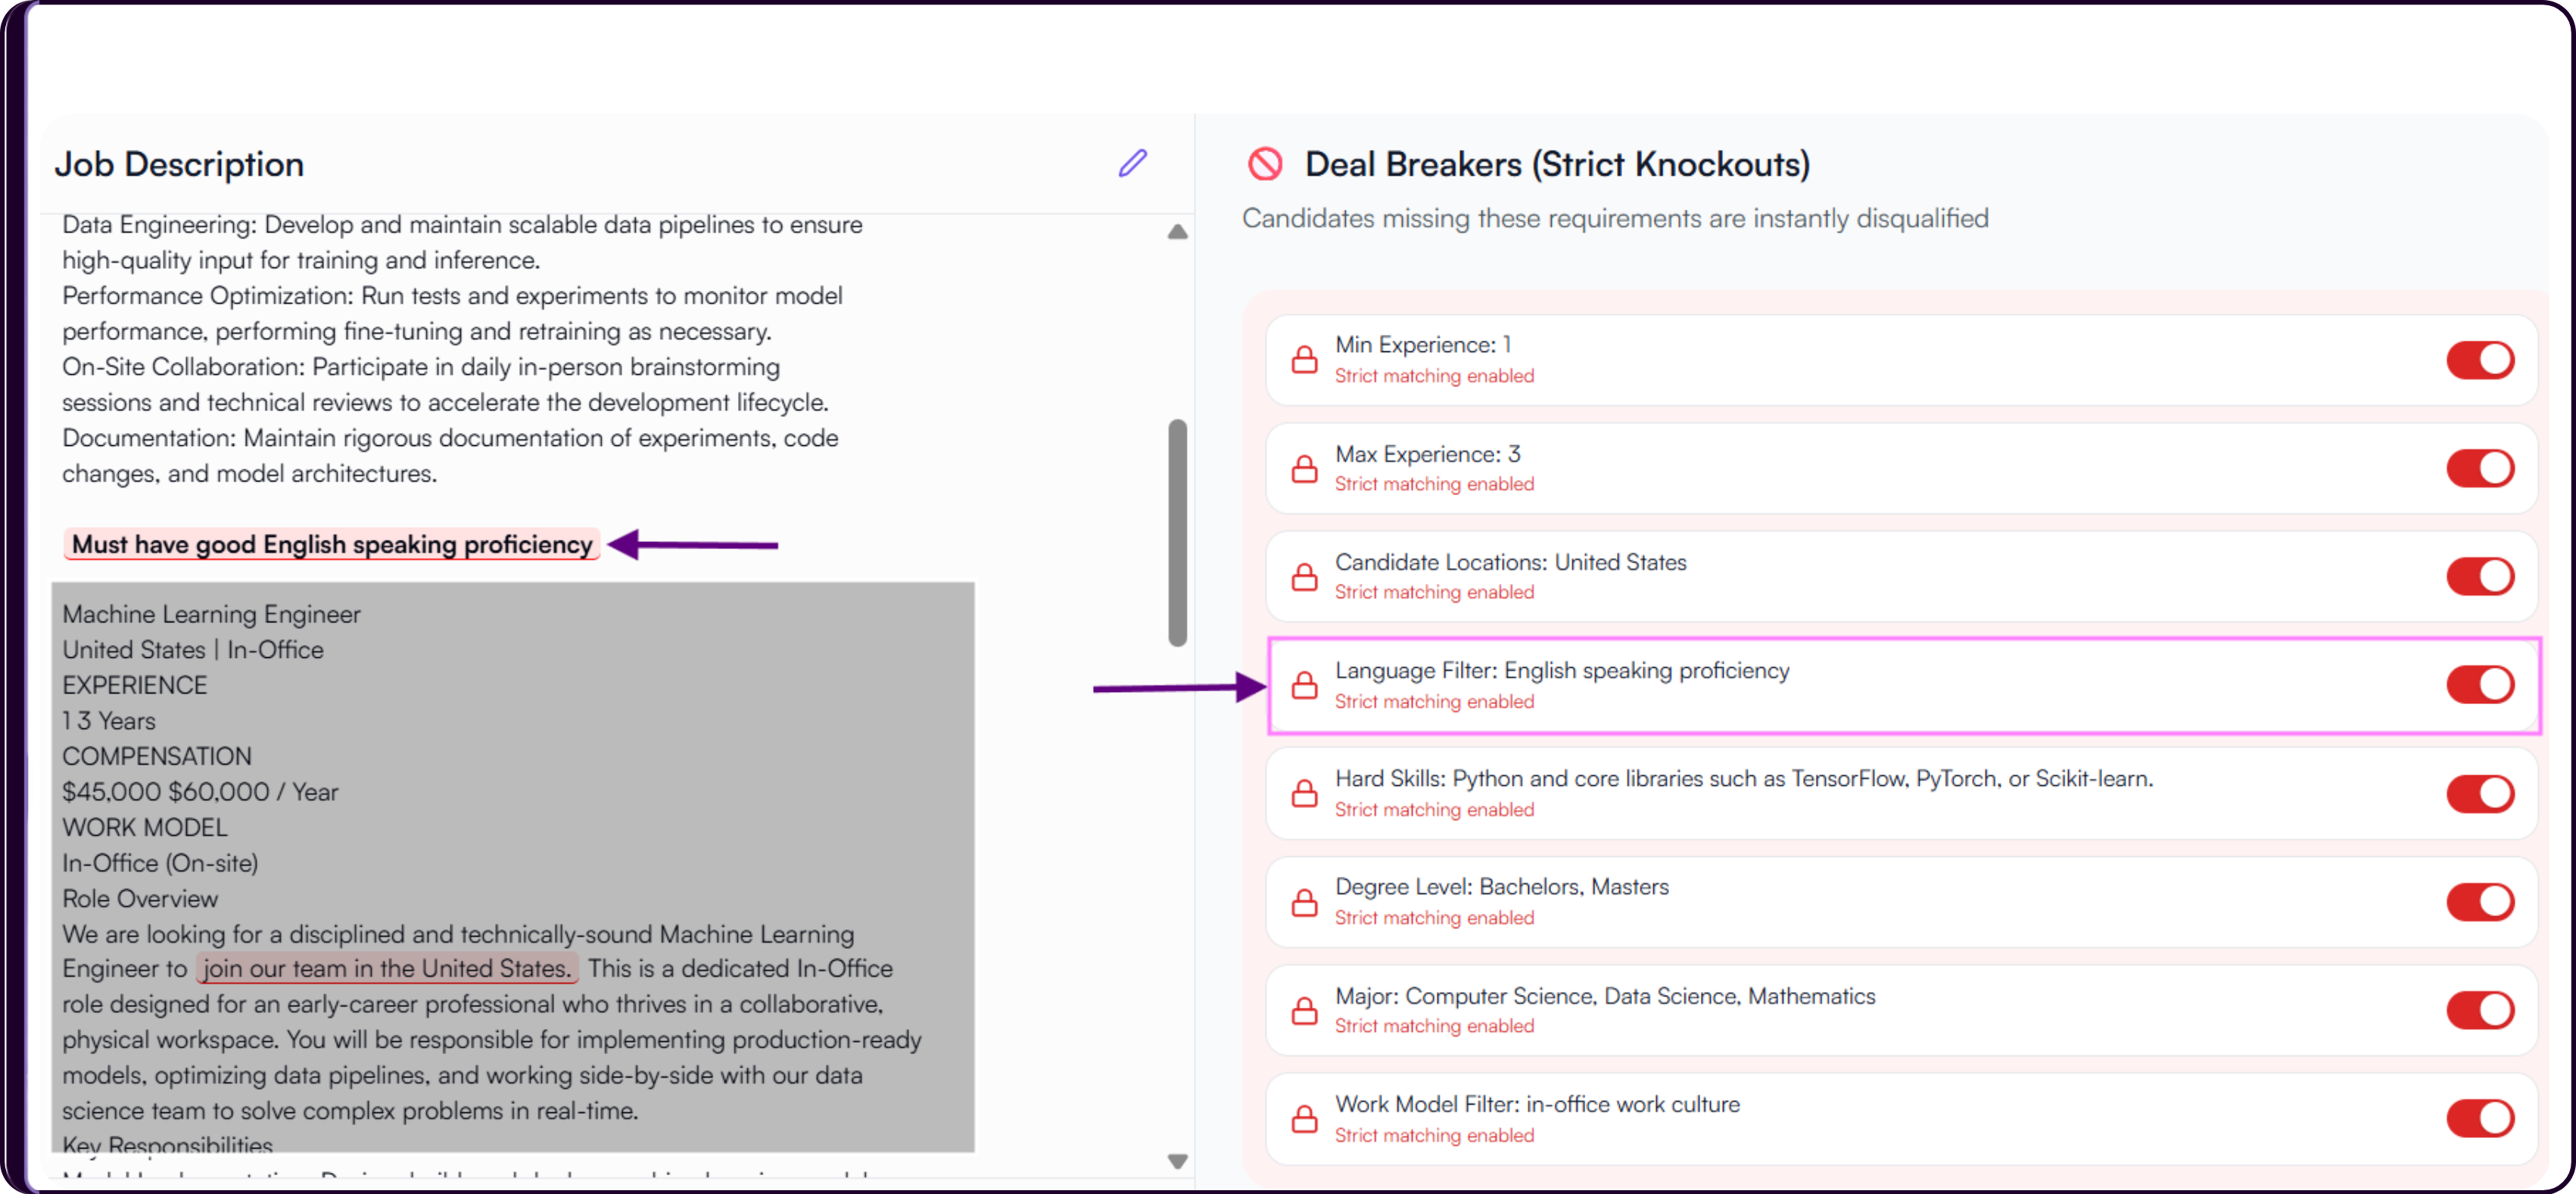
This is useful for adding requirements that may have been missed during AI generation or conditions that require stricter screening enforcement.
Example:
Must have strong English-speaking proficiencySkima AI detects these requirements and converts them into structured knockout filters during reassessment.
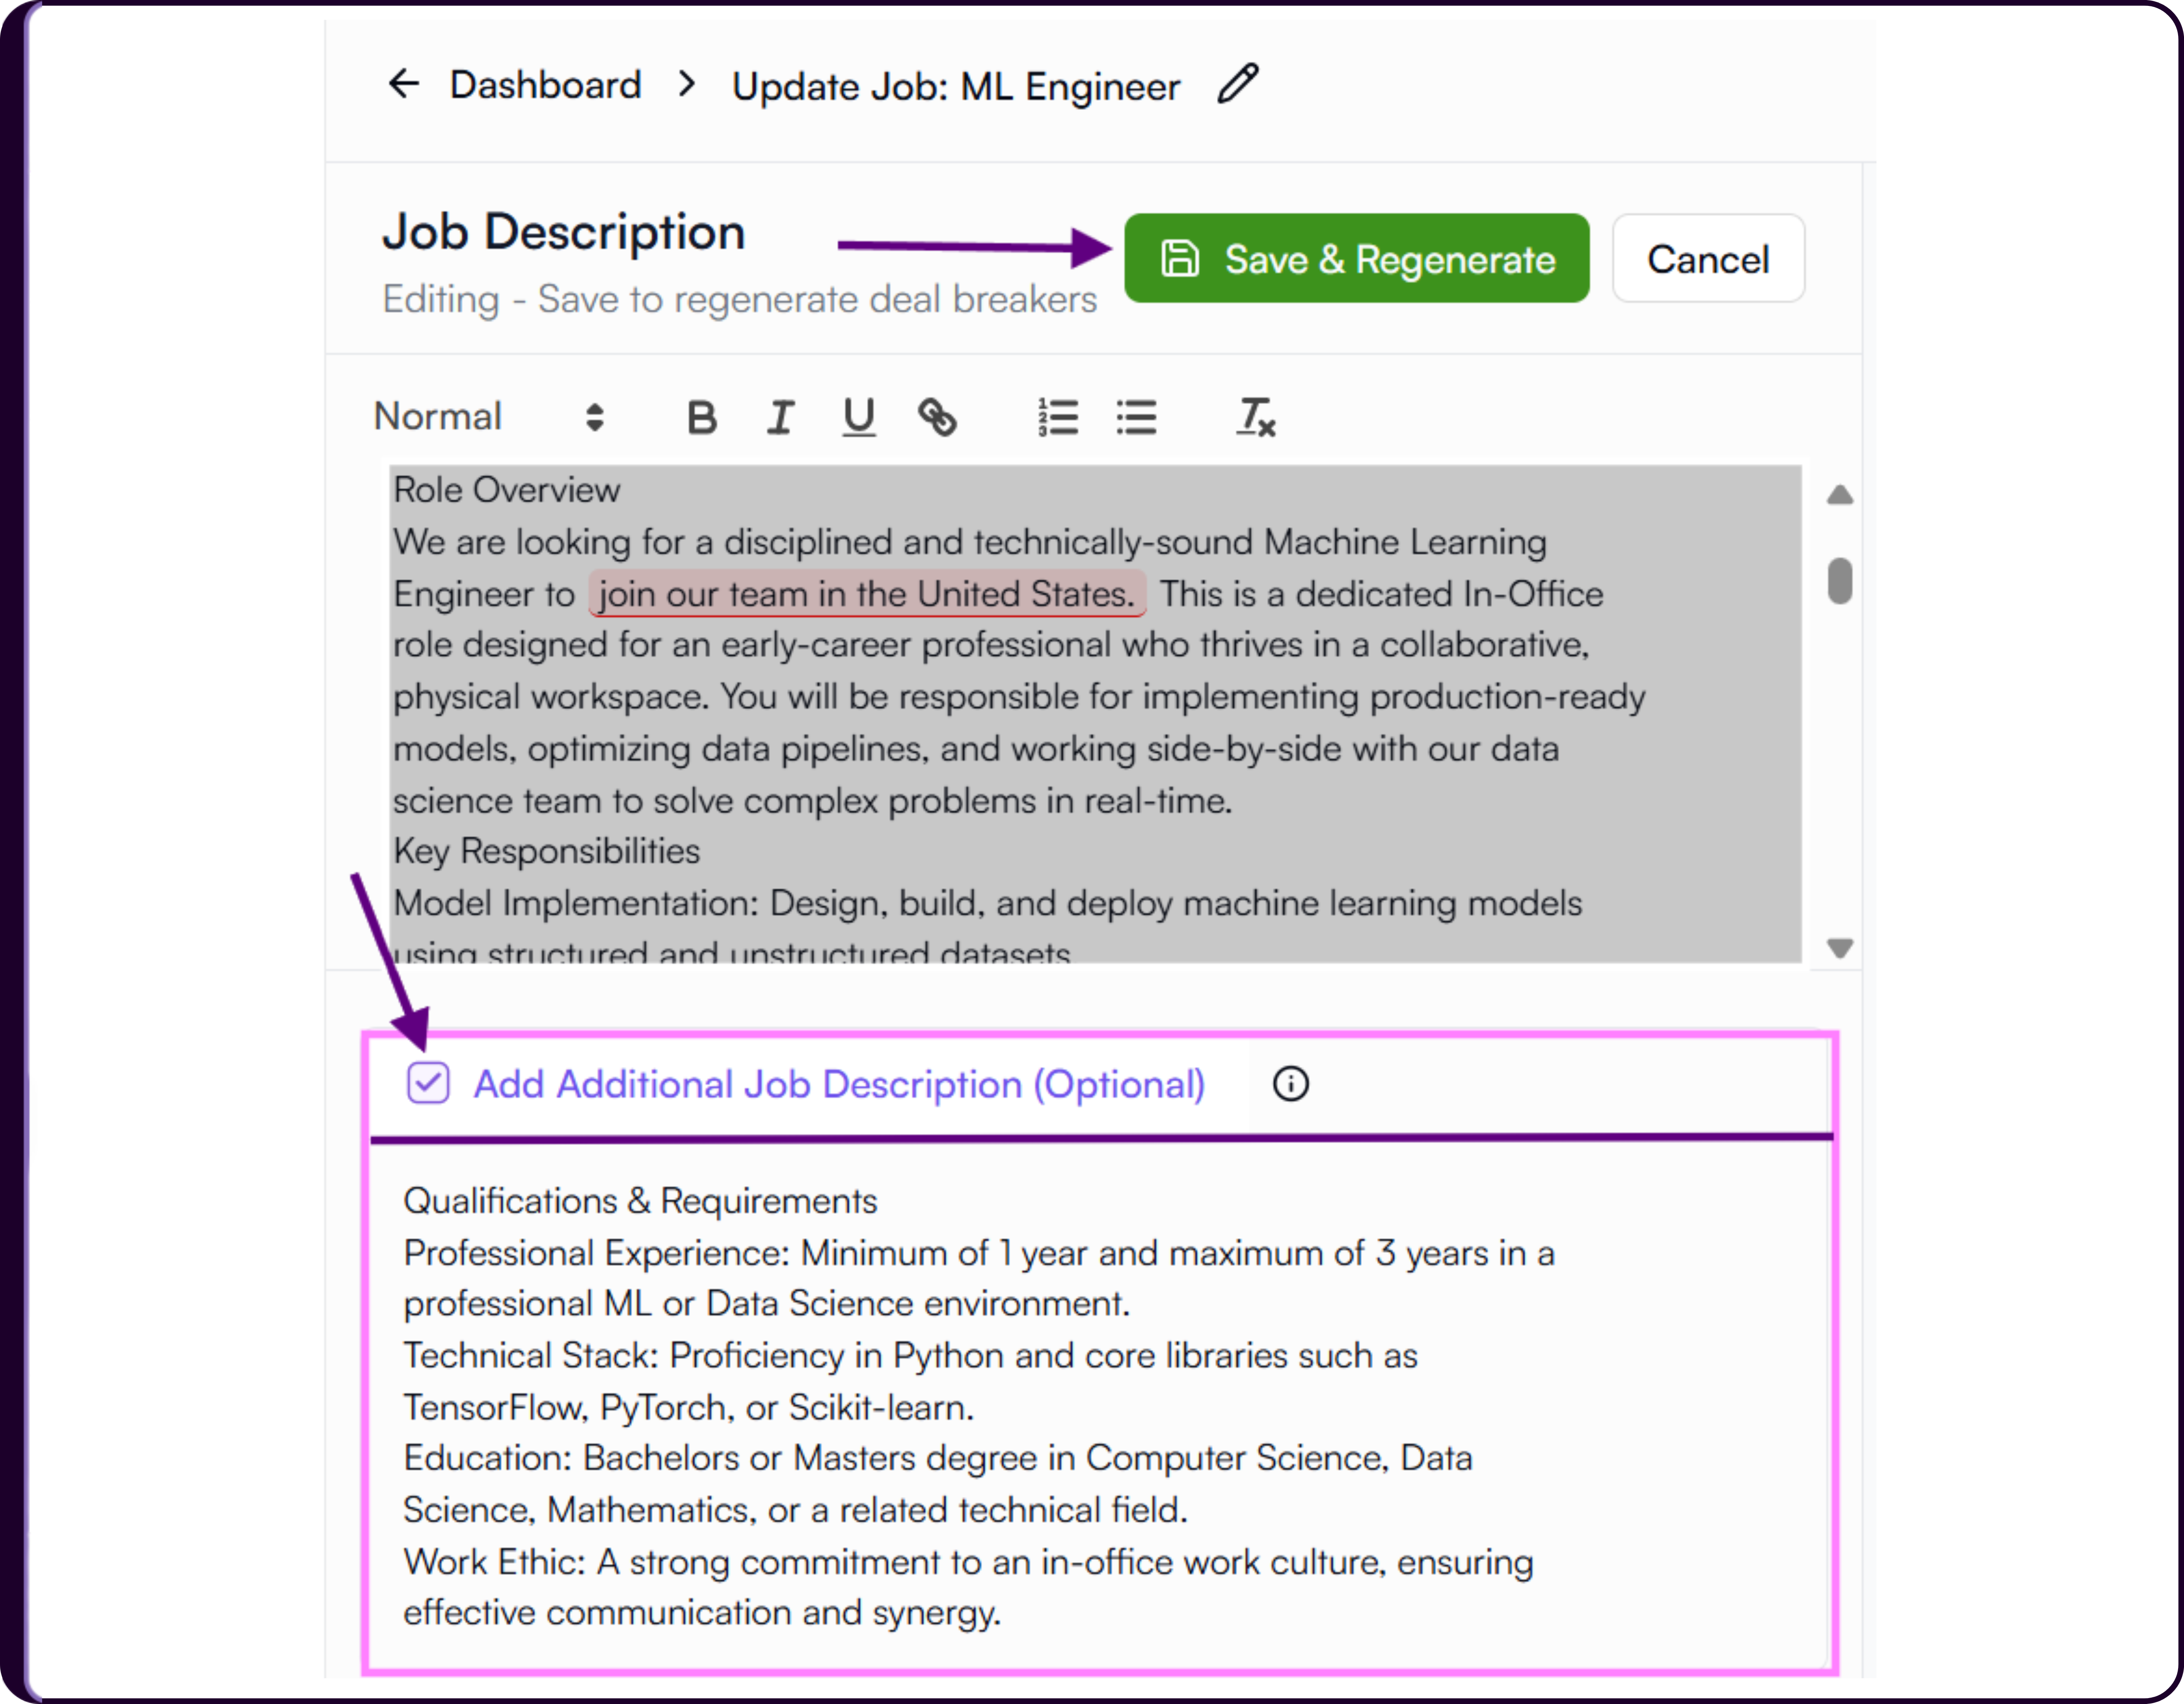
2. Add Additional Job Description Details
Inside the 'Edit Job Description' screen, recruiters can also add Additional Job Description details.
Anything written here is used only for internal screening purposes and is not visible to candidates.
This section is useful for adding hidden screening conditions, recruiter-only preferences, internal evaluation signals, or additional context that helps improve AI scoring accuracy without modifying the public Job Description.
Examples:
Prefer candidates from startup environments
Avoid candidates with short tenure history
Strong preference for enterprise SaaS exposureAdditional Job Description content is used only for internal AI screening and candidate scoring. Candidates cannot view this information.
3. Save and Regenerate
After making changes to the Job Description, click on 'Save and Regenerate'.
Skima AI will reassess the role, update scoring logic, recreate knockout filters, improve candidate matching criteria, and refresh screening conditions.
4. Apply the Screening Logic
Once calibration is complete:
- Click on 'Apply and Score Candidates'.
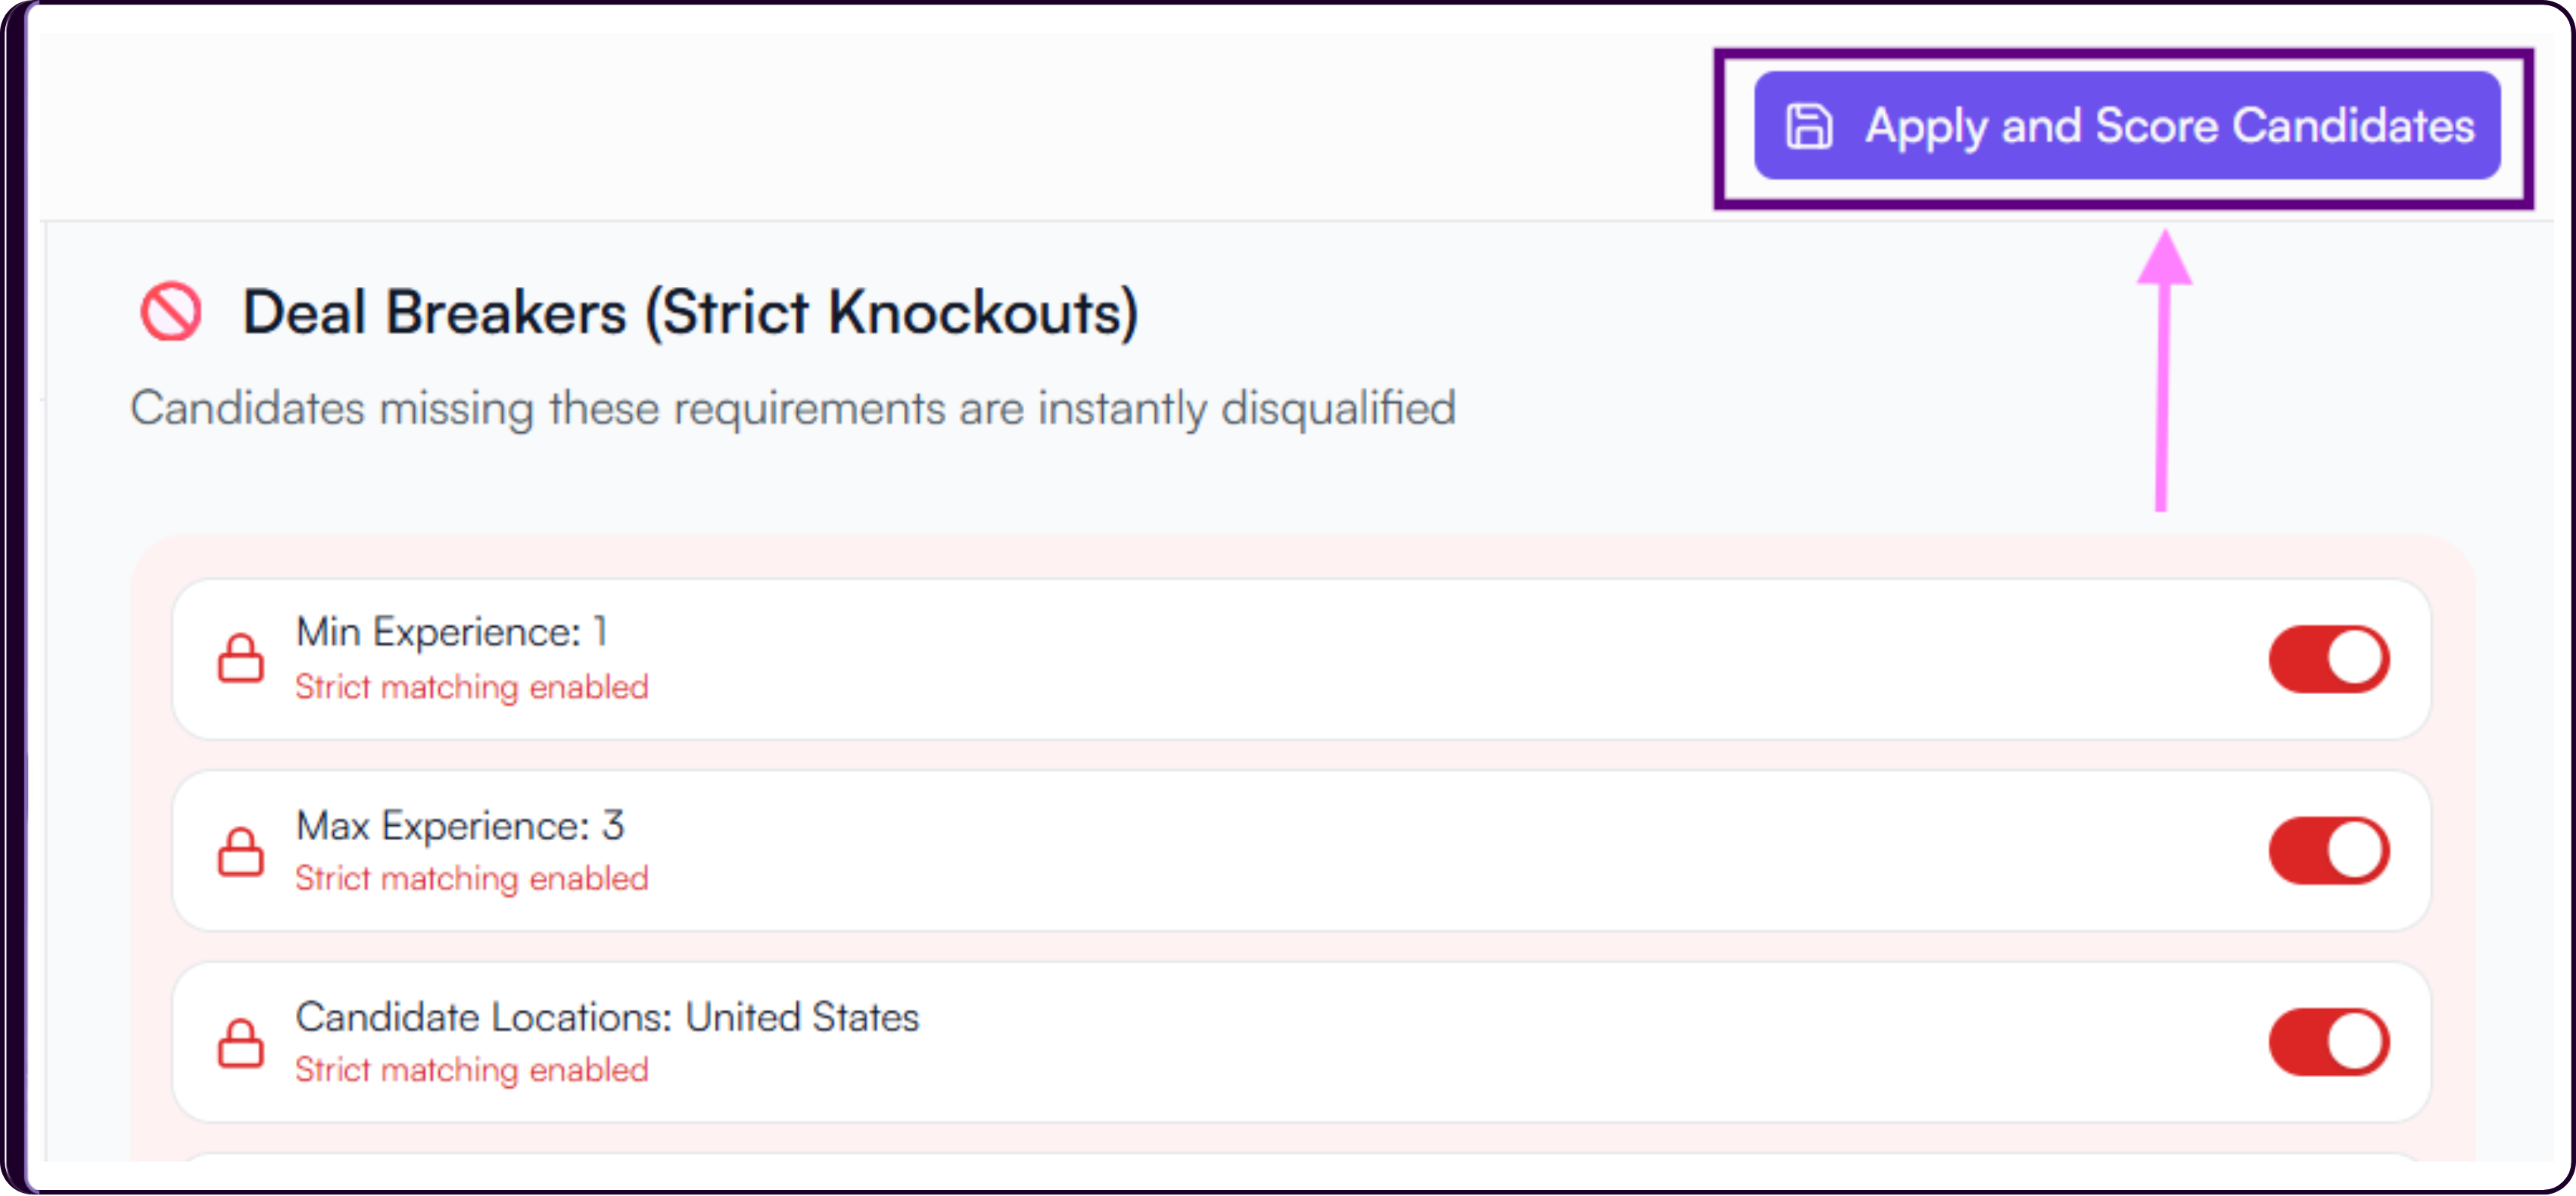
Skima AI will apply the updated scoring and knockout logic to candidates.
You will then be redirected to the 'View Candidates' page.
5. Re-Edit the Job Description Anytime
The Job Description can be updated whenever hiring requirements change.
Open the job.
Navigate to the 'View JD' tab.
Click on 'Edit Job Description'.
Save and regenerate again whenever needed.
Review candidate quality after recalibration. If too many strong candidates are being disqualified, your knockout conditions may be too strict.
Add Candidates to the Job
Once the screening logic is applied, you will land on the View Candidates page.
If no candidates have been added yet, you will see an empty state prompting you to upload candidates for screening.
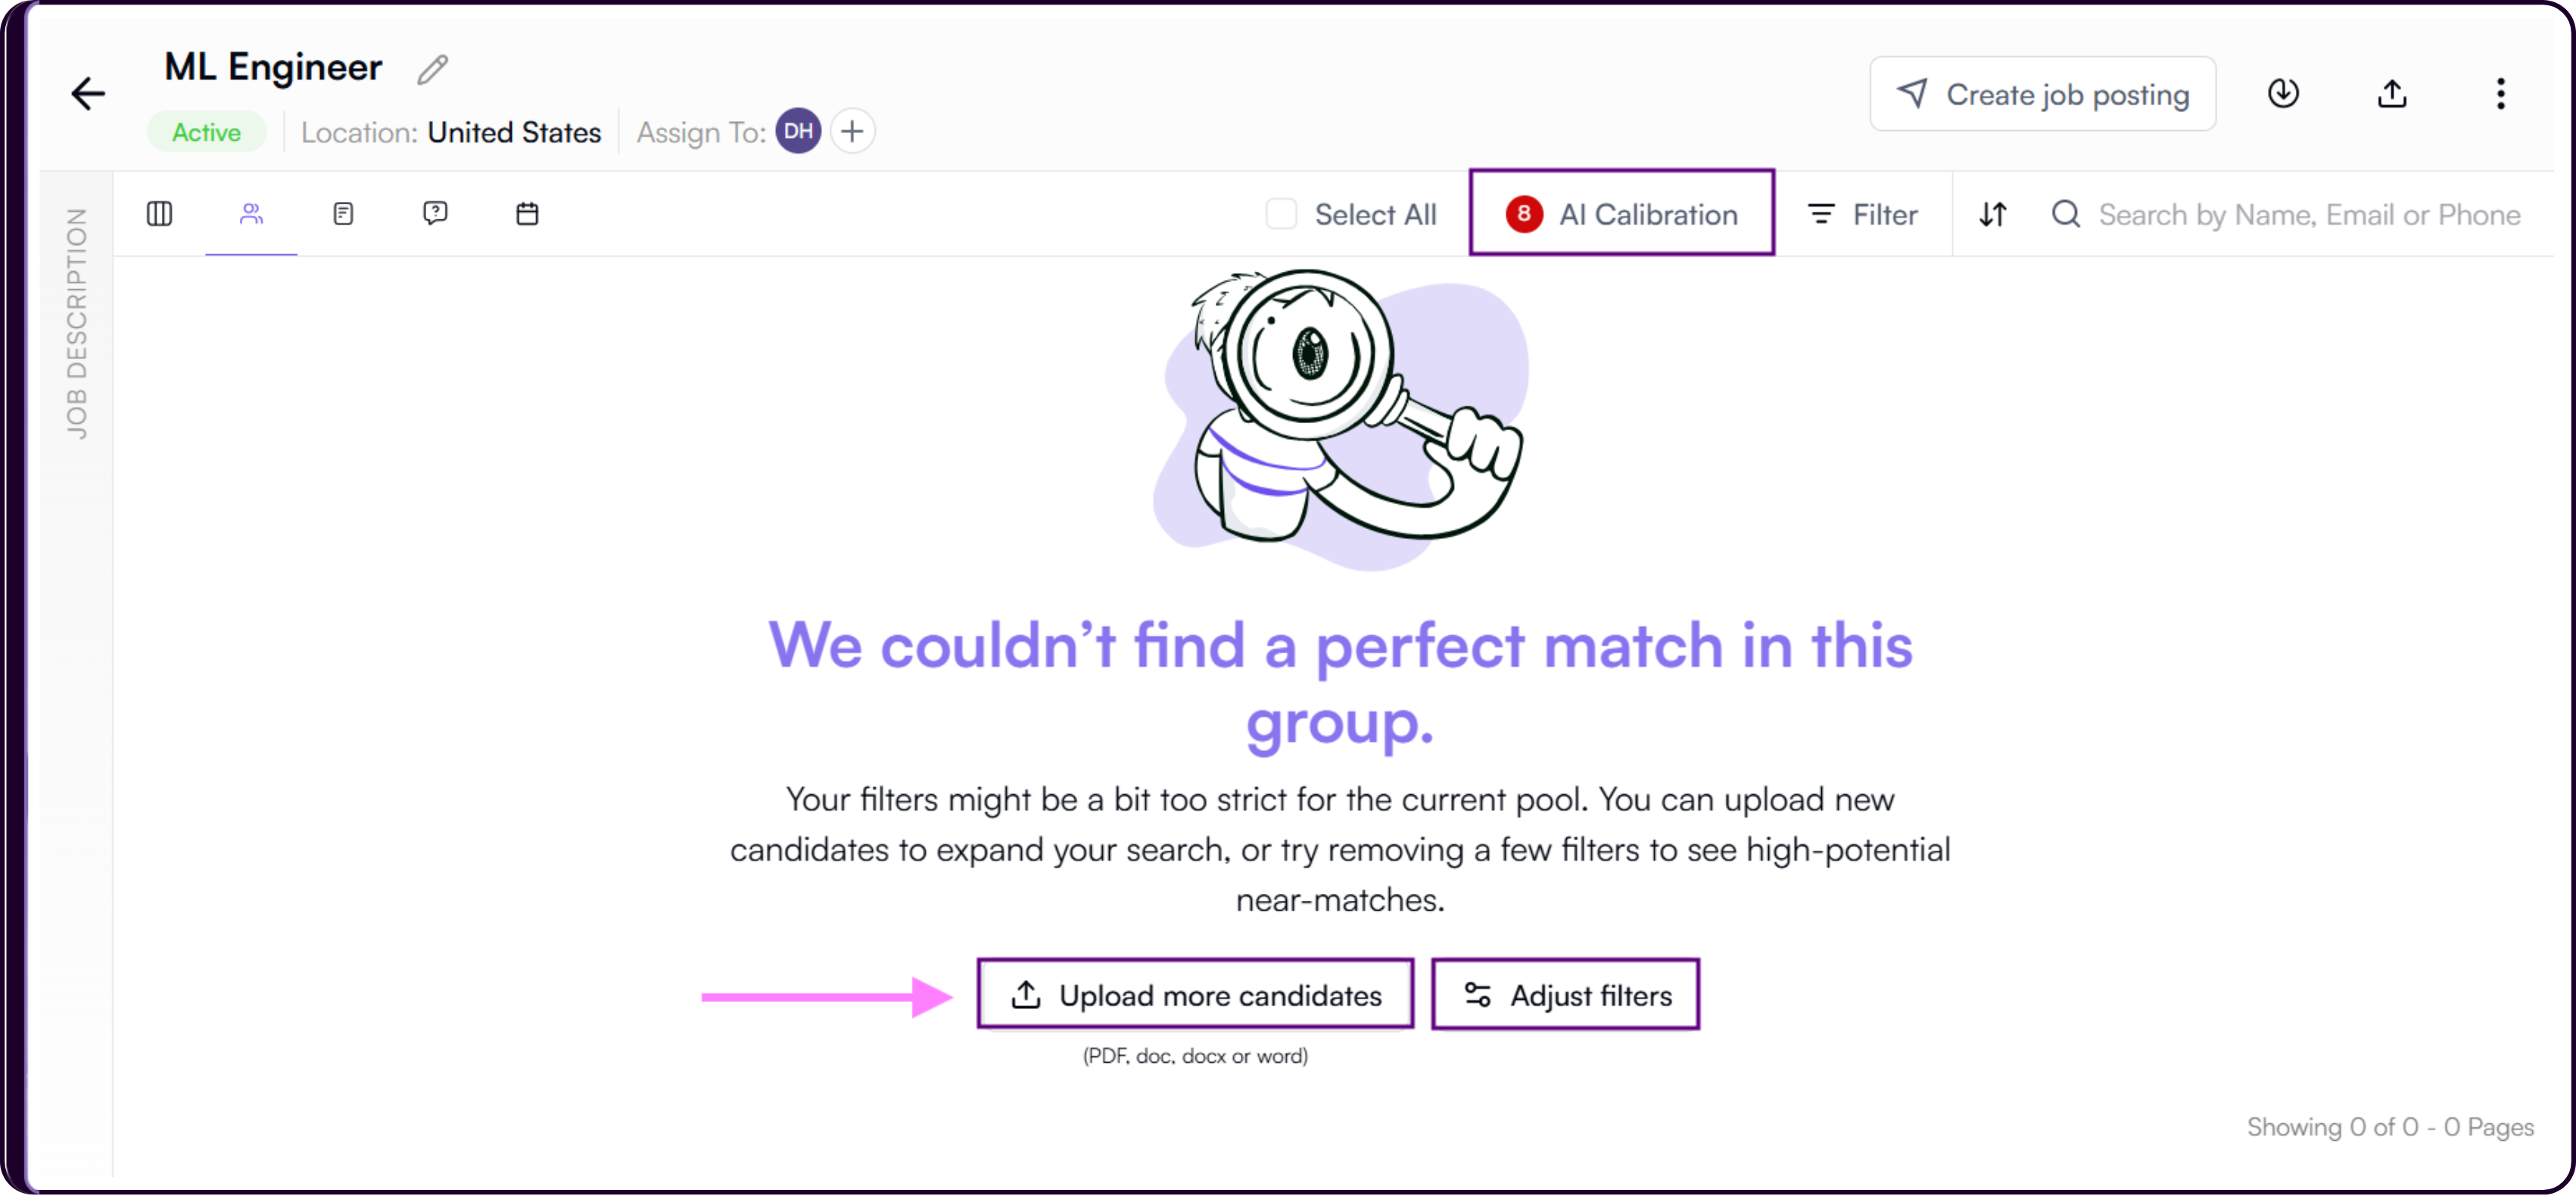
Upload Candidates
Click on 'Upload More Candidates'. An 'Upload Resumes' modal will appear where you can enter a batch name and upload resumes from your system.
Supported formats include:
PDF, DOC, DOCX & WordYou can upload up to 50 resumes at a time.
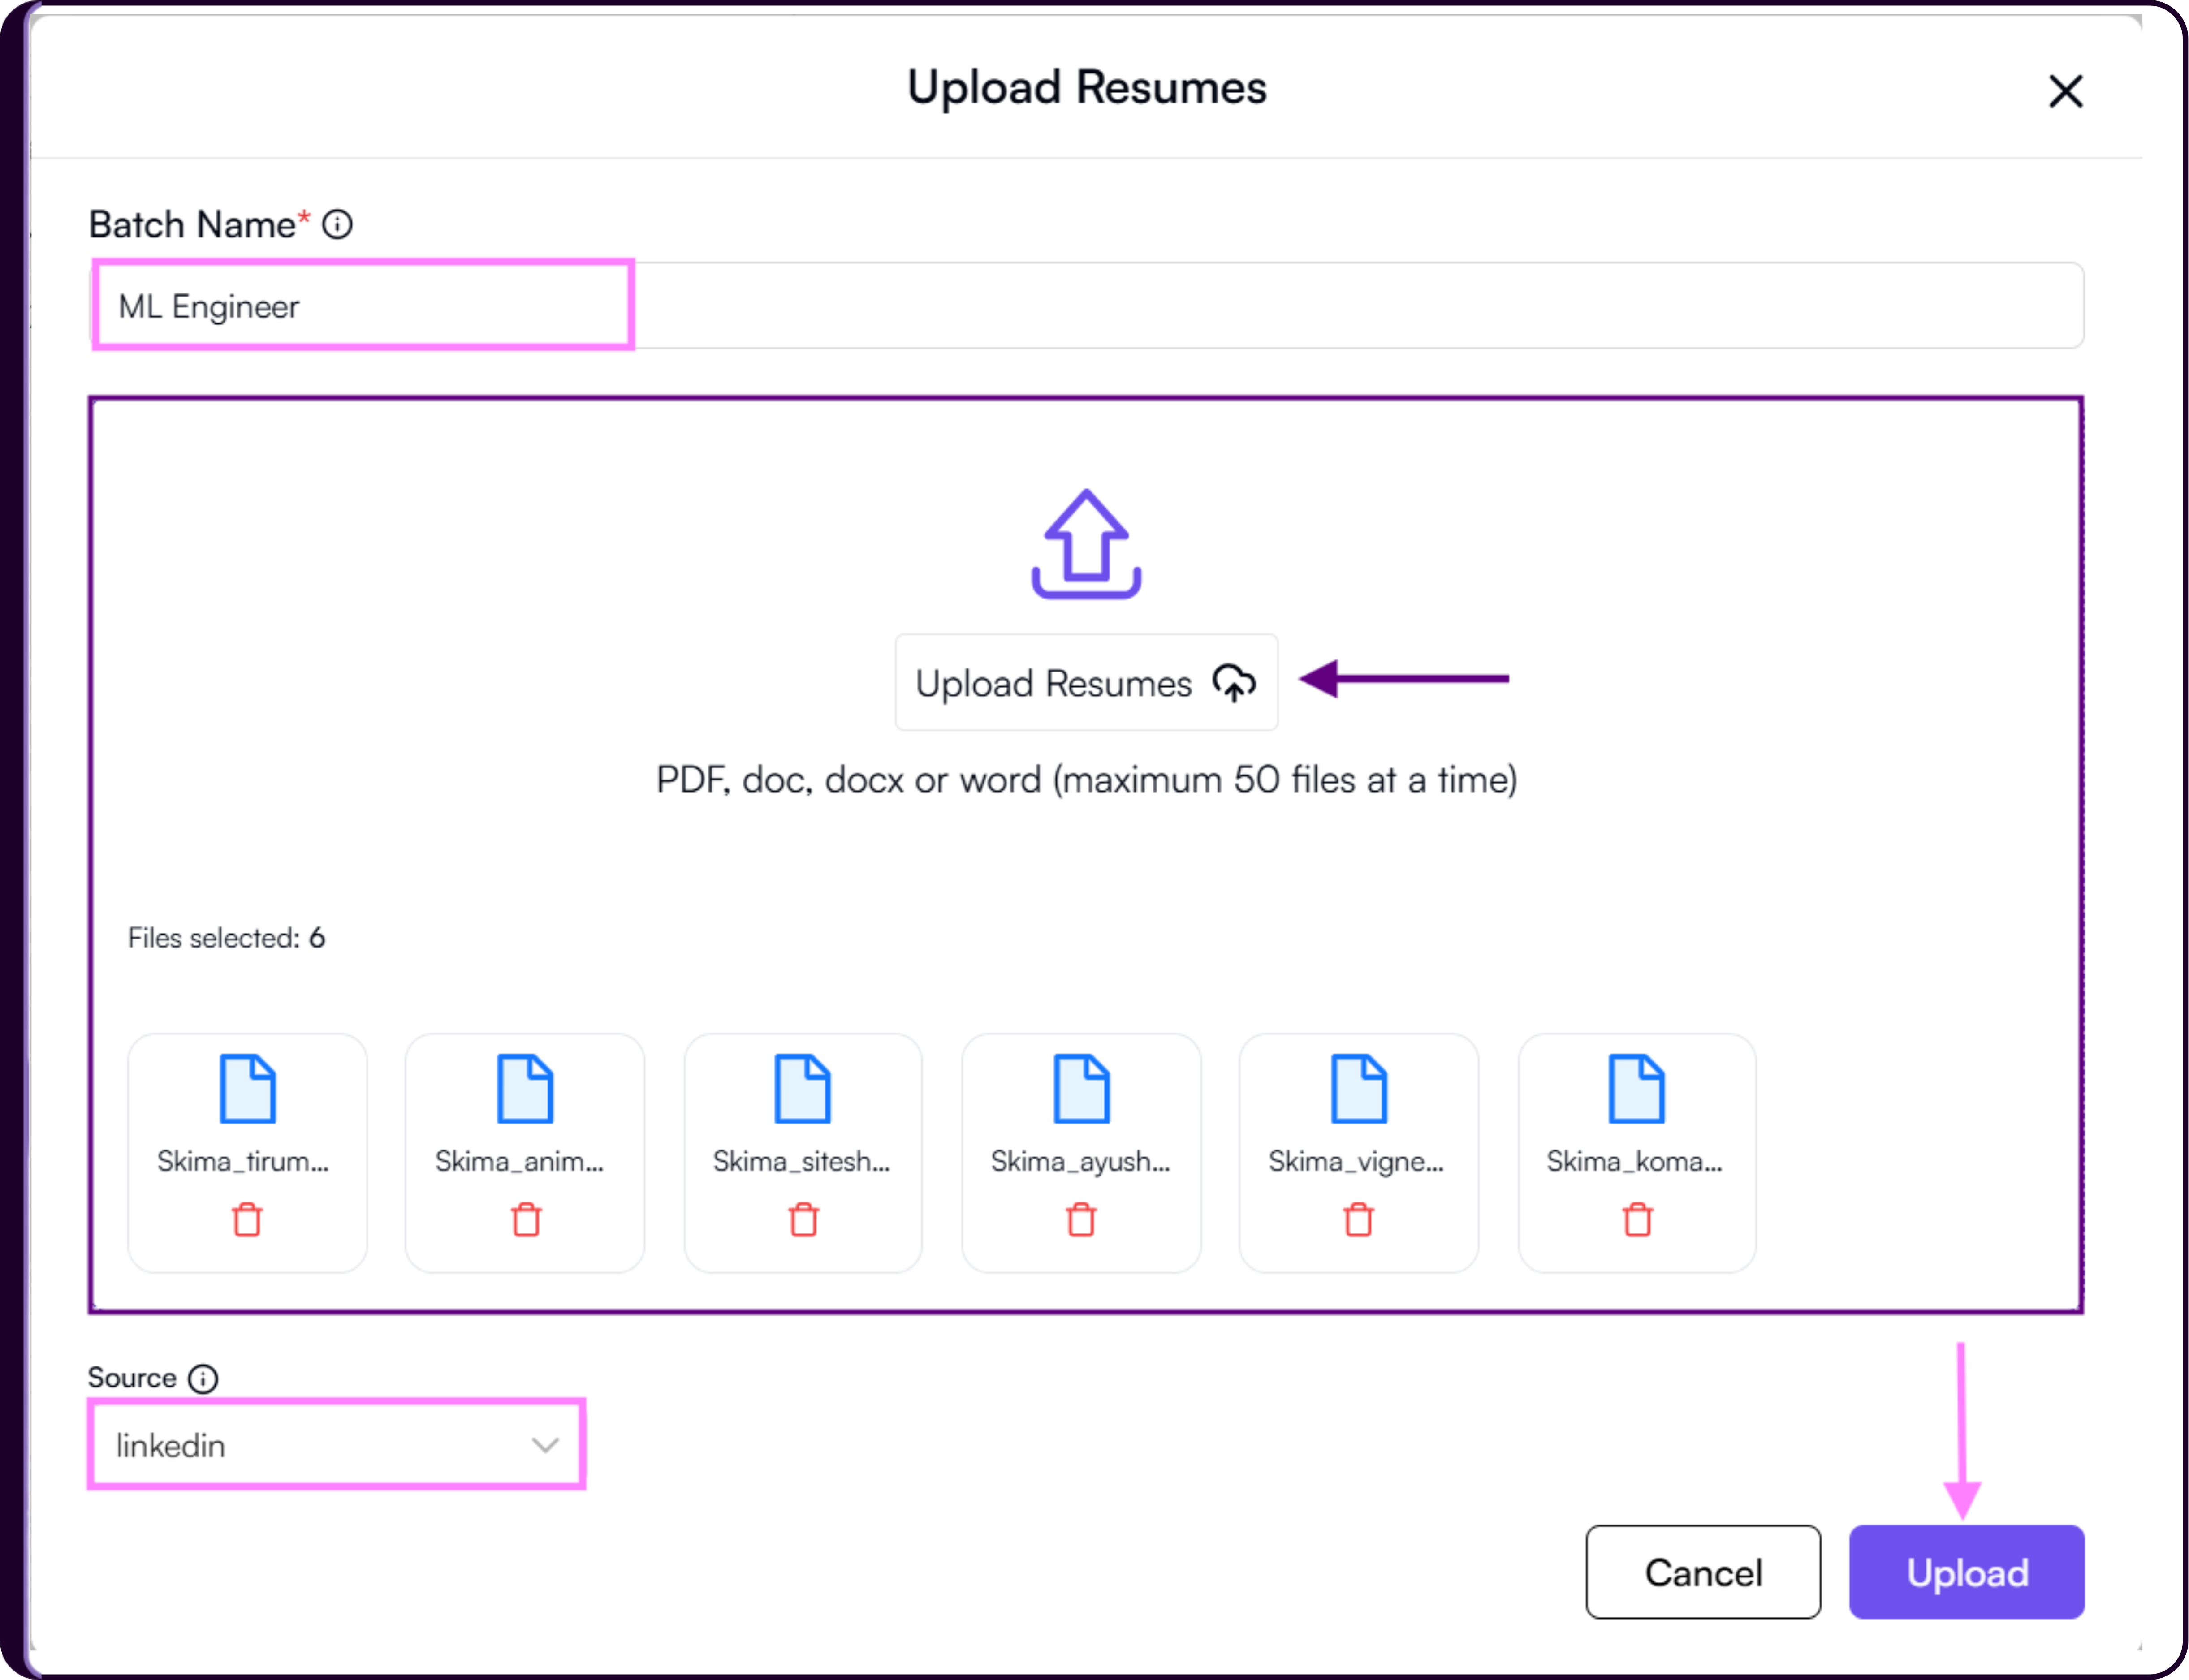
Select Candidate Source
Choose the candidate source from the dropdown before uploading resumes.
Examples include:
LinkedIn
Indeed
This helps recruiters track sourcing quality and analyze candidates based on where they were sourced from.
Upload and Screen Candidates
Click on 'Upload' to begin processing candidates.
Skima AI will automatically parse resumes, score candidates, apply knockout filters, rank applicants, and identify disqualified candidates based on:
- The Job Description
- AI Calibration logic
- Knockout filters
- Additional JD conditions
Review Disqualified Candidates
Candidates who fail knockout conditions will display a 'Disqualified' tag.
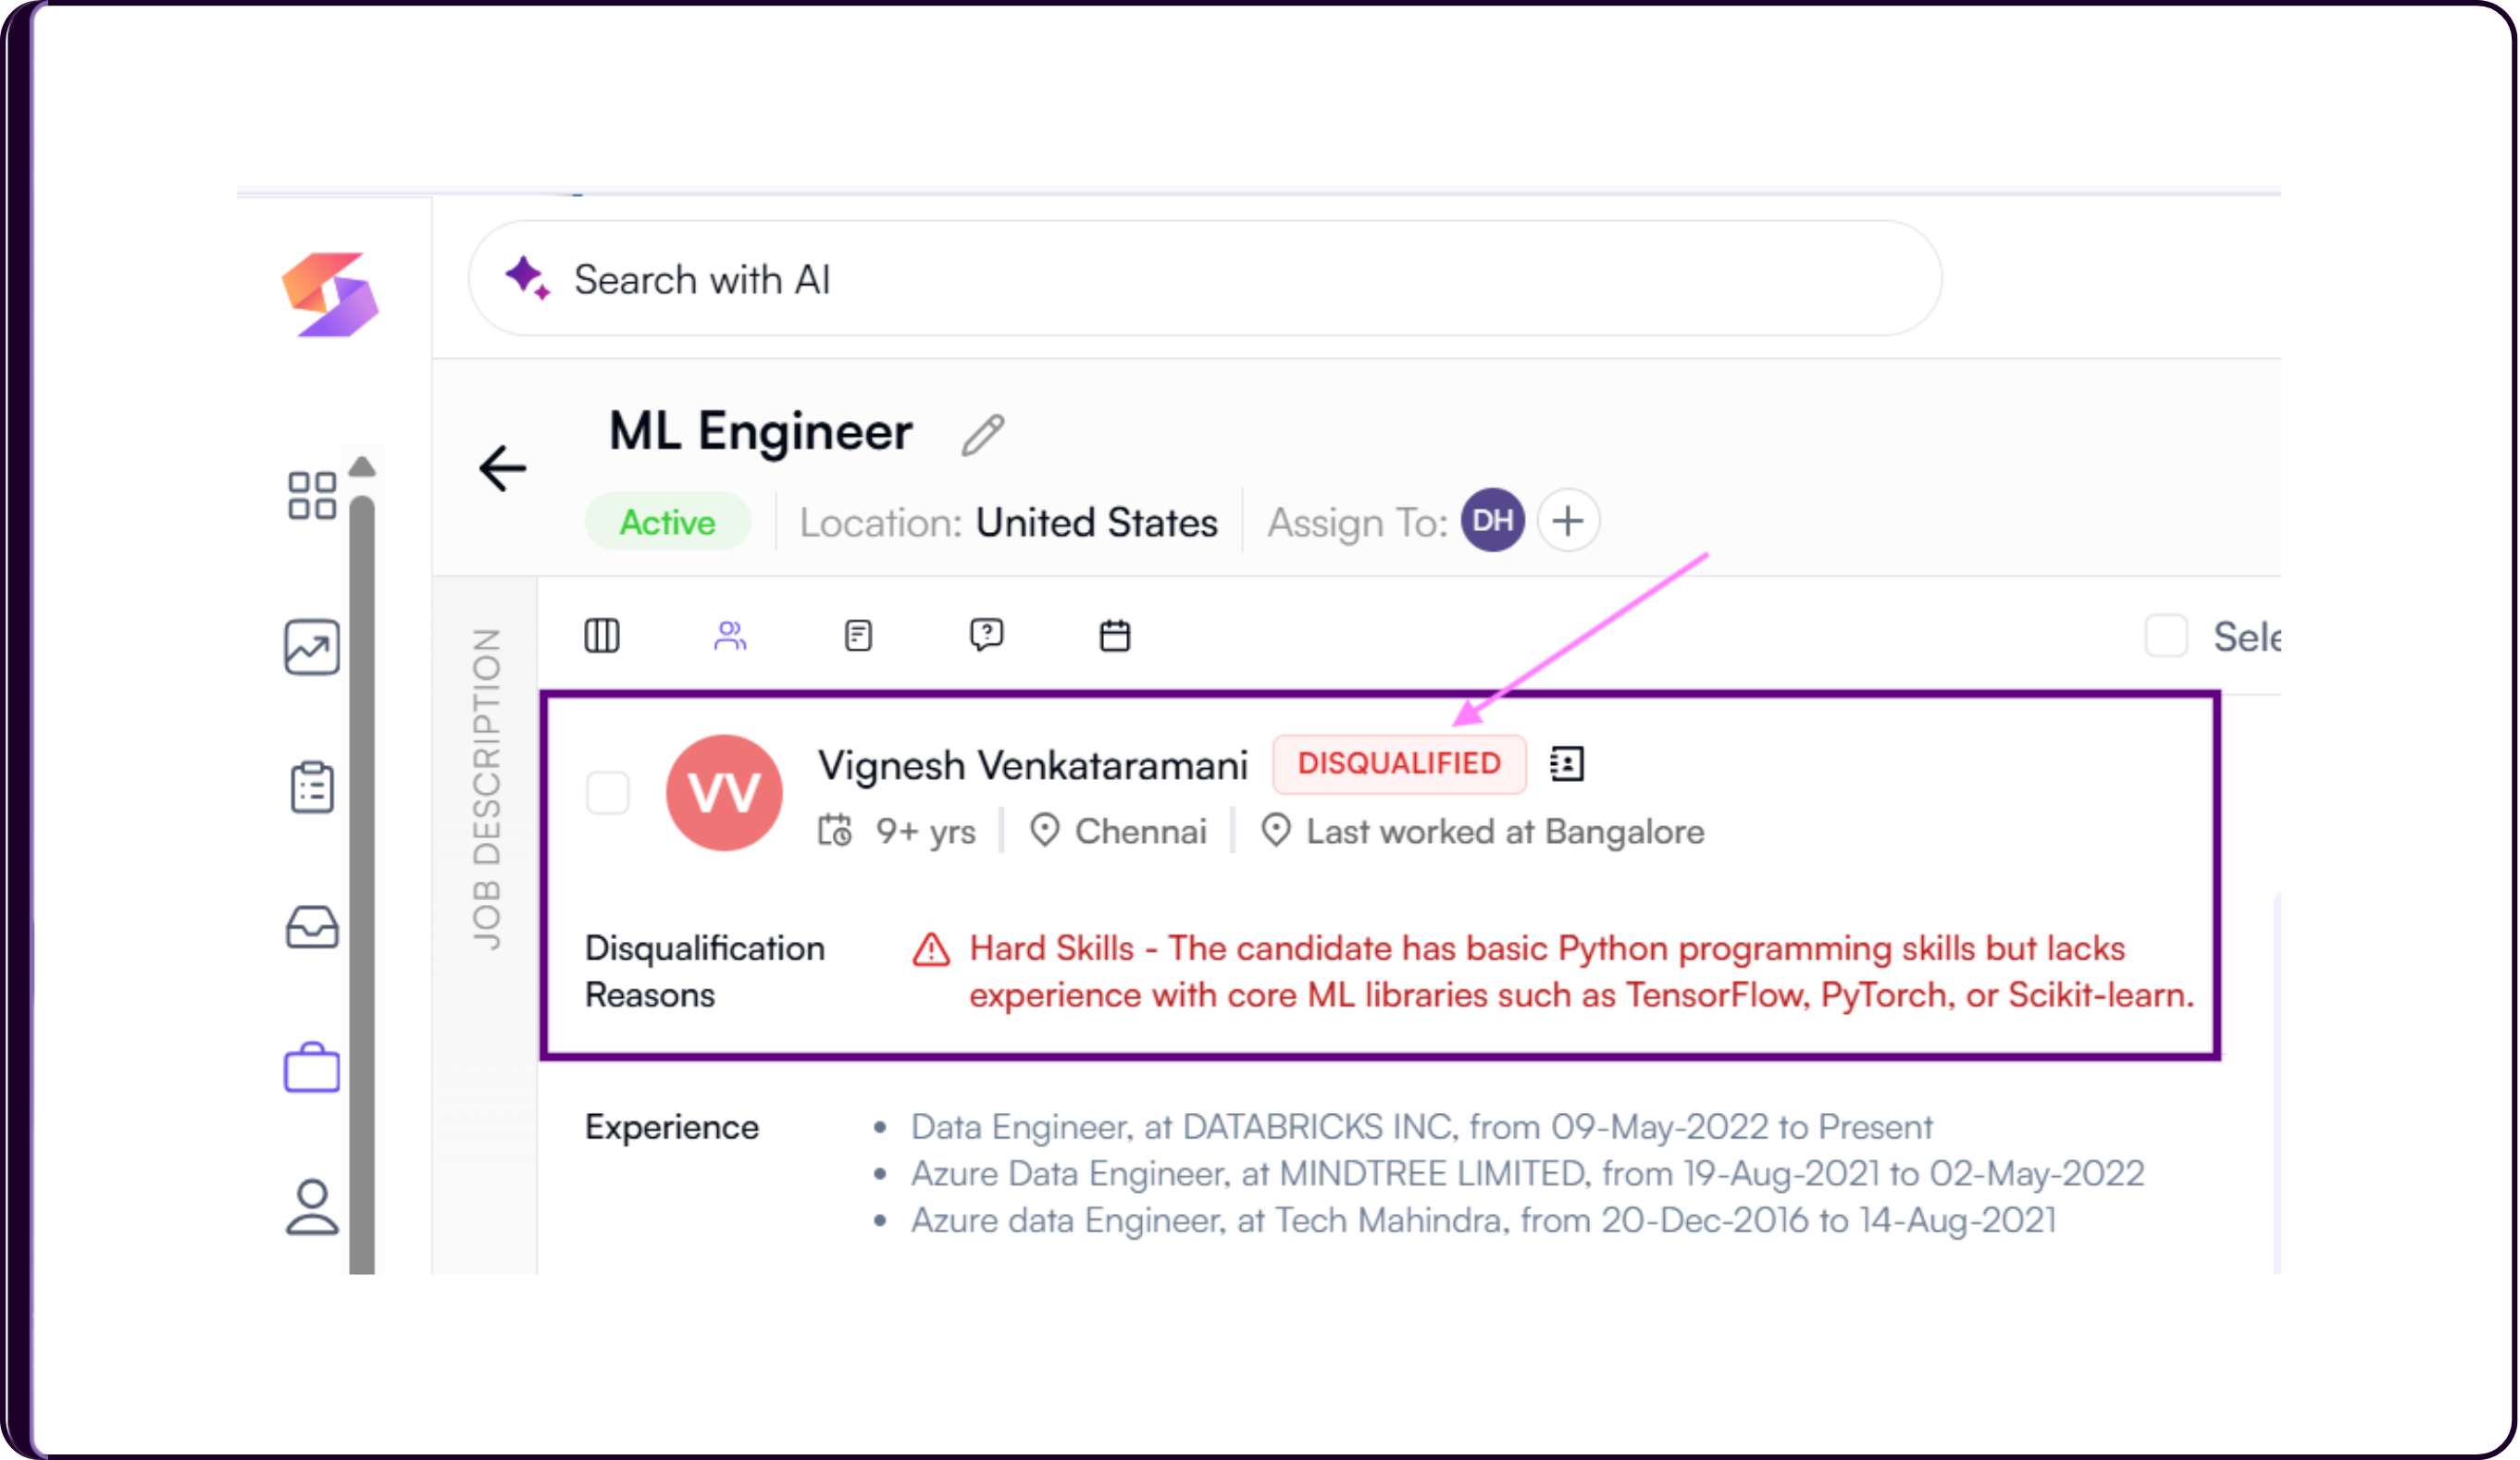
Each disqualified candidate includes a detailed explanation describing which knockout condition failed and why the candidate was removed from the qualified pool.
Disqualified candidates are automatically pushed below qualified candidates in the ranking list, helping recruiters prioritize high-fit candidates faster while maintaining transparency in AI screening decisions.
AI Calibration and knockout filters work only on the basis of information available in the Job Description and candidate skill evidence found in resumes or public candidate data. Missing or non-public information cannot be considered during screening.
Deleting Jobs in Skima AI
Jobs that are no longer active or required can be removed directly from the Jobs page. Deleting a job removes the associated workflow from your active jobs list and helps recruiters keep the workspace organized.
Steps to Delete a Job
Navigate to the 'Jobs' list page.
Find the job you want to delete.
Under the 'Actions' column, click on the three dots menu.
Click on 'Delete Job'.
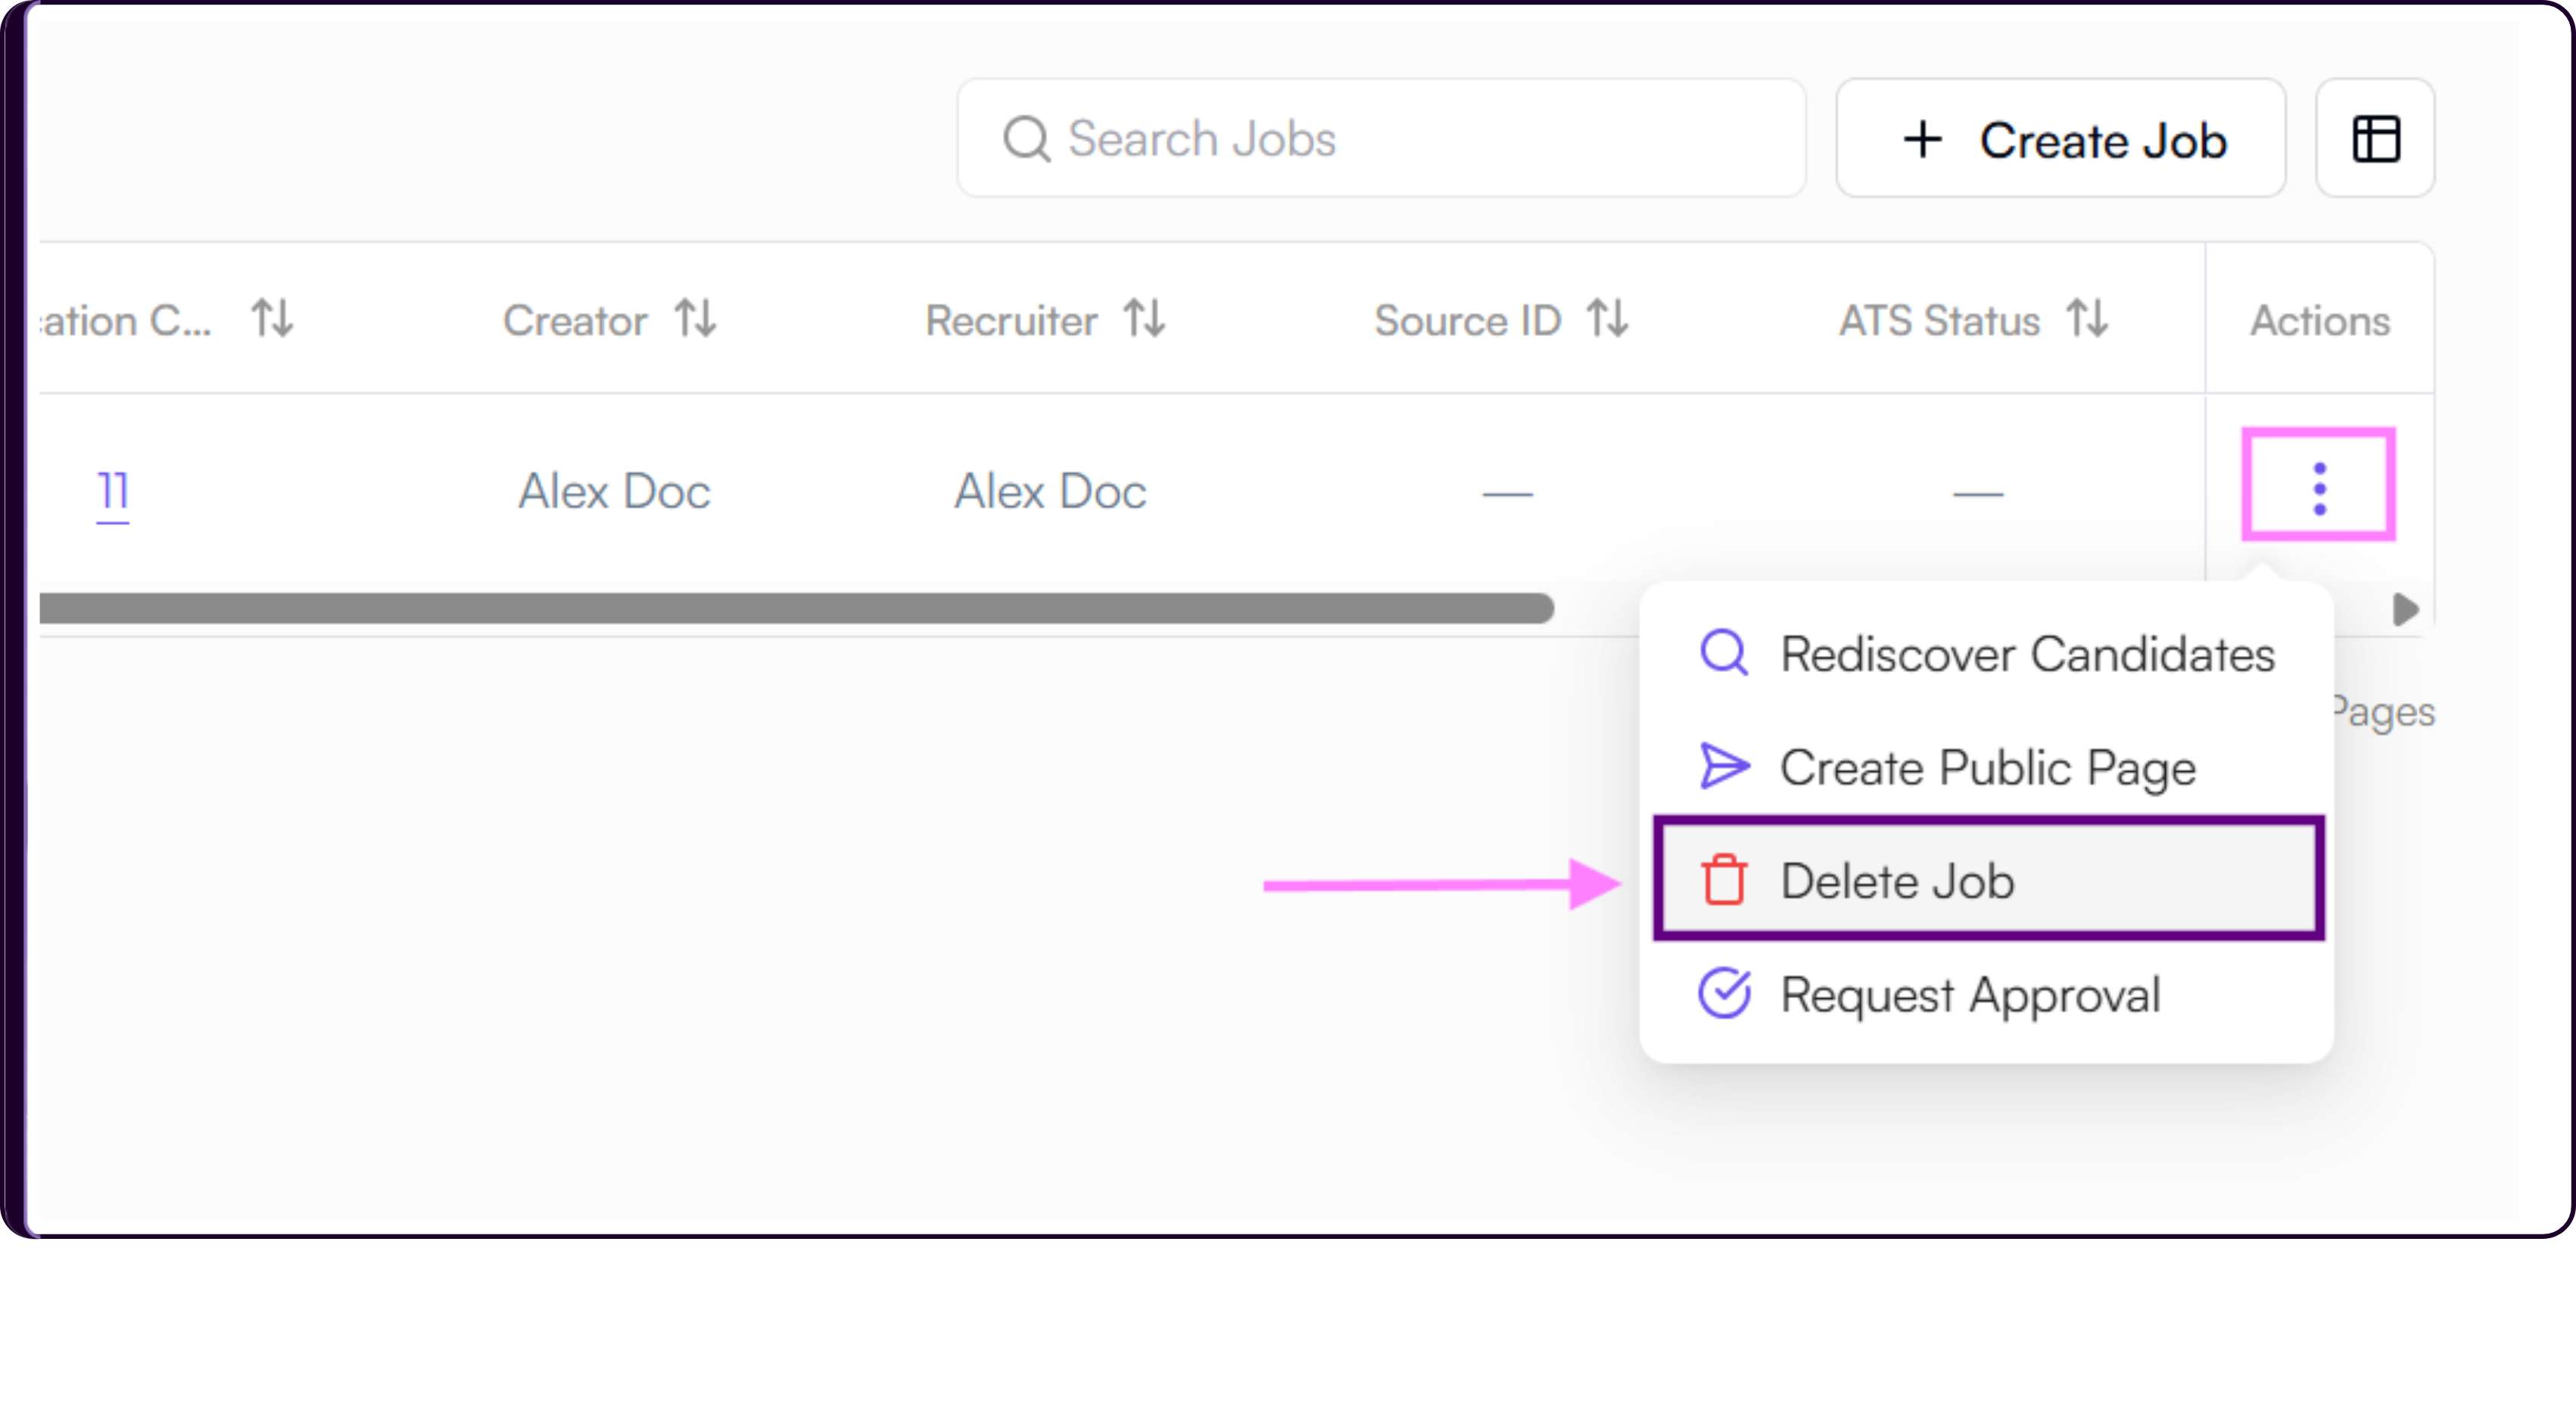
A confirmation message will appear asking you to confirm the deletion.
Click on 'Yes' to proceed.
The job will now be deleted successfully.
Deleting a job is a permanent action. Make sure the role is no longer required before confirming deletion.