My Tasks
The Tasks section helps recruiters manage daily hiring actions and automate repetitive workflows without manual follow-up. Whether it's a one-off reminder or an AI-driven rule that triggers automatically based on candidate activity, everything is managed from one place.
Navigate to 'Tasks' from the left sidebar. The page is split into two tabs: Today's Task and Automated Tasks.
Today's Task Tab
The Today's Task tab displays all tasks due for the day, organised into three priority sections: High Priority, Medium Priority & Low Priority.
If no tasks exist in a section, Skima AI shows an empty state for that priority level.
The header controls available on this tab are:
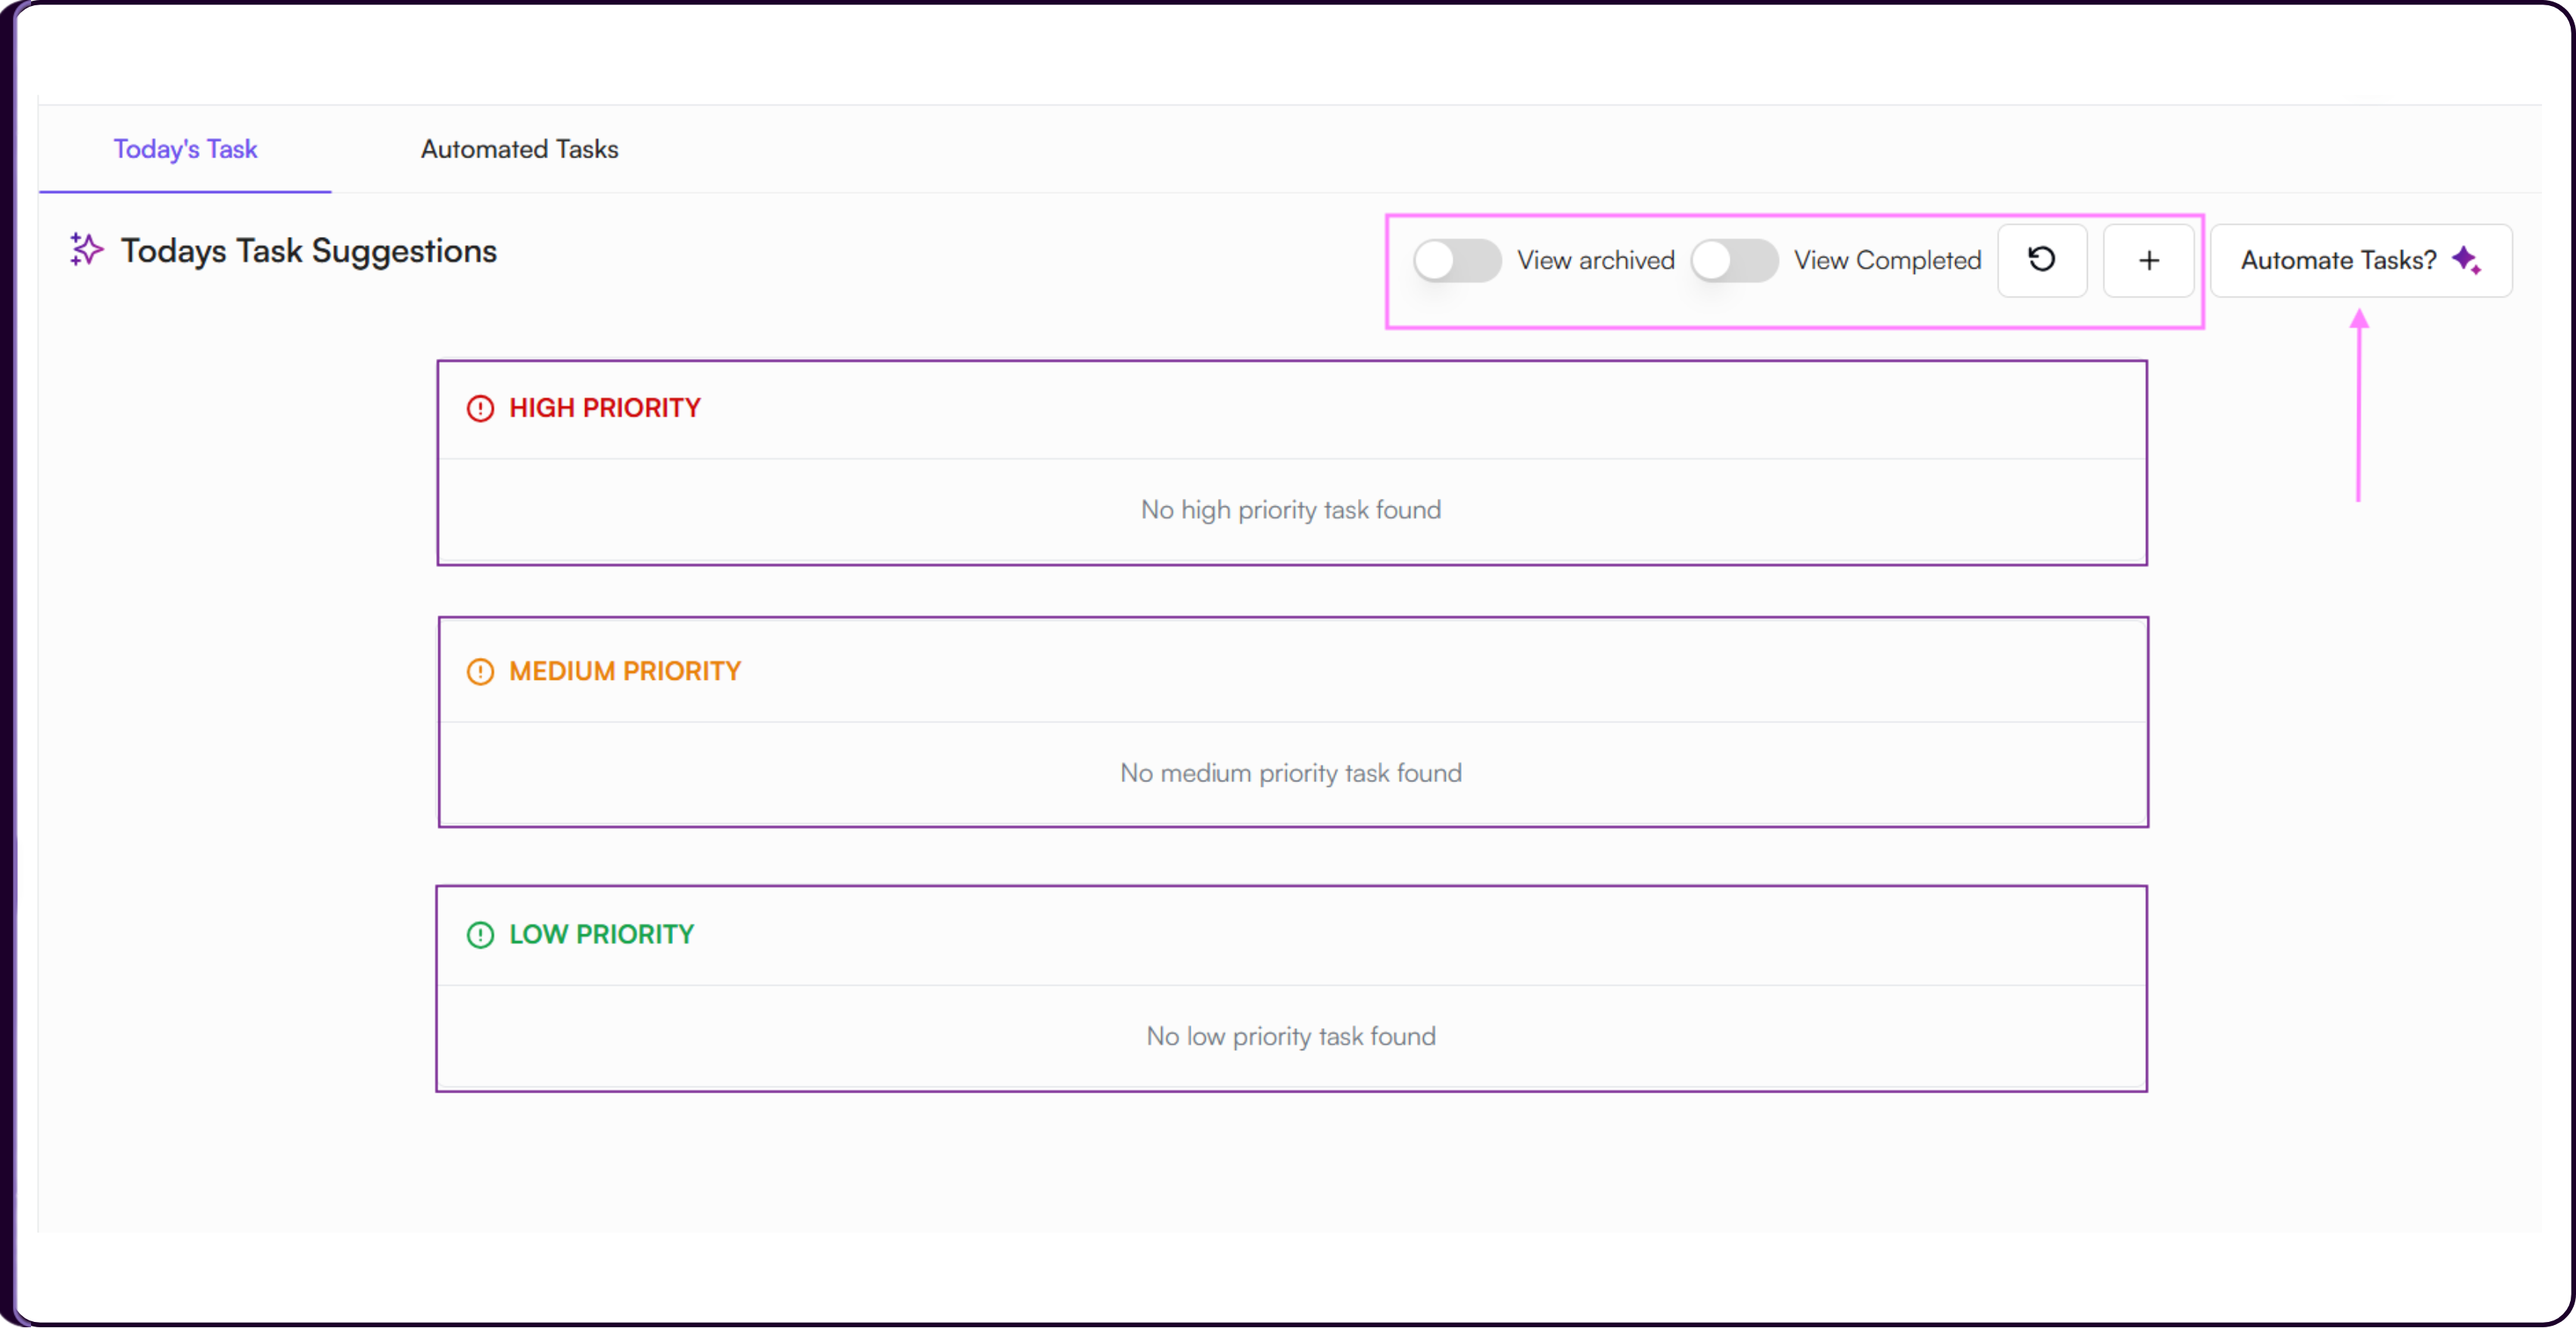
i) View Archived to access tasks you have archived
ii) View Completed to see tasks already marked as done
iii) Refresh button to reload the task list
iv) '+' button to add a new manual task
v) 'Automate Tasks?' button to set up AI automation rules
Today's Task Suggestions
Skima AI dynamically generates task suggestions based on real-time hiring activity across your workspace. Each suggestion is prioritised by urgency so you always know what needs attention first. Click on any suggested task to view its full details.
| Task | Created When |
|---|---|
| Review High-Match New Candidates | New applications in last 24 hrs with AI score above 90% |
| Follow Up for Delayed Review | Candidate in Hiring Manager Review for 48 to 72 hrs without update |
| Schedule Pending Interviews | Candidate moved to Interview stage but no schedule set after 24 hrs |
| Action Stale Applications | Candidate in first stage for 3 or more days |
| Follow Up After Interviews | Interview completed 24 hrs ago with no feedback recorded |
| Source Candidates for Aging Roles | Job open for 45 or more days with 10 or fewer qualified applicants |
Adding a Manual Task
Click the '+' button in the top-right of the Today's Task tab to open the Add New Task modal.
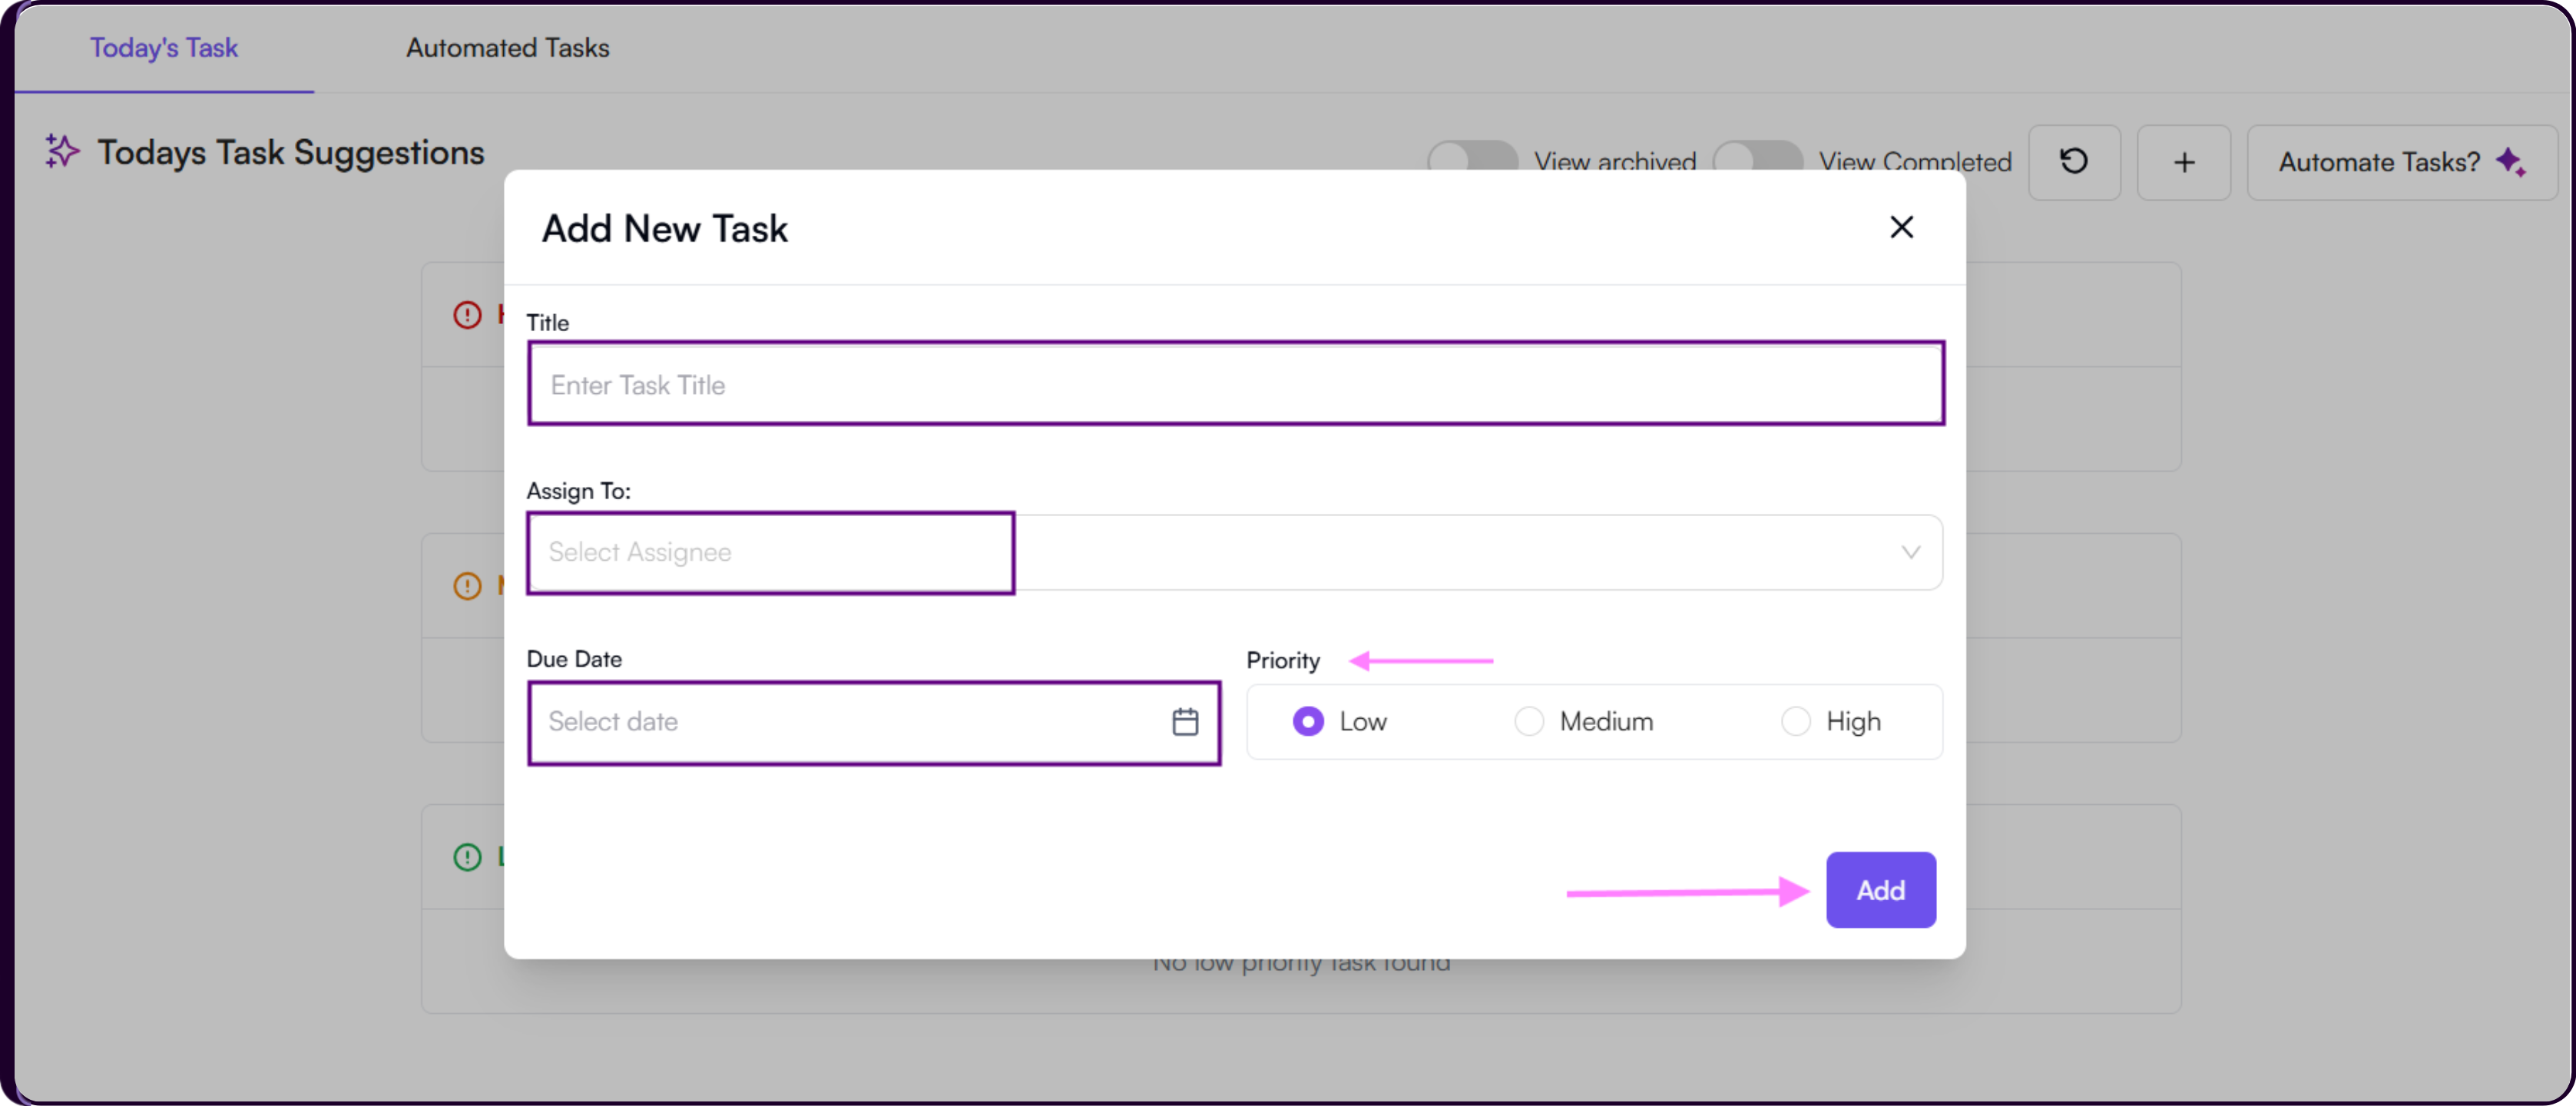
- Enter a Title for the task.
- Select a team member from the Assign To dropdown.
- Pick a Due Date using the calendar.
- Set a Priority as Low, Medium, or High.
- Click 'Add' to save.
The task will appear in the Today's Task tab under the relevant priority section with the assignee's name listed.
Automated Tasks Tab
The Automated Tasks tab shows all AI automation rules created for your workspace. The table displays each rule's Name, Trigger, Automation Status, and Created At date. Use the search bar to locate a specific rule quickly.
Creating an AI Rule
Click '+ Create AI Rule' from the Automated Tasks tab, or click 'Automate Tasks?' from the Today's Task header. Both open the Create new AI Rule modal.
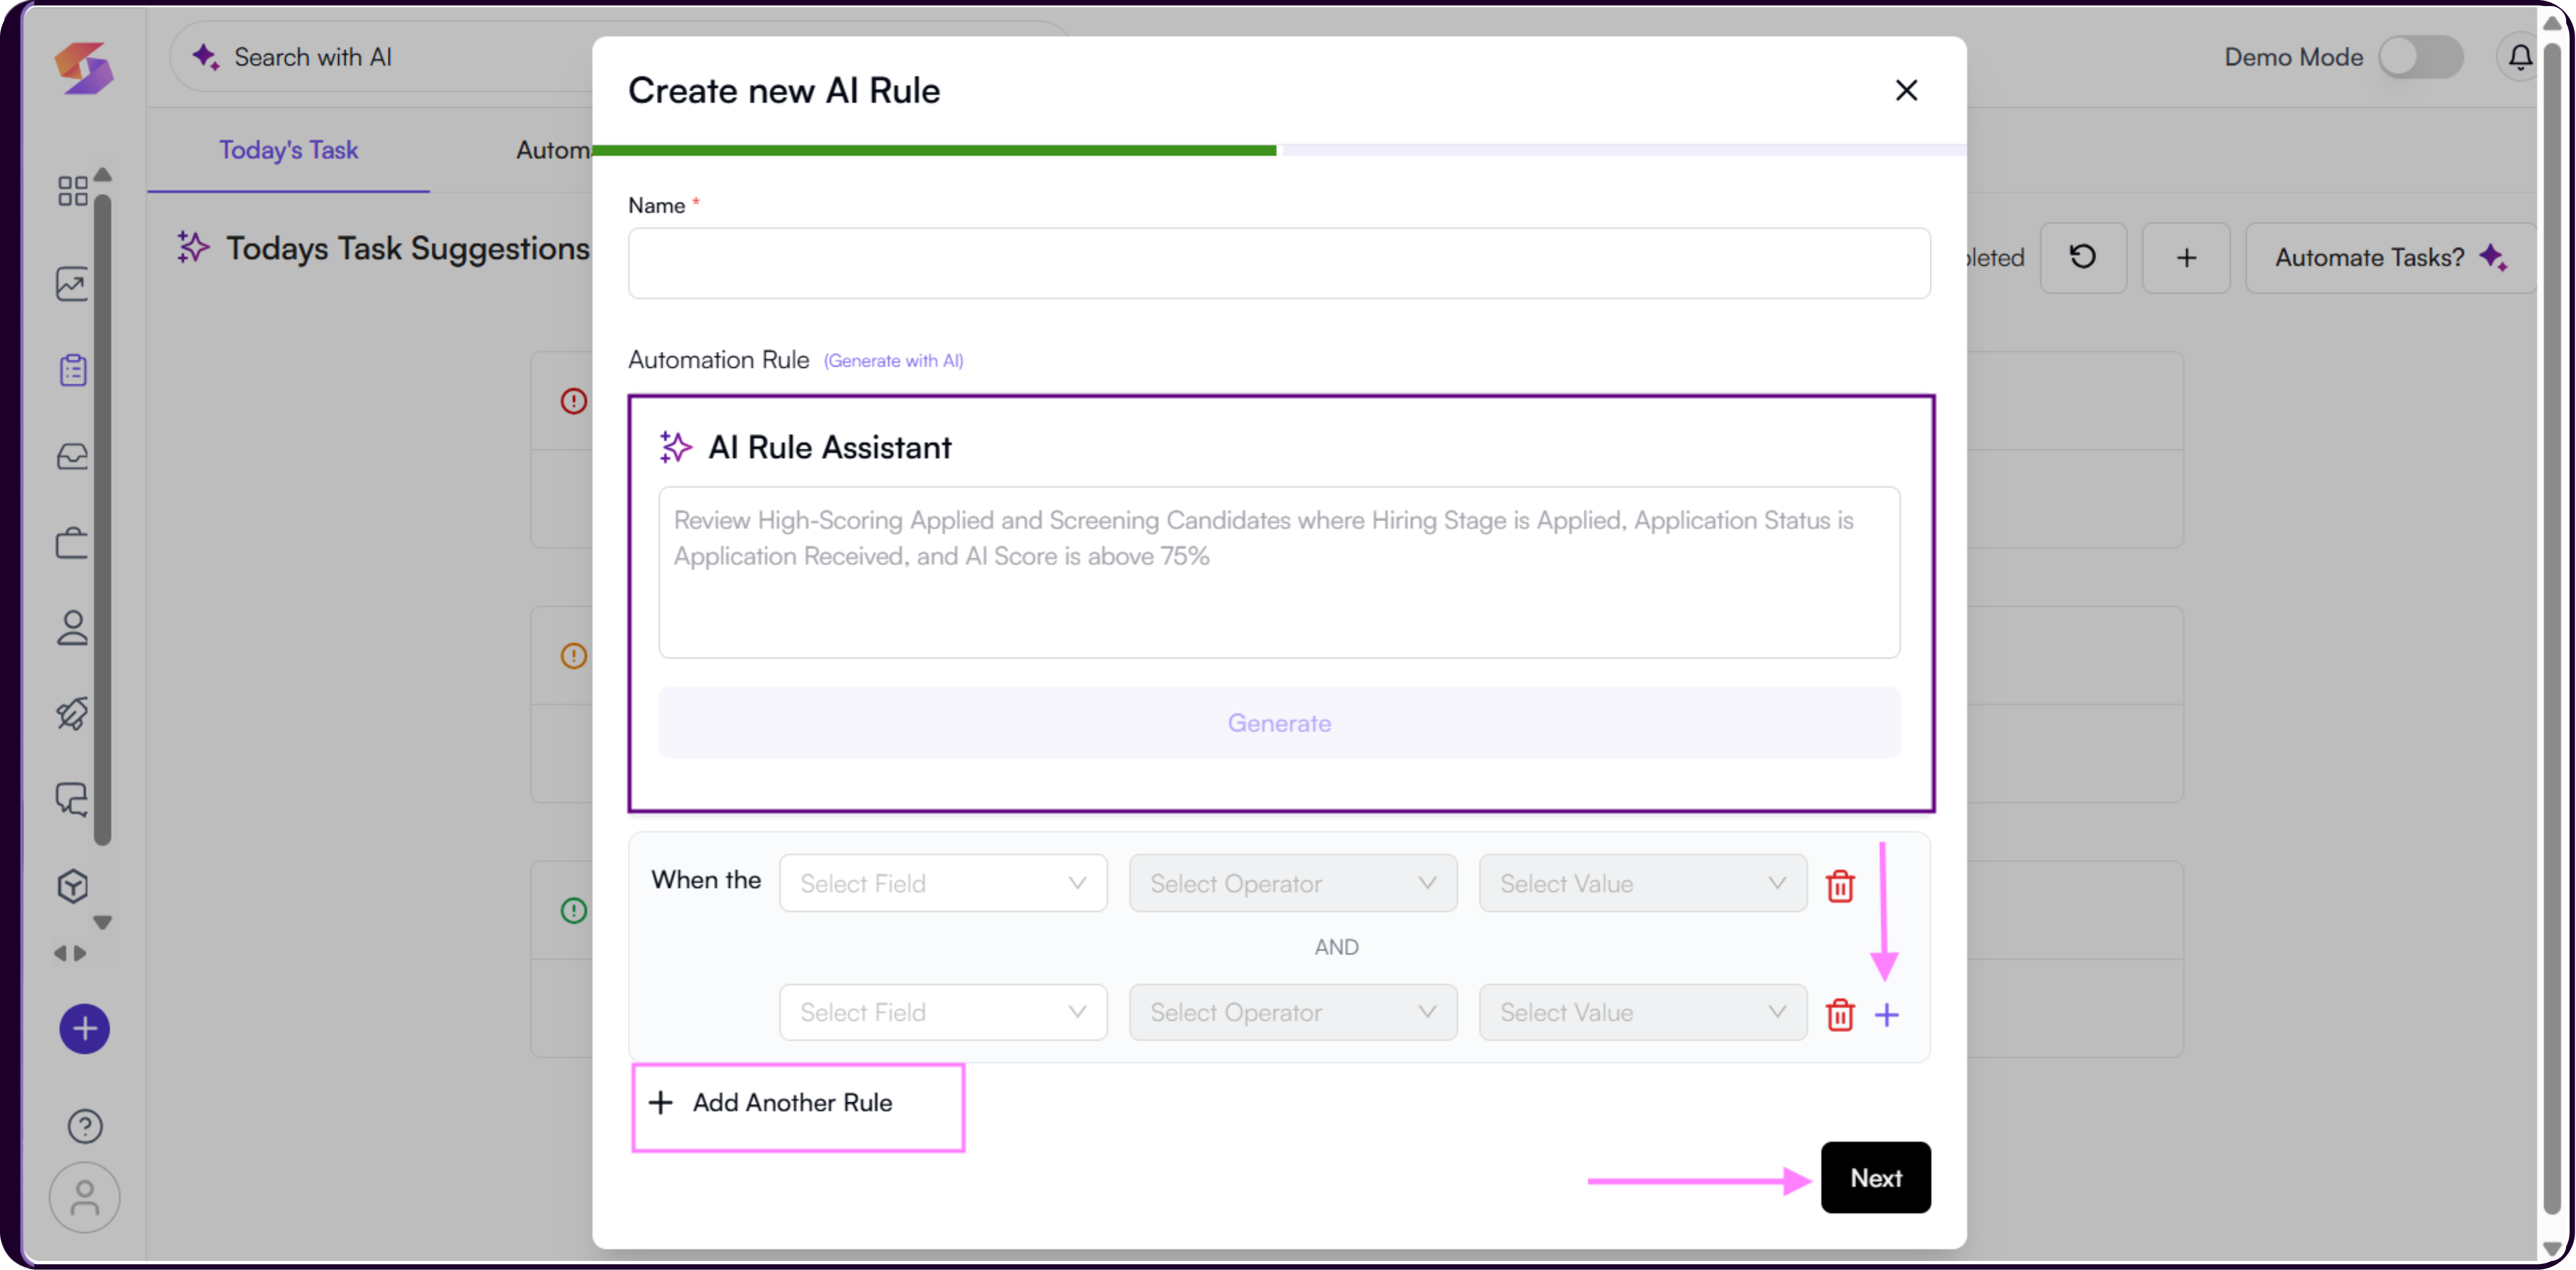
Step 1: Name the Rule
Enter a descriptive name so the rule is easy to identify in the automated rules list.
Step 2: Define the Automation Rule
Set the conditions that will trigger the rule. Each condition uses a Field, Operator, and Value structure.
Use the '+' button within a condition group to add AND conditions, stacking multiple criteria that must all be true together. Use '+ Add Another Rule' at the bottom to add an OR condition group, creating an alternative trigger set.
Available trigger fields include AI Score, Job Title, Job Status, Hiring Stage, and Application Status.
Not sure what conditions to set? Use the AI Rule Assistant at the top of the modal. Describe what you want in plain language and click 'Generate'. Skima AI will build the rule conditions for you. You can edit the generated rule before saving.
Example prompt: Review high-scoring applied and screening candidates where Hiring Stage is Applied, Application Status is Application Received, and AI Score is above 75%Step 3: Define the Task Action
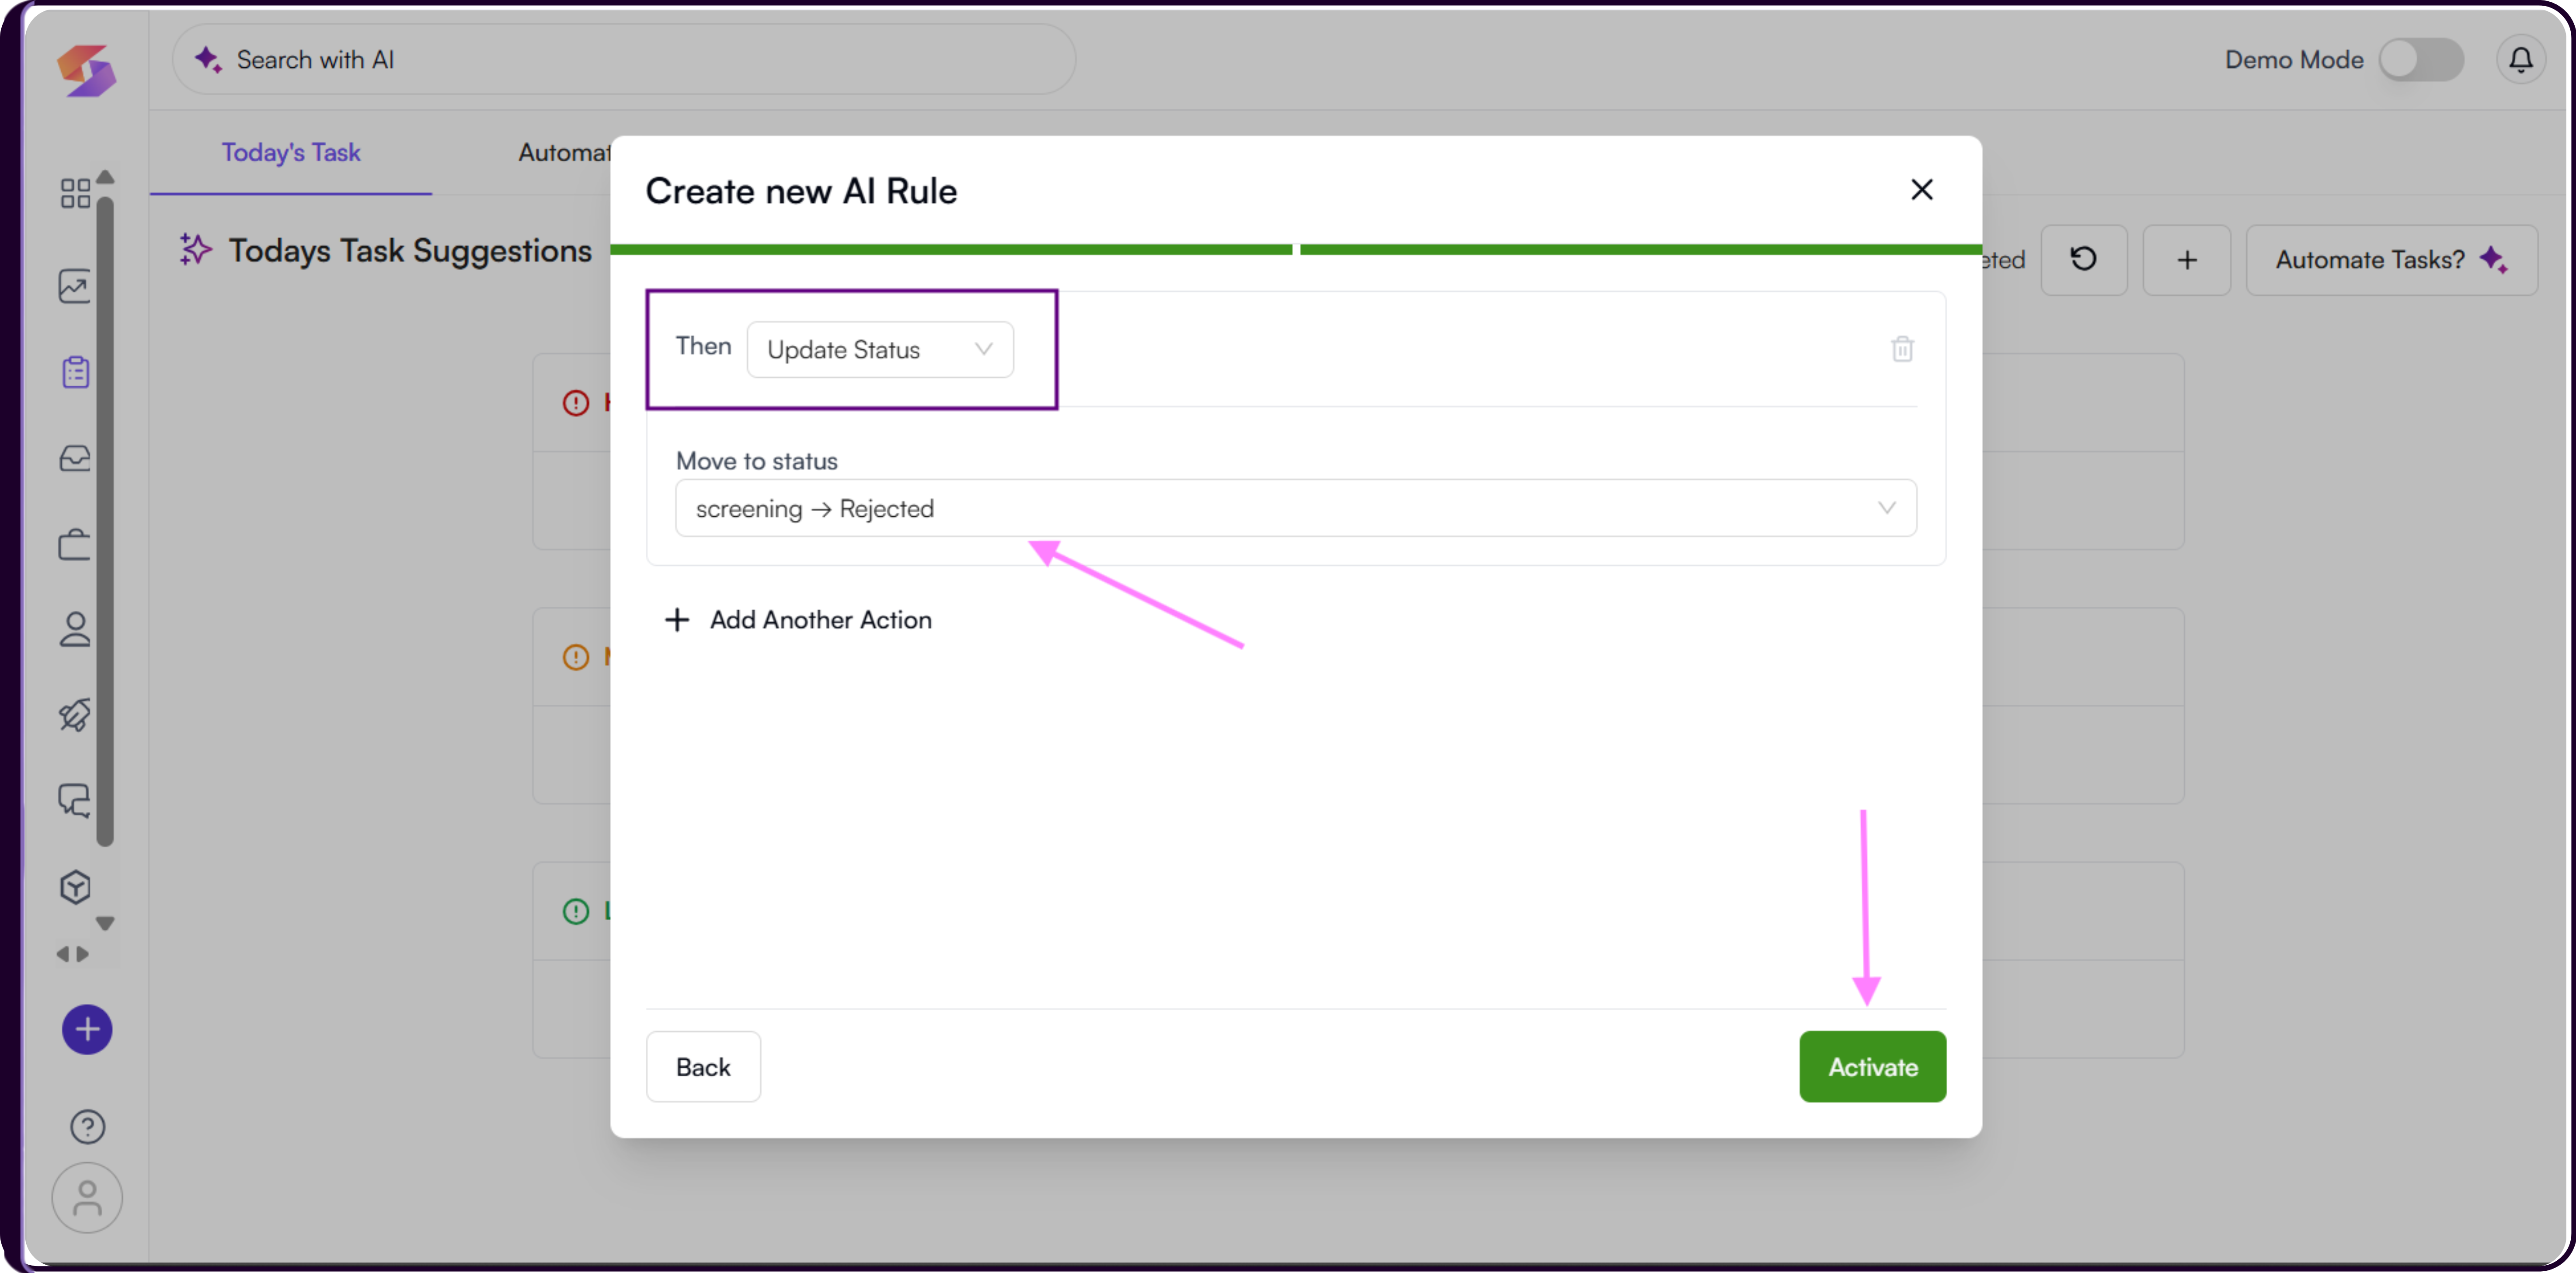
Click 'Next' after setting your trigger conditions to configure what happens when the rule fires.
Use the 'Then' dropdown to select the action type. There are two options: Send Email and Update Status. You can chain multiple actions using '+ Add Another Action'.
Send Email lets you configure an outreach email triggered by the rule. Set the From and Reply-To addresses, define Recipients under the To field, and add CC and BCC as needed.
In the Approval Email Draft section,
i) enter the Subject and Message Content.
ii) Use the Templates button to load a saved template,
iii) Insert Variable to add dynamic placeholders, or
iv) the AI button to generate a tailored draft using the AI assistant.
v) Check 'Add Attachments' to include files such as resumes or JDs, and check 'Add Delay' to introduce a wait time before the email is sent.
- Update Status automatically moves the candidate to a specific application status when the rule conditions are met. Select the target status from the 'Move to status' dropdown.
Step 4: Activate
Review your trigger conditions and actions, then click 'Activate'. The rule will appear in the Automated Tasks table and begin generating tasks automatically as conditions are met.
Managing Automated Rules
From the Automated Tasks table, each rule row shows the rule name, trigger summary, automation status, and creation date. The Actions column has three icon buttons:
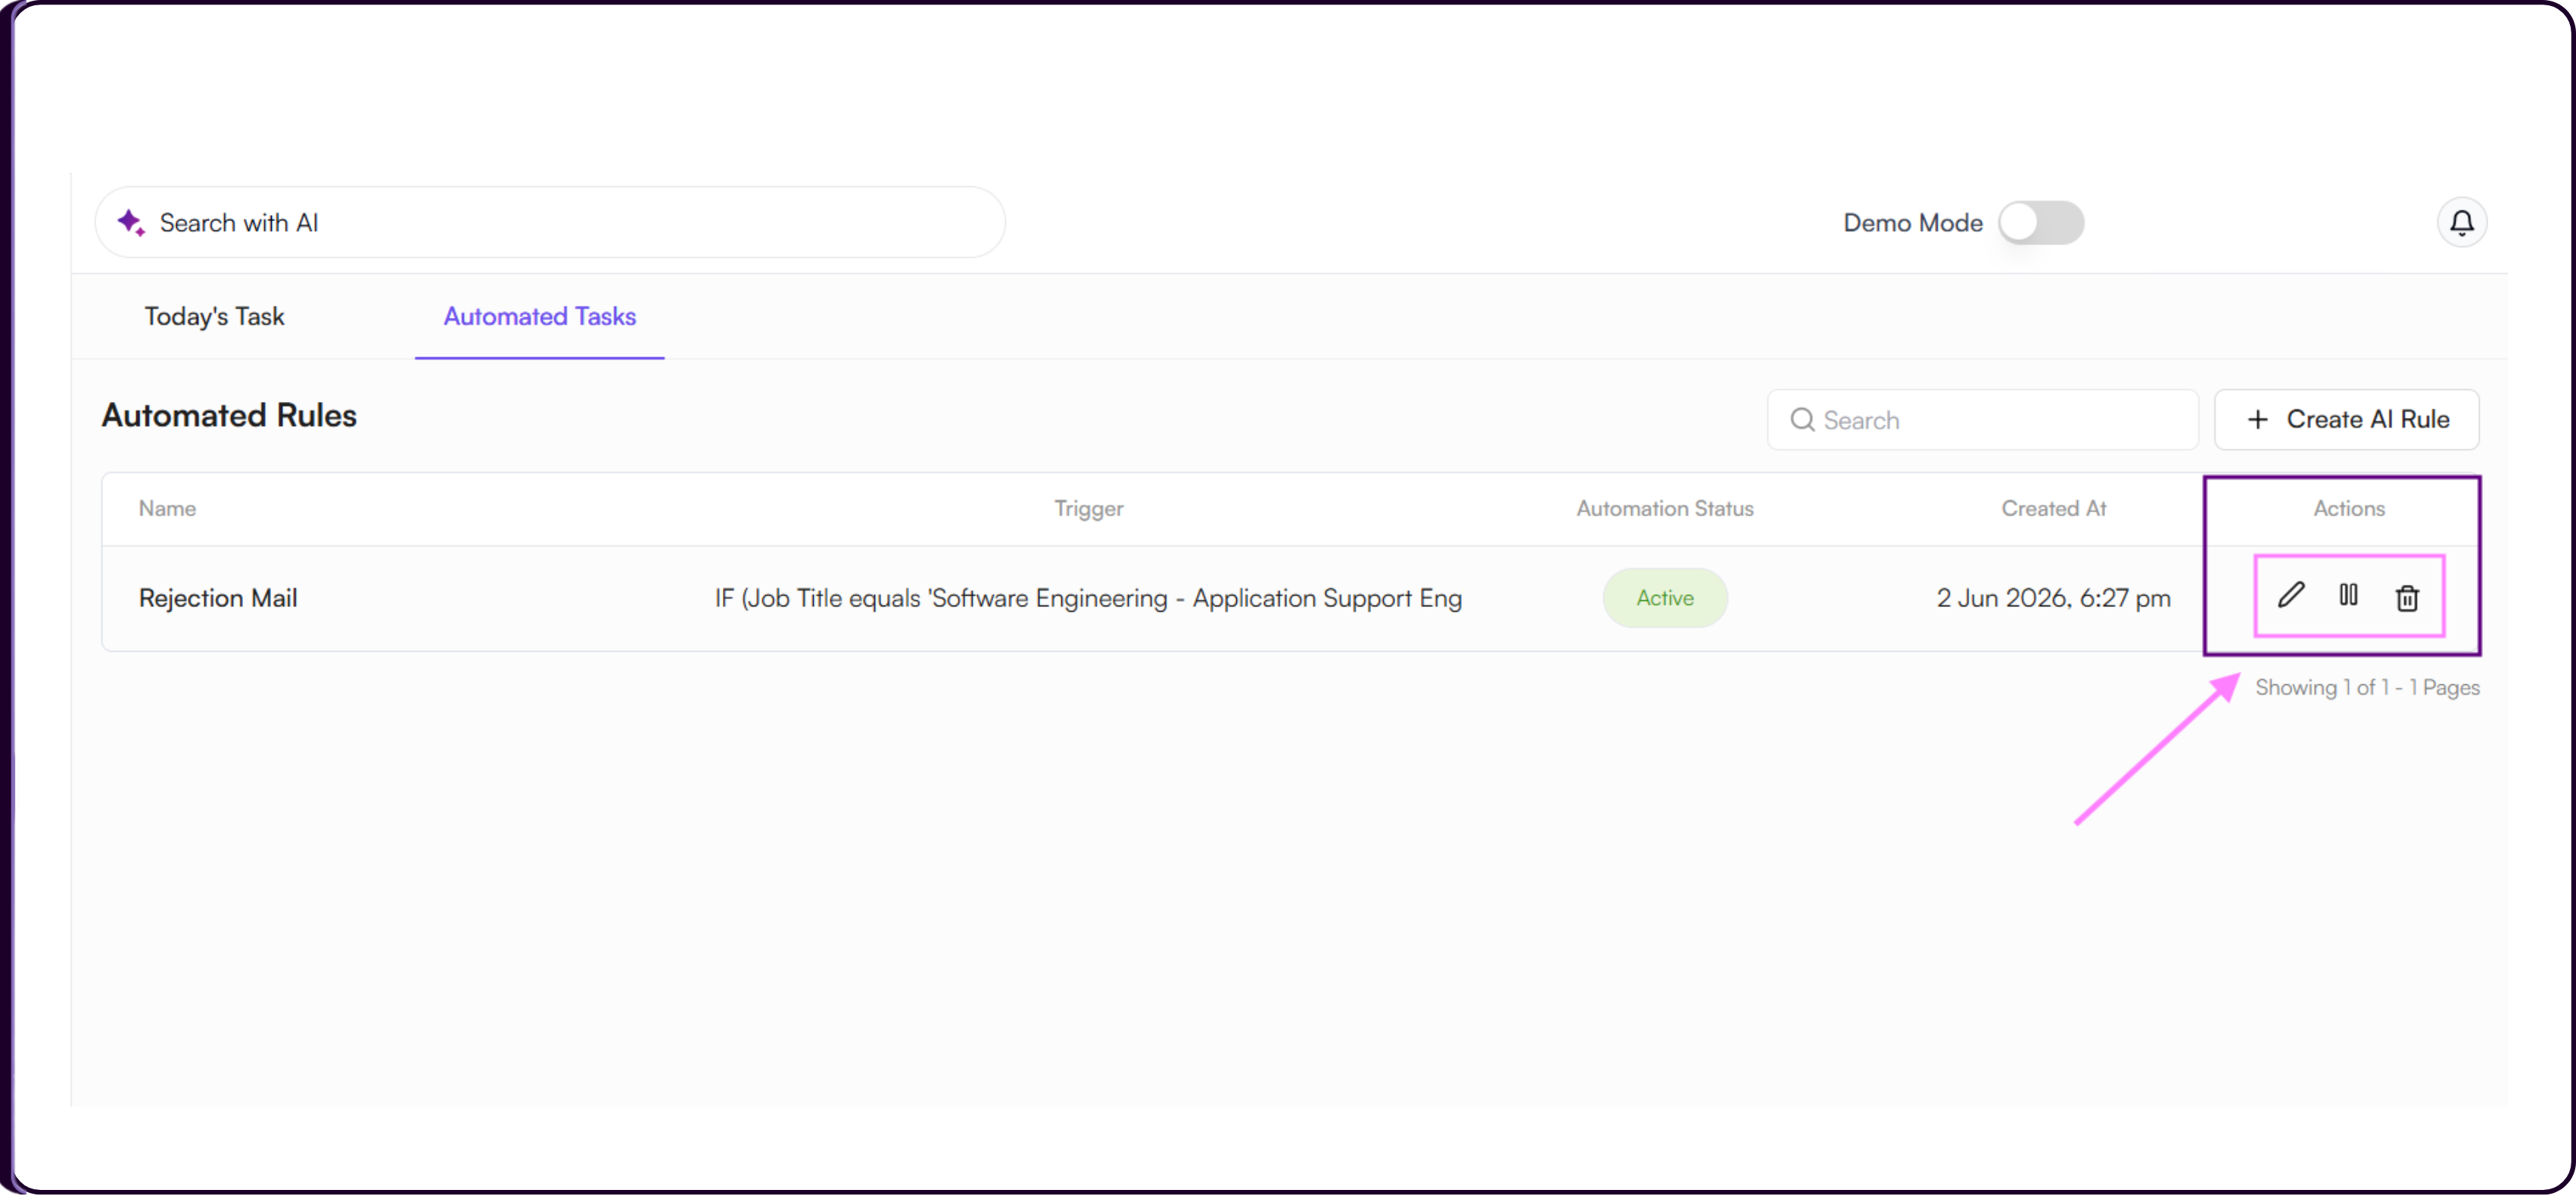
- the pencil icon to edit the rule,
- the pause icon to temporarily disable it without deleting, and
- the trash icon to permanently remove it.